Contents: Front brakes ↳ Rear brakes ↳ Removal and installation the caliper ↳ Disassembling and assembling the… ↳ Caliper repair ↳ Replacing the brake disc ↳
Rear disc brake
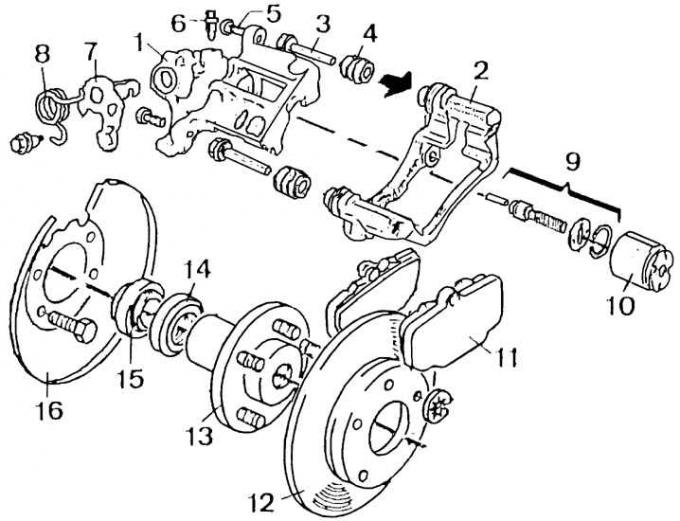
1 – caliper, 2 – caliper holder, 3 – caliper guide pin, 4 – protective cover, 5 – caliper to holder mounting bolt, 6 – deaerator, 7 – handbrake lever, 8 – spring, 9 – piston actuation elements after handbrake is applied, 10 – piston, 11 – brake pads, 12 – brake disc, 13 – wheel hub, 14 – sealing ring, 15 – wheel hub bearing, 16 – brake disc shield
Front brakes
Service and repair of the front brakes is carried out in the same way as for brakes without an anti-lock system (see subsection 10.2).
Rear brakes
Replacing brake columns
Caution! It is recommended to replace all brake pads of both rear brakes at the same time when at least one of the brake pads reaches the minimum thickness. Brake pads of the specified brand and type should be used.
1. Loosen the rear wheel nuts.
2. Check if the handbrake is on.
3. Raise and secure the rear of the vehicle on stands and remove the rear wheels.
4. Disconnect the handbrake cable from the bracket on the rear suspension arm.
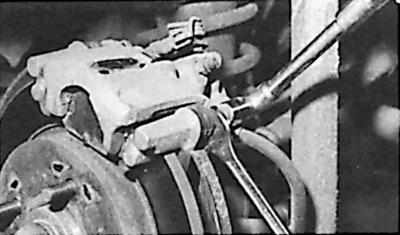
5. Loosen the rear bolt securing the caliper to the bracket while holding the caliper guide pin with a flat wrench.
6. Unscrew and remove the front bolt securing the caliper to the bracket, holding the caliper guide pin with a flat wrench.
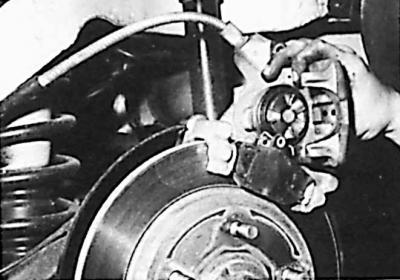
7. Rotate the caliper upward relative to the holder (on the rear mounting bolt).
8. Remove the brake pads.
9. Carefully press the piston into the caliper cylinder using a suitable wooden block, taking care not to damage the elastic piston casing.
10. Check:
- piston casing condition;
- condition of the caliper surface;
- brake disc condition;
- no traces of brake fluid leakage.
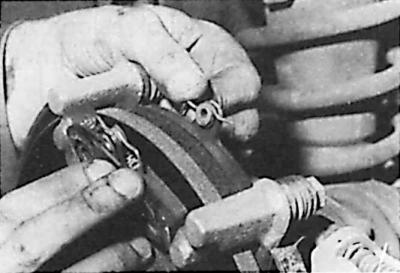
11. Install new brake pads.
12. Turn the caliper (on the rear mounting bolt).
13. Insert the vibration damping plate (if used).
14. Tighten the caliper mounting bolts to the bracket to the appropriate torque.
15. Hook the handbrake cable to the rear suspension arm bracket.
16. Check if the brake disc can rotate freely when the brake pedal is released.
17. Put on the rear wheels and lower the car.
18. Tighten the rear wheel nuts to the appropriate torque.
Removal and installation the caliper
Attention! Before removing the caliper, drain the hydraulic accumulator of the brake system. To do this, turn off the ignition and press the brake pedal all the way (about 20 times) until it becomes "hard".
1. Loosen the rear wheel nuts.
2. Raise and support the rear of the vehicle and remove the appropriate wheel.
3. Raise and support the rear of the vehicle and remove the appropriate wheel.
4. Disconnect the handbrake cable from the lever on the caliper.
5. Disconnect the brake hoses from the pipes. Close the holes in the pipes with appropriate plugs.
6. Unscrew and remove the caliper bracket mounting bolts.
7. Remove the caliper bracket and caliper.
8. To install the caliper, you must perform the steps in reverse order to the process of its removal and remove air from the brake system.
Disassembling and assembling the caliper
The method of disassembling and assembling the caliper is described in the section on removing and installing the brake pads (see subsection 10.3.2).
Caliper repair
1. Remove the brake caliper (see above).
2. Disconnect the caliper from the holder.
3. Install the caliper in a vice.
4. Pull the piston out of the caliper using tool 12.006 so that it protrudes from the cylinder by approximately 20 mm.
5. Remove the elastic casing from the piston groove.
6. Remove the piston completely from the cylinder.
7. Remove the elastic piston casing.
8. Wash the piston and cylinder thoroughly.
9. Carefully check the condition of all parts. Any scratches or signs of wear on the surface of the piston or cylinder mean that the complete caliper must be replaced.
10. During assembly, all seals should be replaced and the components should be lubricated with brake fluid.
11. Connect the caliper to its holder.
12. Install and secure the caliper in the vehicle (see subsection 10.2.2).
13. Remove air from the brake system.
Replacing the brake disc
1. Loosen the nuts securing the corresponding rear wheel.
2. Raise the car and remove the wheel.
3. Disconnect the handbrake cable from the bracket on the rear suspension arm.
4. Unscrew the two caliper mounting bolts.
5. Suspend the caliper under the car using soft wire, being careful not to damage the brake hoses.
6. Mark the position of the disc relative to the wheel hub.
7. Remove the brake disc spring retaining ring.
8. Remove the brake disc.
9. Install the brake disc in relation to the wheel hub in accordance with the markings made during removal, and put on the spring mounting ring.
10. Secure the caliper.
11. Hook the handbrake cable to the bracket on the rear suspension arm.
12. Install the wheel and lower the vehicle.
13. Tighten the wheel nuts to the required torque.
14. Press the brake pedal several times to bring the brake pads into contact with the brake disc.
(For more information, please visit the website: www.FordBook.ru)