Contents: Removal ↳ Installation ↳
Warning! Fuel may spill when removing the carburetor. Gasoline and its vapors are poisonous and flammable, so ensure good ventilation of the workplace. Avoid contact of fuel with skin. Work in fuel-resistant gloves. No open flame, fire hazard!
Removal
Disconnect the negative (-) battery cable.
Caution: When the battery is disconnected, the contents of electronic memory devices, such as engine fault codes or radio codes, are erased. Before disconnecting, also read the instructions in the chapter "Removal and installation the battery".
Remove the air filter, see p. 57.
Disconnect the plug connector of the automatic fuel mixture enrichment device when starting.
Pierburg 2V carburetor: loosen the clamps and disconnect both coolant hoses from the cover of the automatic enrichment device during starting. If terminal clamps are installed, they must be cut and replaced with clamps tightened with a screw during assembly. Hang the coolant hoses so that the liquid does not spill out of them.
Weber 2V-ISC carburetor: disconnect the plug connector of the carburetor stepper motor by pressing in the locking tabs.
Disconnect the throttle linkage from the throttle drive shaft.
Loosen the throttle rod holder fastening.
Note: The gas rod must not have any kinks, otherwise this may lead to its breakage later in the operation. A kinked rod must be replaced in any case.
Pierburg 2V and Weber 2V-TLD carburetors: disconnect and plug the fuel line at the carburetor by first loosening and moving the clamp back. If a terminal clamp is installed, it must be cut and replaced with a clamp tightened with a screw during assembly. The fuel line can be plugged by inserting a clean bolt of suitable diameter into the hose.
Mark the vacuum hoses at the carburetor with tape and disconnect.
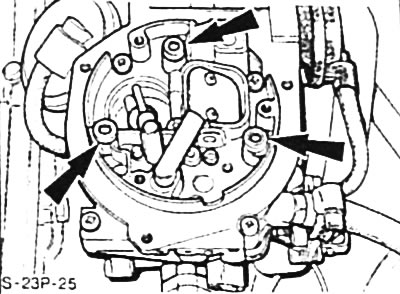
Pierburg 2V carburetor: unscrew the 3 bolts with internal splines in the "arrow" head and lift the carburetor.
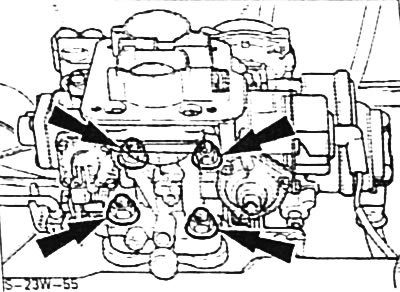
Weber 2V-ISC carburetor: unscrew the 4 nuts securing the "arrow" and lift the carburetor together with the sealing gasket.
Weber 2V-TLD carburetor: unscrew the 4 bolts with internal splines in the head and lift the carburetor.
Installation
Clean the sealing surfaces of the carburetor and intake manifold. Make sure that no dirt gets into the intake manifold.
Remove the rag, place the carburetor with a new sealing gasket and screw it on.
Connect the vacuum hoses to the carburetor body in accordance with the marks applied.
Pierburg 2V and Weber 2V-TLD carburetors: connect the fuel line to the carburetor and secure with a clamp.
Caution: The clamp tightening screw must not touch surrounding parts.
Weber 2V-TLD carburetor: connect the supply and return fuel lines to the carburetor and secure with clamps.
Caution: The clamping screws must not touch the surrounding parts.
Screw the throttle rod holder and hang it on the throttle drive shaft.
Weber 5V-ISC carburetor: connect the plug connector of the carburetor stepper motor.
Connect the plug connector of the automatic fuel mixture enrichment device when starting.
Install the air filter, see p. 57.
Connect the battery ground (-) cable.
If available, set the clock and enter the radio theft protection code.
Check and, if necessary, adjust the engine idle speed and CO content.