Note: If the engine has been overheated, the cylinder head may be warped - check it carefully for signs of this.
Cleaning
2. Scrape off any remaining old gasket and sealant from the head.
3. Scrape off carbon deposits from the combustion chamber walls and passages. Then thoroughly wash the cylinder head with kerosene or other suitable solvent.
4. Scrape off any carbon deposits from the valves. Then use a wire brush attached to an electric drill to remove any remaining carbon deposits from the valve heads and stems.
Control
Note: Make sure you have completed all of the following procedures before contacting your dealer or repair specialist. Make a list of all items that require attention.
Cylinder head
5. Carefully inspect the cylinder head for cracks, coolant leaks, and other damage. If cracks are found, you will need to purchase a new head.
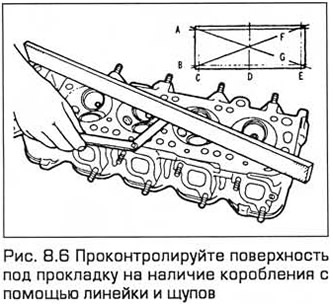
6. Check the surface under the gasket for warping using a ruler and feeler gauges (see Fig. 8.6). If warping is detected, it can be eliminated by mechanical treatment, provided that the head height does not fall below the permissible value.
7. Inspect the valve seats in all combustion chambers. If there is significant evidence of pitting, cracking or burning, they should be replaced or mechanically treated by a specialist. If only traces of minor pitting are found, they can be removed by grinding the valve heads and seats with grinding paste (see later in this paragraph).
8. Check the wear of each valve stem guide by rocking it from side to side. Only a very small amount of play is allowed. If there is excessive play, remove the valve. Measure the diameter of the valve stem (see below in this section) and the guide. Calculate the operating clearance and if it is greater than the permissible value, replace the valve or guide.
9. Valve guide replacement should be performed by dealers or engine repair specialists who have the necessary equipment.
10. If a decision is made to replace or expand the guides, then in this case the valve seats can only be turned after completing work with the guides; if it is greater than the permissible value, replace the valve or guide.
Valves
11. Inspect the valve heads for signs of pitting, cracks, fading, and general wear. Inspect the valve stems for scratches and scoring. Inspect the valves for distortion as they rotate. Inspect the ends of the valve stems for pitting or excessive wear. Replace the valve if any of these signs of wear or damage are found.
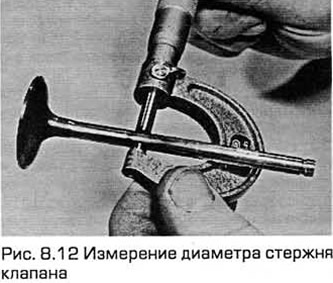
12. If the inspection of the valve is satisfactory, measure the diameter of its stem in several sections with a micrometer (see Fig. 8.12). A significant difference in the micrometer readings indicates wear of the valve stem. If wear is clearly visible, the valve must be replaced.
13. If the valves are in satisfactory condition, they should be lapped to their respective seats to ensure a uniform and reliable seal. If the valve and seat show only slight traces of pitting or if the seat has been reground, finish with a fine lapping paste. Do not use a coarse lapping paste unless there is burning or significant pitting. If such defects are present, the cylinder head and valves should be shown to a specialist to decide whether to reground the seat or replace the valve or seat insert (if possible).
14. The valve grinding is performed as follows: Place the cylinder head on the workbench with the top side down.
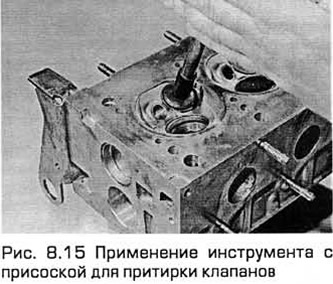
15. Apply lapping paste to the seat surface, insert the valve and press the valve lapping tool with the suction cup onto the valve plate (see Fig. 8.15). Perform lapping using semi-circular movements and periodically lifting the valve to distribute the paste. This work can be made much easier by inserting a weak spring under the valve plate.
16. When using coarse paste, grind until the valve and seat surfaces become matte. Then wipe off the remaining paste and repeat grinding with fine paste. Finish grinding when a continuous ring of light gray color of constant width is visible on the valve and seat surfaces. Do not continue grinding after this result has been achieved, otherwise the seat will be prematurely recessed into the cylinder head.
17. After finishing lapping all valves, thoroughly wash off any remaining paste with kerosene or other suitable solvent before beginning assembly of the cylinder head.
Valve kit parts
18. Inspect the valve springs for damage and discoloration. Measure the free length of each spring and compare it with the same spring from the new set.
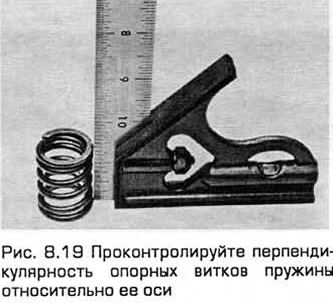
19. Place each spring on a plane and check the perpendicularity of the support turns relative to its axis (see Fig. 8.19). If any of the springs is damaged or weakened, it is necessary to purchase a new set of springs.
20. Inspect the upper seats and crackers for wear or cracks; if any of these signs are found, or if there is any doubt about the serviceability of any part, they must be replaced. Replace the lower spring seats/valve stem seals regardless of their condition.
21. Check the hydraulic lifters (chapter 2A or 2B).