Note: Before starting a repair, you need to make sure that you can obtain spare parts (see paragraph 1 of this chapter). If you do not have any of the spare parts, contact your dealer or engine rebuilder.
1. Before carrying out the inspection, the connecting rod and piston assemblies must be cleaned and the piston rings must be removed from them. The working surfaces of the piston rings must be polished, without carbon deposits (which indicates poor sealing, as a result of which gases break through the ring during combustion), and there must be no wear on the upper and lower surfaces of the rings. The end gaps of the rings must be clean, without carbon deposits. However, if they look polished, this means that the gap in the ring is too small. All rings, including the sections of the oil scraper ring, must rotate freely in the grooves, but the axial play of the rings in the grooves must be small. If the rings appear to be in good condition, they can be reinstalled on the pistons during assembly. Check the end gaps of the rings (when the ring is in the unworn area of the cylinder) as specified in par. 16. If any of the rings is worn or damaged, or if its end gap exceeds the specified value, then the entire set of piston rings must be replaced.
Note: It is common practice to replace piston rings when doing a rebuild. Do this if you can purchase a set of rings separately from the pistons. Otherwise, when performing the following procedures, be careful not to break or damage the rings, and mark them so that they fit into their grooves during assembly.
2. Using a piston ring extractor, carefully remove the rings from the pistons. Be careful not to leave nicks in the pistons. Mark each ring on its top surface so that you can install it in the correct place during assembly. Be careful with your hands, the piston rings are very sharp! If you do not have a ring extractor, you can remove them by hand.
Do it yourself
If you do not have a device for extracting piston rings, you can remove them by hand. Carefully spread the ends of the rings and remove them upwards through the piston crown. To prevent the track from sinking into empty grooves, use 2-3 used feeler gauges.
3. Scrape off any carbon deposits from the piston bottom. After the rough cleaning is complete, clean the bottom with a wire brush or fine sandpaper.
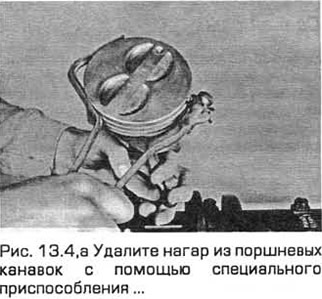
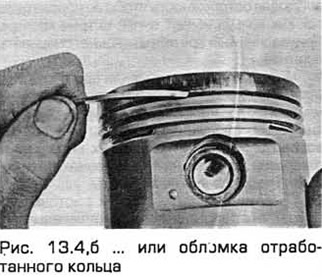
4. Remove carbon deposits from the piston grooves using a special device or a piece of a used ring (see Fig. 13.4, a, b). To do this, break the ring in half, being careful not to cut yourself, as the rings have very sharp edges. When removing carbon deposits, try not to scratch the piston.
5. Immediately after removing the carbon deposits, wash the connecting rod and piston group parts in kerosene or another suitable solvent, and then dry thoroughly. Check the oil return holes in the piston grooves and the oil holes in the lower ends of the connecting rods and make sure they are not clogged.
6. If the pistons and bores are not damaged or significantly worn, and the cylinder block does not require boring, then the pistons may not need to be replaced. Usually, piston wear is manifested in the form of uniform (along the height of the piston) wear of the rubbing surfaces and a slight weakening of the upper ring in its groove.
7. Carefully inspect the pistons for cracks in the skirt areas, piston pin bosses and between the ring grooves.
8. Check for scratches and scoring in the areas where the skirt is pressed against the cylinder walls, burnouts on the bottom, and burn marks along the edges of the bottom. The presence of scratches and scoring on the skirt may indicate that the engine was overheated and/or that the combustion mode of the mixture was disrupted, accompanied by high temperatures. Carefully check the cooling and lubrication systems. The presence of burn marks on the side surface of the piston indicates a gas breakthrough. Burnouts on the bottom or burn marks along its edges may indicate an incorrect combustion mode (early ignition or detonation). If any of the above signs of malfunction are detected, it is necessary to identify and eliminate their causes. Otherwise, the damage will occur again. The causes of malfunctions may be: incorrect ignition timing/fuel injection, leaks in the intake air duct, incorrect air-fuel mixture ratio, or a malfunction of the exhaust gas recirculation system.
9. Piston corrosion in the form of pitting indicates coolant entering the combustion chamber and/or crankcase. Eliminate the causes of the malfunctions, otherwise they will reoccur after engine assembly.
10. Check the piston clearance relative to the connecting rod by rocking the piston and connecting rod in opposite directions. If the clearance is noticeable, this indicates excessive wear that needs to be eliminated. The connecting rod and piston assemblies should be handed over to specialists for processing.
11. Do not attempt to separate pistons from connecting rods, even if you have replacement parts. This work should be entrusted to dealers who have special equipment for heating, pressing, etc., necessary for this work. If connecting rod and piston groups are subject to such repair, then it is necessary to check whether the connecting rods are bent or twisted, since such defects can only be corrected by an engine repair specialist.
12. Check the connecting rods for cracks and other damage. Temporarily remove the connecting rod bearing caps and old liners. Clean the connecting rod bearing seats and caps and check them for nicks and scratches. After checking the pistons, replace the old liners. Reinstall the caps and tighten the bolts by hand.