Headlight adjustment
| Element | X value |
| Headlights of traditional design | X = 12cm/10m = 0 degrees 41 minutes = 1.2% |
| xenon headlights | X = 10cm/10m = 0 degrees 34 minutes = 1.0% |
| Fog lights | X = 22cm/10m = 1 degree 16 minutes = 2.2% |
Torque Specifications
| Name | Nm | lb-ft | lb-in |
| Bolts of fastening of a headlight assy | 5 | - | 44 |
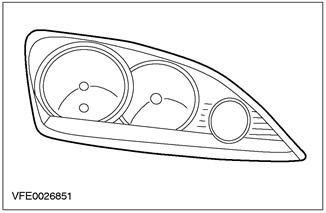
Conventional headlight up to model year 2002
The front position lights are built into the headlight housing and cannot be removed separately. The headlight is equipped with a H4L-50/55W bulb for low beam and high beam.
The reflector of a complex shape provides a very high intensity of the light beam.
Plastic is used to make headlight lenses because it is lighter and easier to mold.
The direction indicator in the bumper is equipped with a transparent lamp P-21W.
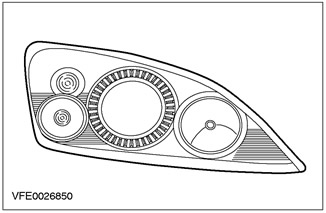
Conventional headlight from model year 2002
NOTE: When replacing the lamp, use a specially coated lamp instead of a regular H1 or H7 lamp to avoid yellowing of the inside of the plastic diffuser.
Front marker lights and direction indicators are built into the headlight housing. The headlight has an H7 bulb for low beam and an H1 bulb for high beam headlights and headlight signaling.
Discharge headlights from model year 2002
HID headlights are offered as an option, while low beams are provided by a 35-watt HID lamp. The discharge lamp burns three times brighter than a conventional H7 lamp.
The headlight consists of the following items:
- headlight housing
- headlight housing cover
- Discharge lamp for low beam and high beam
- Halogen bulbs for high beams and signaling headlights
- Turn signal lamp
- Parking lamp
- headlight control motor
- Starter
- Electronic control unit
Action
WARNING: Voltages up to 30 kV are possible.
Similar to sunlight, the light produced contains a high proportion of green and blue.
Due to the special design of the socket and diffuser, the range is significantly improved and the coverage is wider. This results in better illumination of the edge of the road, without exceeding the limit value for glare.
An additional advantage of the selected light distribution is a softer light-dark boundary. Too much contrast «light-darkness» can lead to disturbing changes in road lighting while driving. Discharge headlights make a decisive contribution to improving active safety.
Full light intensity from the gas discharge headlight is reached one minute after switching on. Therefore, special electronic equipment is needed to ensure immediate action when used in automobiles.
The glass bulb of a discharge lamp is filled with xenon and a mixture of metal halide salts.
A short-term high voltage of 20 kV ignites the gas between the two electrodes. After a short ultra-high current phase during which the light arc is present, the lamp power is electronically regulated to 35 watts.
Lamp wear is so low that the service life of a discharge lamp corresponds to the entire life of the vehicle.
Side lights and direction indicators are integrated with the headlight housing.
Headlight range adjustment - gas discharge headlights
On vehicles with gas discharge headlights, an automatic headlight beam leveling system is required by law.
The system includes the following elements:
- Vehicle ride height sensors on the front and rear axles
- Main control module on the left headlight housing
- Working control module on the right headlight housing
- Electric motors for headlight range adjustment in both headlight housings
In order not to dazzle oncoming traffic, when the ignition is turned on, an adjustment is made depending on the load of the car.
No adjustment is made during dynamic processes (braking, accelerating, starting).
NOTE: After performing work on the headlight range adjustment sensors, the headlight range adjustment system must be recalibrated and initialized using WDS.
The vehicle ride height sensors on the front and rear axles send a load dependent signal to the main control module. Based on the difference between the two signals, the module calculates the optimal angle of the light beam and sends the necessary data to the operating module. Based on the actual and desired positions of the headlight reflectors, both modules generate control signals for the headlight range adjustment motors.
When the dipped beam is on, the system compares the actual load with the original setting. Thus, road illumination is reduced and blinding of oncoming traffic is prevented.
Headlight beam leveling system - conventional headlights
NOTE: Basic headlight adjustment should always be performed with the headlight beam throw adjustment switch in the «0»
Each headlight has an actuator motor that can be activated using a switch. The electric motor moves the swivel headlamp reflector to the desired position using an adjusting shaft.
The headlight range adjustment switch has two positions. Pregnant «0» the switch is latched, this is the basic setting. Pregnant «4» headlights are deflected to the maximum angle.
The headlight range adjustment system is driven by DC motors. Voltage is supplied through a potentiometer combined with the headlight beam adjustment switch (required value). Using the same principle, an actuator in an electric motor generates a voltage depending on the position of the adjusting shaft.
Required value (switch setting) and actual value (adjusting shaft) compared. Depending on the voltage difference, the reflector moves up or down until the voltage values are equal.
For safety reasons, if there is no signal or it is implausible, the system adjusts to low beam.
Headlight washer system
On vehicles with gas discharge headlights, a headlight washer system is required by law. It is a high pressure washer system.
The non-adjustable nozzle holder is located in the bumper. With the headlights on, as soon as the windshield washers are activated, the telescoping nozzle holder extends and cleans the outer surface of the headlight (plastic diffuser), using a high pressure jet.
An additional high pressure pump for the high pressure washer system is mounted on the washer fluid reservoir.
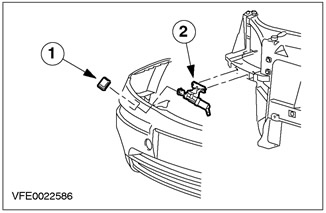
| Element | Name |
| 1 | Lid |
| 2 | nozzle holder |
Differences provided for the Scandinavian markets
Daytime running lights, which are dimmed low beams, should turn on when the ignition is turned on. The daytime running light system includes
- Daytime running lamp relay,
- Resistance for low beam mode,
- Three diodes for daytime running lights.
The voltage reduction in the dipped beam lamps is achieved by connecting the dipped beam lamps in series or by a preliminary resistor, i.e. dipped beam resistor with reduced brightness. Thus, the brightness of the low beam is reduced.
If the side lights or headlights are switched on via the light switch, the daytime running lamp relay energizes and breaks the electrical circuit through the dimmed low beam resistor. If the light switch is in position «headlights», the dipped beam lamps receive their voltage via the dipped beam relay and burn at full brightness.
Diodes for daytime running lights only allow current to flow in one direction when the light switch is turned on because otherwise a number of contacts not required for daytime running lights would be closed in the light switch.
Procedure if there is a complaint about condensation inside the plastic headlight lens or if the plastic headlight lens is broken.
NOTE: It is normal for a small amount of condensation to form on the inside of the plastic headlight lens, it will disappear after the headlight is turned on. If the headlight does not dry out after being turned on for 15 minutes, check the date of manufacture of the headlight. If the date of manufacture is between 08/01/98 and 09/30/98, install a new headlight cover flap. The date of manufacture can be recognized by the eight-digit number on the white label on the top of the headlight. The last four digits indicate the day and month.
Due to the stresses caused by the fixing of the headlamp, a crack may appear in the plastic headlamp and then moisture will penetrate into the headlamp. If there is a problem, both headlights should be removed. Defective headlights should be replaced and may require rework. When installing the headlight, reduce the number of attachment points. For more information, refer to the chapter Removing and installing headlights available in this section.
Visitor comments