- hot air hot air gun
- Straight glass blade for cutting glued glass
- Adhesive kit for direct glazing
- Direct Glazing Furnace
- Glass suction cups
Withdrawal
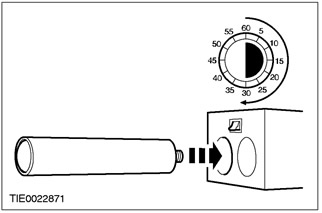
1. Remove the cap from the polyurethane tube (PU) glue and heat the PU glue for at least 30 minutes.
2. Disconnect the top additional stoplight from a back door of a luggage space.
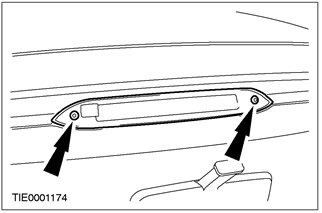
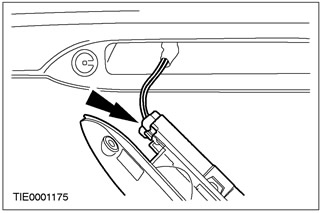
3. Disconnect an electric socket and remove the top additional stoplight.
4. Remove the luggage rack.

5. Remove the rear window wiper motor. See Section 501-16 for more information.
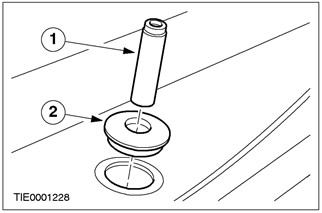
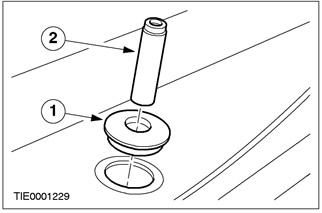
6. Remove the rear window wiper motor bushing.
- 1. Remove bushing.
- 2. Remove the sealing ring.
7. Disconnect electric sockets of heating of back glass.
8.
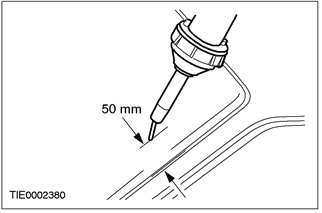
WARNING: Be sure to wear gloves and goggles when working with glass cutting tools, as cutting may cause splinters. Wear earmuffs while cutting. Failure to follow these instructions may result in personal injury.
CAUTION: Be sure to change blade when changing depth of cut to avoid damage to body and trim panels.
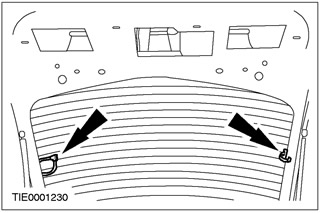
NOTE: There may be some resistance when cutting through the glass guide pins located at the bottom corners of the glass.
NOTE: Care must be taken when cutting in the mounting block area along the lower edge of the rear window glass.
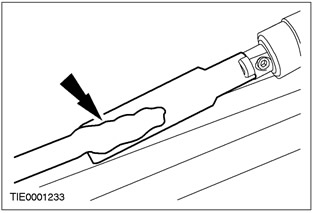
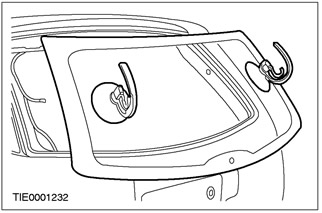
Cut through the PU adhesive with a suitable straight glazing knife and, with the help of another mechanic, use the glass suction cups to remove the tailgate window glass.
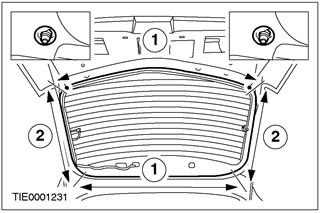
- Cut the PU adhesive from inside the car to the given maximum depth.
- 1. 20 mm.
- 2. 50 mm.
Installation
1. Carefully remove the rest of the dowel pins from the rear window glass flange.
2.
CAUTION: Do not touch the adhesive surface. This can make re-gluing difficult.
Carefully trim the remaining PU adhesive from the rear window glass flange so that approximately 1 mm of trimmed PU adhesive remains on the flange.
3. Inspect the rear window glass flange, looking for sheet metal damage, corrosion, or the presence of foreign material that may or may not have caused the glass to break.
4.
CAUTION: To ensure that the PU adhesive cures, it is essential that all surfaces to be bonded be free of moisture.
Using a hot air blower, direct the warm air (25°C) on the rear window glass flange and on the glass bonding line to remove all traces of moisture.
5. Prepare the glass, rear window glass flange and trimmed PU adhesive according to the instructions included with the PU adhesive kit.
6.
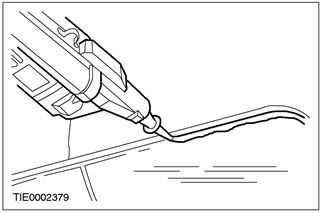
NOTE: Discard the first 100mm of PU adhesive as this adhesive may have a shorter working time.
NOTE: An overlap of 20 mm must be made at any point where the continuous strip is interrupted to prevent water leakage.
Apply PU adhesive in a continuous strip 8 to 10 mm high on the rear window glass flange along the bonding line.
7. With the help of another mechanic, use the glass suction cups to install the rear window glass.
- Set the glass to the desired position by pressing firmly and evenly.
8.
CAUTION: While the PU adhesive is curing, the door windows must be left open to prevent pressure from building up when opening and closing the doors.
Use a suitable film to fix the rear window glass in the desired position until the PU adhesive has cured.
9. If the ambient temperature drops below 10°C, use a hot air blower to blow hot air continuously (25°C) within 15 minutes (inside or outside the car).
10. Dock electric sockets of heating of back glass.

11. Install the rear window wiper motor hub.
- 1. Install the sealing ring.
- 2. Install bushing.
12. Install the rear window wiper motor. See Section 501-16 for more information.
13. Install the luggage rack.

14. Dock an electric socket of the top additional stoplight.

15. Fix the top additional stoplight on a back door of a luggage compartment.

Visitor comments