


Contents: Stages of work ↳ Replacing the rubber seal ↳
Double articulated joints (except for the model with a stepped rear section) make installation or dismantling easier. Their design allows for an increased gap between the rear cover and the roof during installation work.
Stages of work
Disconnect the battery.
Remove the trunk trim assembly with the retaining strips.
Disconnect the wire connectors to the heated rear window and to the rear window wiper. Disconnect the water hose from the washer nozzle.
Support the back cover.
Press the gas-filled shock absorbers away from the ball head of the holder. To do this, slightly lift the mounting bracket so that you can remove the shock absorber from the ball head.
Mark the position of the rear cover hinges with a felt-tip pen.
Unscrew the mounting bolts and remove the cover with an assistant.
When installing, first only lightly tighten the mounting bolts. Align the cover and the gap sizes.
Tighten the mounting bolts to 10 Nm.
Complete the installation in reverse order.
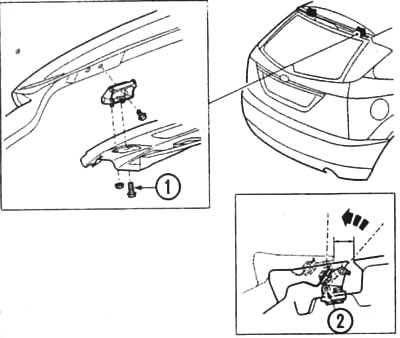
Double articulated joint in the rear cover: 1 - locking bolt; 2 - hinge axis in the mounting position.
To make it easier to install the new "insides" of the rear cover, extend all disconnected connections with twine already during dismantling. Then pull the supply wires out of the cover by the other end together with the tied twine. Let a sufficiently long twine hang from both sides of the cover, since you will then attach new parts to it for subsequent installation. Installation is carried out in the reverse order - the twine functions as a "pioneer" for wires and hoses.
Replacing the rubber seal
If you have already taken on the rear cover, then also immediately check the rear cover seal: traces of dust and water leaks on both sides of the sealing surface indicate leaky areas. If the seal is brittle or covered with cracks, install a new shaped part on your car. To do this, completely remove the old part and clean the fold from the remains of the old seal and dirt.
Press new sealant into the groove of the seal sparingly (e.g. joint sealant, silicone). Place the seal in the middle of the lock and press it along the perimeter. Cut off the protruding end as needed with side cutters. The final butt joint should be under slight pre-tension. Carefully tap the installed seal with a rubber mallet.
[The full article is on the online resource: fordbook.ru]