Contents: Lowering and raising the side door… ↳ Opening the hatch ↳ Internal nozzles of the ventilation… ↳ Heating ↳ Air temperature regulation ↳ Adjusting the air flow direction ↳ Nozzles ↳ Fan ↳ Eliminating fogging of windows and… ↳ Heated front seats ↳ Rear window heating ↳
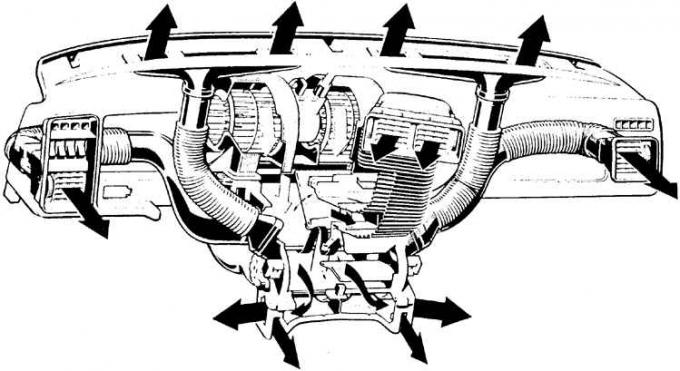
Heating and ventilation diagram of the Ford Sierra car
Lowering and raising the side door windows
Switches for electric windows of the front left and right side doors
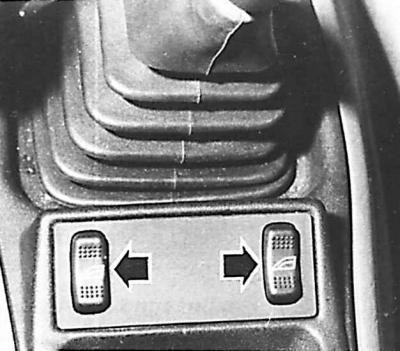
Depending on the vehicle's equipment version, the side door windows are lowered and raised using handles located on the inside of the doors, or electrically using lifts controlled by buttons.
Electric mechanisms can be installed in the front or all side doors of the car. Electric switches are located on the center console behind the gearshift lever and are accessible to the driver and passenger.
The electrical switches for the rear side door mechanisms are located in the armrests. In addition, there is an additional switch on the center console that turns off the power to the rear side door window control switches and prevents the windows from opening. The additional switch must be pressed to operate the rear side door windows.
Opening the hatch
To open the hatch, lower the handle and rotate it counterclockwise. After opening the hatch (partially or completely), fold the handle. Rotating the handle in the opposite direction closes the hatch.
To tilt the rear part of the hatch, turn the handle clockwise with the hatch closed. After overcoming significant resistance, the rear part of the hatch will rise. After reaching the desired tilt, fold the handle. At high speed, tilting the hatch can cause a decrease in pressure inside the car. This can be avoided by opening the middle nozzles of the ventilation system on the front panel.
The sliding hatch cover can be installed in any position, regardless of whether the hatch is open, closed or tilted. Opening the hatch causes its cover to move simultaneously.
Internal nozzles of the ventilation system
Heating and ventilation controls
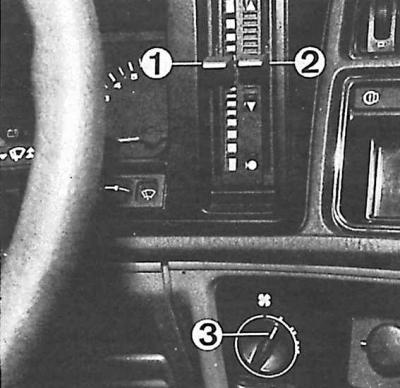
1 – temperature control lever, 2 – air flow direction control lever, 3 – fan switch
Medium nozzles of the ventilation system
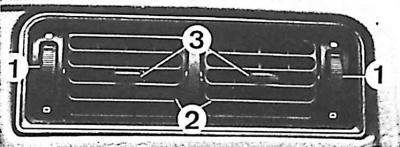
1 – adjustment handle, 2 – movable plates, 3 – plate position adjustment levers
Air enters the car's interior through fixed and movable nozzles of the ventilation system, allowing the direction of air flow to be set. This air can be heated if it enters through a heater that uses the heat of the engine coolant.
Heating
The temperature and direction of air flow are controlled by two vertically moving levers located on the front panel (see Fig. Heating and ventilation controls).
Air enters through two fixed nozzles, as well as through adjustable side and middle nozzles of the ventilation system.
Air temperature regulation
The air temperature is regulated by the left lever (1, see Fig. Heating and ventilation controls). In the upper position of this lever, the heating is off, and in the lower position, the heating is at maximum. The lever can occupy any intermediate position, which corresponds to the average air heating temperature.
Adjusting the air flow direction
The right lever (2, see Fig. Heating and ventilation controls) regulates the direction of air supply into the car's interior. In the upper position of this lever (near the triangle with the apex pointing upwards), air is directed to the windshield, as well as to the fixed side nozzles that direct it to the side door windows (to prevent fogging of the windows).
In the upper position of this lever, at the height of a triangle with its apex pointing downwards, air is supplied through two fixed nozzles towards the floor.
In the middle position of the lever between the triangles, air is supplied partly to the windshield and side windows, and partly to the floor.
In the lowest position of this lever, the air supply to the windows and floor is blocked, and between the position corresponding to the lower triangle and the lowest position, the air supply to the windows and floor is less the closer the lever is to the lowest position.
Nozzles
The air flow direction adjustment does not apply to the two nozzles located in the middle of the front panel. The air flow intensity is adjusted by the handles located next to them. In addition, the movable plates adjust the air flow direction both horizontally and vertically. The temperature of the air coming out through them depends on the position of the lever (1, see Fig. Heating and ventilation controls).
The side nozzles, located at both ends of the front panel, like the middle nozzles, are individually adjustable. In addition, they are not adjustable in their upper part and direct the air flow to the side door windows (to prevent fogging of the windows). The intensity of the air flow through these parts of the nozzles depends on the position of the lever that regulates the direction of air flow.
Fan
The intensity of the natural air flow depends on the speed of movement. At speeds below 60 km/h the intensity is low. It can be increased by turning on the fan using the rotary switch located under the heating and ventilation control levers, which allows the fan to operate at three speeds.
The fan switch has four positions:
- 0 – fan off;
- 1, 2 and 3 – the fan is on, each subsequent position provides a stronger air supply.
Eliminating fogging of windows and defrosting the rear window
The rear window heating switch is located under the left side nozzle. Pressing its lower part turns the rear window heating on, and pressing its upper part turns it off.
In some versions of cars, the rear window heating switches off automatically 10 minutes after switching on. Earlier manual switching off is possible. The control lamp located under the switch lights up when the heating is switched on.
Warning! The rear window heating consumes a large amount of electricity. It is recommended to use it only when the engine is running and to turn it off immediately after visibility through the rear window is sufficient.
Heated front seats
In some versions of the car equipment, the seats and their backs (or only the driver's seat) are heated. The heating is switched on by two lever switches (or one) located near the ashtray. This heating reaches full efficiency 4-6 minutes after switching on.
Important! The front seat heating can be switched on with the ignition key in position "I" (ignition off). However, it is recommended to switch on the heating with the engine running, so as not to discharge the battery.
Rear window heating
The rear window heating is switched on by pressing the button (2, see Fig. Power buttons) above the left side nozzle of the ventilation system.
Caution! The rear window heater consumes a lot of current, so it is recommended to use it only when the engine is running and turn it off immediately after visibility through the rear window becomes sufficient.