Contents: Headlights ↳ Outdoor Light Switch ↳ Multifunctional switch ↳ Rear fog lights ↳ Sound signal ↳ Hazard warning lights switch ↳ Windscreen wiper and washer switch ↳ Rear Window Wiper and Washer Switch ↳ Windscreen washer reservoirs ↳ Adjusting the instrument panel… ↳ Interior lighting bulbs ↳ Concentrated light indoor lighting… ↳ Tachometer ↳ Electric clock ↳ Graphic information module ↳ Econometer ↳ Multifunctional digital watch ↳
Headlights
Installing headlights
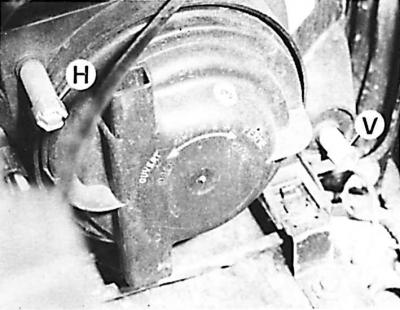
H – horizontal adjustment screw,
V – vertical adjustment screw
The headlight alignment should be checked every 10,000 km of vehicle mileage.
Outdoor Light Switch
Positions of the levers for the exterior lighting (EE) and windscreen wipers (EG) and washer (LG)
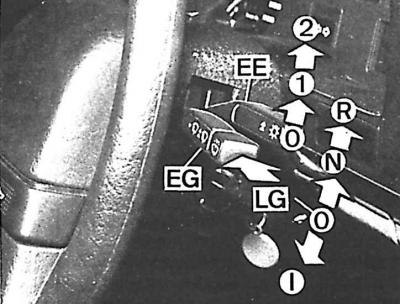
Positions of the exterior lighting switch lever:
- 0 – lighting off,
- 1 – front and rear side lights are on,
- 2 – high or low beam, as well as side lights are on
- LG – windshield washer on
Windshield wiper and washer switch positions:
- 0 – windshield wiper off,
- N – windshield wiper operation at normal speed,
- R – accelerated operation of the windshield wiper,
- I – intermittent operation of the windshield wiper
Multifunctional switch
Multifunction switch lever positions
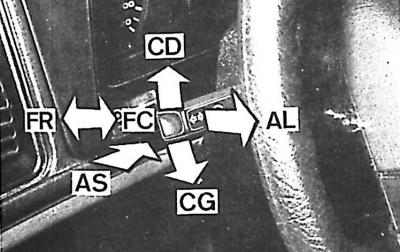
FR – high beam on, FC – low beam on, AL – headlight signal on, CD – right turn signal on, CG – left turn signal on, AS – horn on
The multifunction switch lever is located under the steering wheel on the left side and consists of a turn signal switch and a headlight type switch, and in some equipment versions also has a horn button.
Moving the multifunction switch lever (see Fig. Multifunction switch lever positions) parallel to the steering wheel causes the direction indicators to turn on:
- left (CG);
- right (CD).
The direction indicators switch off automatically when the steering wheel is turned back to the straight ahead position.
When the turn signals are switched on, the green indicator light flashes at the same frequency on the corresponding side of the instrument panel. If one of the bulbs burns out, the corresponding indicator light flashes at a significantly higher frequency than the turn signals.
When the exterior lighting switch lever is in position 2 (see Fig. Positions of the exterior lighting (EE) and windscreen wiper (EG) and washer (LG) switch levers), then:
- pushing the multifunction switch lever away from the steering wheel (FR, see fig. Multifunction switch lever positions) causes the high beam to turn on; the high beam indicator light comes on on the instrument panel;
- moving the multifunction switch lever towards the steering wheel (FC, see fig. Multifunction switch lever positions) turns on the low beam;
- moving the multifunction switch lever all the way towards the steering wheel (AL, see fig. Multifunction switch lever positions) turns on the high beam; after releasing, the multifunction switch lever returns to the low beam position.
Rear fog lights
The rear fog lights are switched on by a switch located on the left side of the dashboard above the side air vent. They only light when the low beam headlights are on. The rear fog light indicator light is located near the switch, lights up when the low beam headlights are on and becomes brighter when the rear fog lights are on.
Sound signal
Power buttons
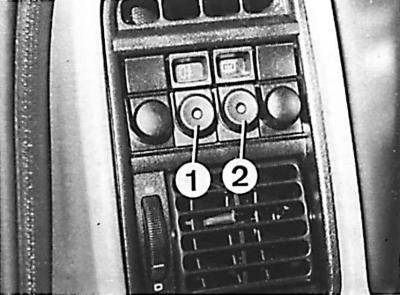
1 – rear fog light switch,
2 – Rear window heating switch
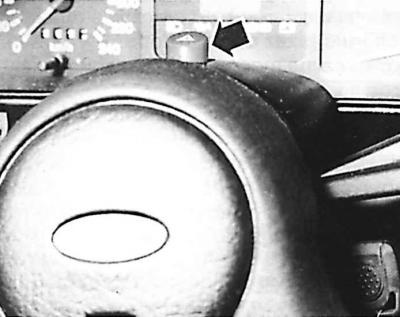
Depending on the equipment, the horn button is located in the middle of the steering wheel or on the multifunction switch.
Hazard warning lights switch
The hazard warning light switch button, which contains the indicator light, is located at the top of the steering column. When pressed, all the turn signal lights come on.
Windscreen wiper and washer switch
Windscreen wiper and washer switch lever (EG, see fig. Positions of the levers for the exterior lighting (EE) and windscreen wipers (EG) and washer (LG)) is located on the right side under the steering wheel. The windshield wiper and washer can be turned on if the key is in position II of the ignition switch. The windshield wiper and washer lever positions can be as follows:
- O – windshield wiper off;
- N – windshield wiper operation at normal speed;
- R – accelerated operation of the windshield wiper;
- I (in some equipment versions) – single movement of the windshield wiper blades or intermittent operation of the blades, can be with an adjustable interval of the frequency of the blades, under the tachometer there is a knob for adjusting the programmer of the intermittent operation of the windshield wiper blades;
- LG – the button on the end of the lever allows you to turn on the windshield washer; if the vehicle is equipped with headlight washers, they operate simultaneously with the windshield washer, provided that the low or high beam headlights are on.
Rear Window Wiper and Washer Switch
The rear window wiper and washer switch is located on the right side above the left ventilation nozzle.
Setting the switch to the first position turns on the rear window wiper, and holding the switch in the second position turns on the washer (after releasing the force, it returns to the first position).
Windscreen washer reservoirs
Windscreen and headlight washer reservoir
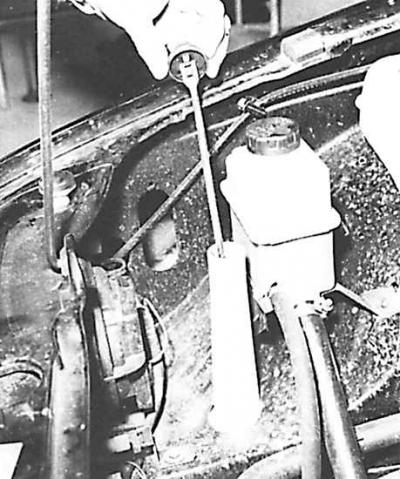
The windshield washer reservoir (and headlight washer reservoir in some versions) is located on the right side at the front of the engine compartment.
The manufacturer recommends using a special Motorcraft windshield washer fluid mixed with water in proportions appropriate to the season.
If the vehicle is equipped with a rear window wiper and washer, then on the left side of the trunk under the cover there is a rear window washer reservoir, which should be filled with the same composition as the windshield washer reservoir.
Please note: Some versions are equipped with a control lamp under the middle ventilation nozzles, which lights up when the fluid level in the windshield washer reservoir is below the minimum.
Adjusting the instrument panel illumination intensity
The control knob is located on the left side of the front panel under the ventilation nozzle and allows you to adjust the intensity of the instrument panel lighting in accordance with the surrounding conditions.
Interior lighting bulbs
The front interior light is located between the sun visors, and the rear interior light is above the rear window. The switches have three positions:
- turning on interior lighting when opening the front doors;
- turn off interior lighting;
- constant switching on of interior lighting.
Concentrated light indoor lighting bulb
Some versions are equipped with a lamp that directs a narrow beam of light onto the front passenger seat. The direction of this concentrated light can be adjusted within a small range.
Tachometer
Present in some vehicle equipment versions.
Electric clock
The clock with a pointer dial, located under the middle nozzles of the ventilation system, is set by pressing and turning its handle.
Some versions are additionally equipped with a clock with a digital display, which, in addition to the usual function of informing about the current time, can act as an alarm clock, a timer, and also measure the period of time (for example, travel time).
Graphic information module
Graphic information module display
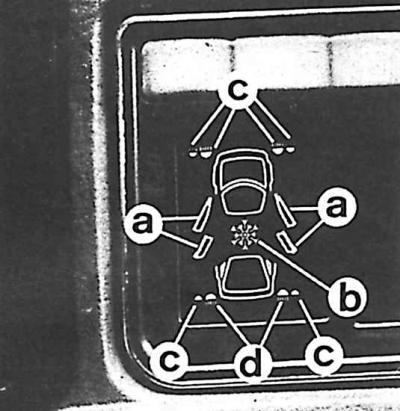
a – doors not closed tightly, b – danger of ice, c – burnt out bulb or fuse for headlight or parking light, d – burnt out bulb or fuse for brake light
The graphic information module, installed in some versions of cars, is designed for visual control of the serviceability of individual elements related to traffic safety. The display of this module, located on the left side of the clock, shows a schematic drawing of the car from above (see Fig. Display of the graphic information module).
The lighting of individual lamps indicates:
- the doors are not closed tightly;
- at the current ambient temperature, ice may form (b) – the yellow light indicates a temperature of 4°C, the red light indicates a temperature not higher than 0°C;
- burnout of a headlight bulb, front or rear parking lights, or burnout of the corresponding fuse (c);
- burnout of the brake warning light bulb or the corresponding fuse (d).
After the ignition is turned on, all indicator lights are on for 5 seconds. This allows you to check whether one of them has burned out.
Econometer
Some versions of the vehicle equipment provide the ability to monitor fuel consumption while driving and warn if the consumption exceeds the fuel economy standards. There are two control lights on the instrument panel:
- yellow, which lights up when fuel consumption slightly exceeds the minimum possible under these driving conditions;
- red, which lights up when fuel consumption significantly exceeds the minimum.
Multifunctional digital watch
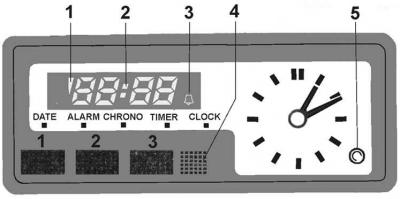
1 – clock indicator (flashing), 2 – time countdown (flashing), 3 – alarm indicator, 4 – buzzer, 5 – setting the time on a hand-held clock
The watch includes:
- pointer clock;
- digital display for indicating the operation of the clock and chronometer, as well as for selecting the alarm;
- five LEDs indicate the selected function – date, alarm, chronometer, timer and clock;
- programmable sound alarm;
- three buttons provide various operations of selection, time setting, programming and other functions.
The selection of the five main functions is carried out in order by successively pressing button 1 (see Fig. Multifunctional watch). A full cycle is to press the button 6 times. First the display induces the hours and minutes, then, on the next impulse, the minutes and seconds. Button 1 is also used to set, turn off and switch off the alarm signal.
Button 2 is used to control the chronometer and sequentially gives the command to stop the display to record the intermediate time (the real time continues to be recorded), or to switch back to the real time.
In the clock or calendar function, button 2 quickly scrolls through the readings to set the hour or day.
In the elapsed time function, it can subtract the stop time from the total time.
Button 3, like button 2, serves to scroll through the readings, but at low speed.
In the chronometer function, this button stops or resets the chronometer to zero.
In the timer function, button 3 sequentially sets the display to zero and then starts the time counter.
By pressing button 2, you can exclude the time of stops (during the engine stop, there is no contact). This makes it possible to quite easily calculate the average speed during long trips, interrupted by many and long stops.