Contents: Removal ↳ Installation ↳
Removal
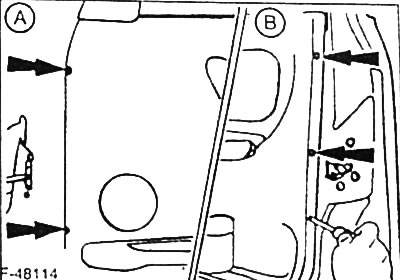
Open the door and unscrew 5 (7 for the rear door) screws securing the "arrow" along the edges of the door trim.
Front door: Remove both caps over the door trim pocket mounting screws. Remove the screws and remove the pocket.
Model with electric window: Using a small screwdriver, pry the window switch out of the door trim and disconnect its plug connector.
Model without electric window: Use a small screwdriver to pry up the window crank cover and remove the mounting screw located underneath. Remove the window crank.
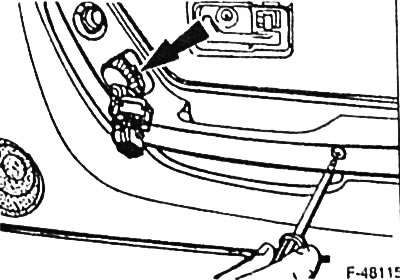
Unscrew the armrest mounting screws (basic equipment), and for the model with extended equipment, additionally unscrew the "arrow" screw on the front door, visible through the hole for the window lift switch (the picture applies to the model with extended equipment).
Front door: Remove the cover from the mirror trim and unscrew the screw located underneath. If adjusting the mirror manually, remove the manual adjustment lever extension and remove the mirror trim.
Rear door: Remove the ashtray and unscrew the screws securing the door release mechanism trim. There are two screws under the ashtray and one screw in the recess for the door release mechanism handle.
Loosen the screw securing the door release mechanism cover and remove the cover.
Remove the door trim at the top from the two clamps, then pull the trim out of the lower U-shaped holder.
If present, disconnect the speaker plug.
Installation
If available, connect the speaker plug.
Insert the trim at the bottom into the U-shaped holder and, if available, pull the wire for the electric window through the hole in the trim. Press the trim at the top so that it is fixed in the clamps.
Front door, place and screw on the door release mechanism cover.
Rear door: place and screw on the door release mechanism cover. Insert the ashtray.
Place and screw the armrest.
Front door: place and screw the door trim pocket in place.
Model without electric window lift: attach and tighten the window lift crank. Press the cap covering the fastening screw into place.
Model with electric window: Connect the plug connector of the window switch and fix the switch in the hole of the door trim.
Front door: attach and screw on the mirror cover. If adjusting the mirror manually, install the manual adjustment lever extension. Replace the cover that covers the fastening.
Tighten 5 (7 for the rear door) mounting screws along the edges of the door trim.
(The original source of this article can be found at: Fordbook.ru)