Special tool
 | World Diagnostic System (WDS) 418-F224 |
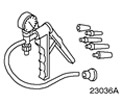 | Hand vacuum/pressure pump 23-036A (416-D001) |
General equipment: Vacuum cleaner for engine.
| Name | Specification |
| Silicone gasket and sealant | WSE-M4G323-A4 |
| Gasket material | WSK-M2G348-A5 |
| Lubricant for the nipple connection of the TBD high pressure fuel supply line | TBD |
Withdrawal
WARNING: Do not smoke or walk with a lit cigarette or any type of open flame while working on or near fuel related items. In such situations, there are always highly flammable mixtures that can ignite. Failure to follow these instructions may result in injury.
WARNING: This procedure is related to fuel handling. Always be aware of the possibility of fuel splashing and observe fuel handling precautions. Failure to follow these instructions may result in injury.
WARNING: Do not make any repairs to the fuel injection system while the engine is running. The fuel pressure in the system can reach 1600 bar. Failure to follow these instructions may result in injury.
WARNING: Do not make any repairs to the fuel injection system without checking that the fuel pressure has dropped to zero and the fuel temperature has reached the outside temperature or below 30°C, whichever is greater. Failure to follow these instructions may result in injury.
WARNING: After stopping the engine, wait at least one minute before making any repairs to the fuel injection system. Failure to follow these instructions may result in injury.
WARNING: Make sure that the workshop area where the vehicle is being worked on is as clean and dust free as possible. Foreign matter from work on the clutch, brakes, or machining or welding operations can contaminate the fuel system and result in subsequent malfunction.
CAUTION: Always perform the cleaning procedure before making any repairs to the fuel injection system components. Failure to follow this instruction may result in dirt entering the fuel injection system.
CAUTION: Diesel fuel injection equipment is manufactured to very precise tolerances and very close clearances. Therefore, when working with these elements, it is especially important to observe absolute cleanliness. Open holes or lines should always be plugged with appropriate plugs.
CAUTION: Do not disassemble or clean the inside of the fuel pump, even with ultrasonication. Always install a new fuel pump if necessary.
1. Using the function «Data logger» («Datalogger») world diagnostic system (WDS), check that the fuel pressure has dropped to zero and the fuel temperature has reached the outside temperature or a temperature below 30°C, whichever is greater.
2. Remove the timing belt. Refer to Section 303-01A / 303-01B / 303-01C / 303-01D / 303-01E for more information.
3.
NOTE: The fuel pump pulley seals against the fuel pump sprocket.
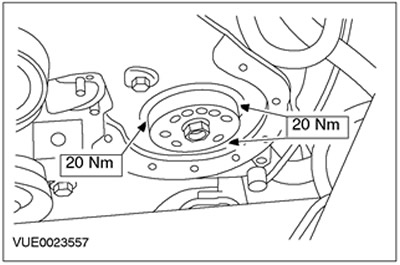
Remove the fuel pump pulley.
4. Remove the fuel pump seal. Discard the seal as it is no longer needed.
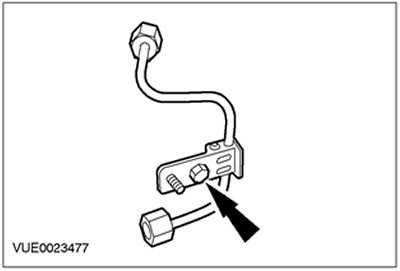
5. Remove the high pressure fuel line support bracket.
6.
CAUTION: Protect generator from contamination. Failure to follow this instruction may result in premature generator failure.
Cover the generator with lint-free material to prevent contamination.
7.
CAUTION: Close the plug connections of the fuel metering valve and the fuel temperature sensor to prevent them from being contaminated by the cleaning fluid.
Clean the fuel pump, the fuel manifold, the high pressure fuel supply line and adjacent areas. For more information, refer to the Cleaning the Fuel Injection System Components chapter in this section.
8.
CAUTION: The high pressure fuel supply line must remain in contact with the fuel pump and fuel manifold until all pin connections have been disconnected and cleaned. Failure to follow this instruction may result in dirt entering the fuel injection system.
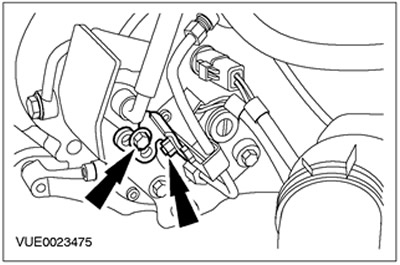
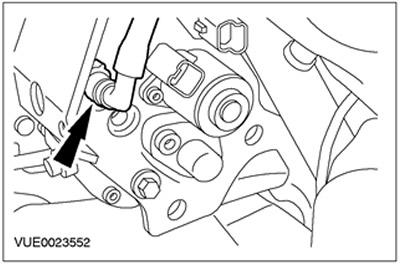
Disconnect the high pressure fuel supply line and clamp from the fuel pump and fuel manifold.
9.
CAUTION: The high pressure fuel supply line must remain in contact with the fuel pump and fuel manifold until all pin connections have been disconnected and cleaned. Failure to follow this instruction may result in dirt entering the fuel injection system.
Using an engine vacuum cleaner, remove foreign material from the high pressure fuel supply line, fuel pump and fuel manifold.
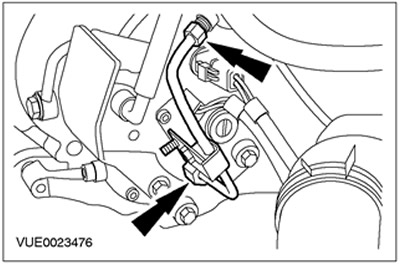
10. Remove the high pressure fuel supply line.
11. Using an engine vacuum cleaner, remove foreign material from the fuel pump and fuel manifold.
12. Install the plugs in the exposed threaded holes on the fuel pump and fuel manifold.
13.
NOTE: Mark the orientation of the clip to ensure it is installed in exactly the same position.
Remove the clamp from the high pressure fuel supply line.

14. Discard the high pressure fuel supply line as it is no longer needed.
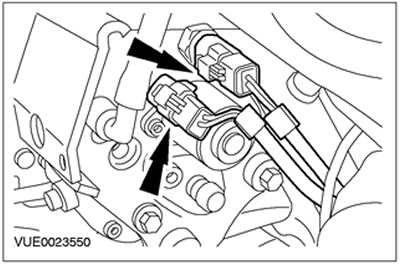
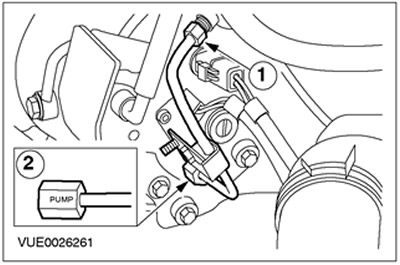
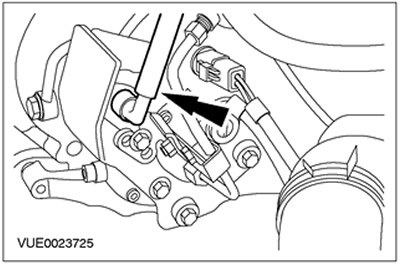
15. Disconnect the plug connectors for the fuel metering valve and the fuel temperature sensor.
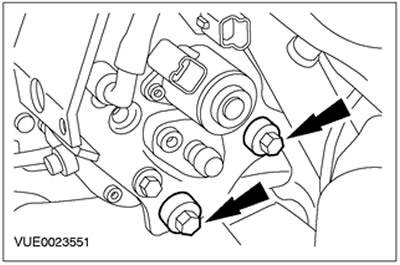
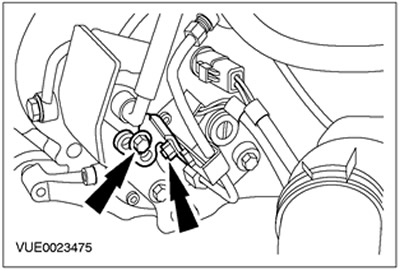
16. Turn out bolts of a basic arm of the fuel pump.
17. Disconnect the fuel return line from the fuel pump to the fuel filter from the fuel return diffuser. Refer to Section 310-00 for more information. Install the plugs on the fuel return line of the fuel pump and the diffuser of the fuel return line.
18. Disconnect the fuel pump fuel feed line from the fuel pump. Refer to Section 310-00 for more information. Install the plugs on the fuel supply line of the fuel pump and the fuel pump.

19. Disconnect the fuel injector return line from the fuel return line diffuser. Install plugs on the fuel return line of the fuel injector and the diffuser of the fuel return line.

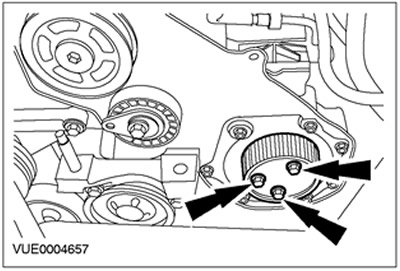
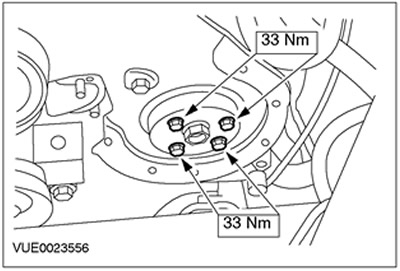
20. Turn out bolts of fastening of an asterisk of the fuel pump.
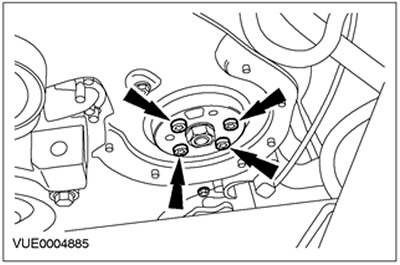
21.
NOTE: The fuel pump mounting bolts can be accessed through the holes provided, but the mounting bolts cannot be completely removed.
Remove the fuel pump and protective screen. Discard the gasket as it is no longer needed.
22. Remove the protective screen from the fuel pump.

Installation
WARNING: Do not smoke or walk with a lit cigarette or any type of open flame while working on or near fuel related items. In such situations, there are always highly flammable mixtures that can ignite. Failure to follow these instructions may result in injury.
WARNING: This procedure is related to fuel handling. Always be aware of the possibility of fuel splashing and observe fuel handling precautions. Failure to follow these instructions may result in injury.
WARNING: Make sure that the workshop area where the vehicle is being worked on is as clean and dust free as possible. Foreign matter from work on the clutch, brakes, or machining or welding operations can contaminate the fuel system and result in subsequent malfunction.
CAUTION: Always perform the cleaning procedure before making any repairs to the fuel injection system components. Failure to follow this instruction may result in dirt entering the fuel injection system.
CAUTION: Diesel fuel injection equipment is manufactured to very precise tolerances and very close clearances. Therefore, when working with these elements, it is especially important to observe absolute cleanliness. Open holes or lines should always be plugged with appropriate plugs.
CAUTION: Do not disassemble or clean the inside of the fuel pump, even with ultrasonication. Always install a new fuel pump if necessary.
NOTE: Install a new fuel pump gasket.
NOTE: Install a new fuel pump seal.
NOTE: Install a new high pressure fuel supply line.
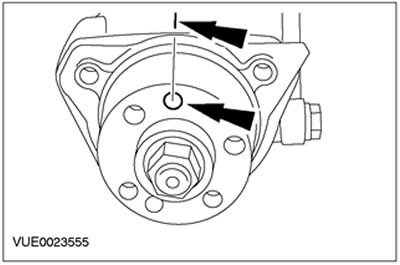
1. Align the hole in the fuel pump drive with the marked line on the fuel pump housing.
2.
NOTE: To properly install the fuel pump, tighten the bolts evenly.
Install the fuel pump.
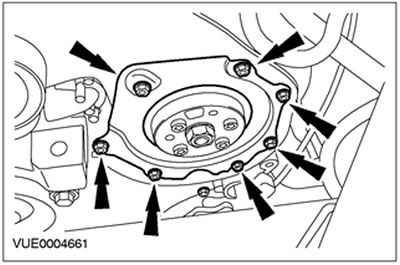
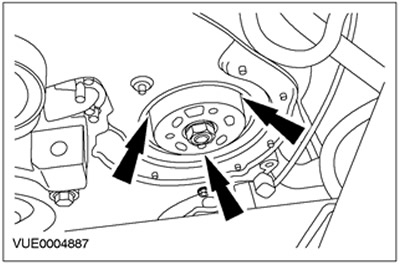
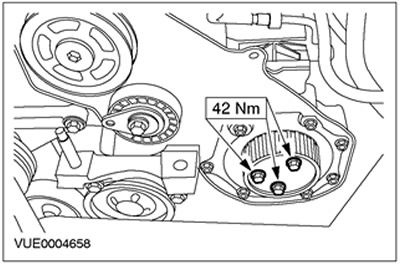
3. Install the fuel pump sprocket bolts.
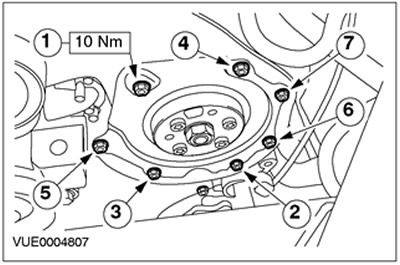
4. Install a new fuel pump seal. Tighten bolts in sequence
5. Remove the plugs and connect the fuel injector return line to the fuel return line diffuser. Discard plugs as they are no longer needed.

6. Remove the plugs and connect the fuel pump feed line to the fuel pump. Discard plugs as they are no longer needed.

7. Install the protective screen on the fuel pump (for clarity, the fuel pump is shown removed).

8. Connect the plug connectors of the fuel metering valve and the fuel temperature sensor.

9.
NOTE: Be sure to install the clip in the same position it was in before removal.
Install the clamp on the high pressure fuel supply line.
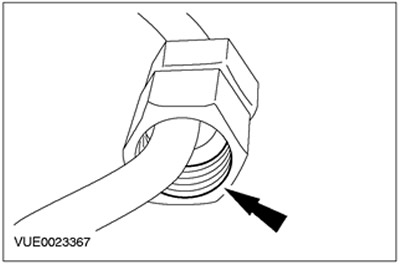
10. Lubricate the threads of the nipple connections of the high pressure fuel supply lines with a clean lubricant.
11.
CAUTION: Protect generator from contamination. Failure to follow this instruction may result in premature generator failure.
Cover the generator with lint-free material to prevent contamination.
12.
CAUTION: Do not strike the ends of the high pressure fuel supply line. Failure to follow this instruction may result in damage to the ends of the fuel line and the entry of foreign material into the fuel injection system.
CAUTION: Remove the plugs from the high pressure fuel supply line, fuel injector and fuel manifold as soon as possible. Failure to follow this instruction may result in dirt entering the fuel injection system.
NOTE: Do not tighten the high pressure fuel feed nipple connections at this stage.
NOTE: Apply pressure to the high pressure fuel supply line to keep the fuel line nipple in contact with the fuel pump and fuel manifold cones when connected.
Install a new high pressure fuel supply line.
- 1. Connect the high pressure fuel supply line to the fuel manifold.
- 2. Connect the high pressure fuel supply line to the fuel pump.
- Discard plugs as they are no longer needed.
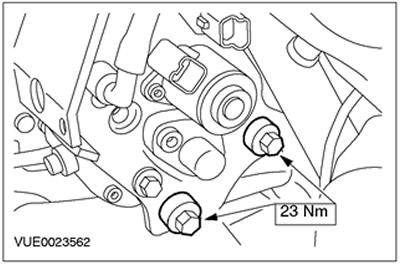
13. Tighten the fuel pump support bracket bolts (for clarity, the high pressure fuel supply line is shown removed).
14.
CAUTION: The high pressure fuel supply nipple tightening tool should be installed at the top of the connection as this is where most of the material is found. Failure to follow this instruction may result in damage to the pin connection.
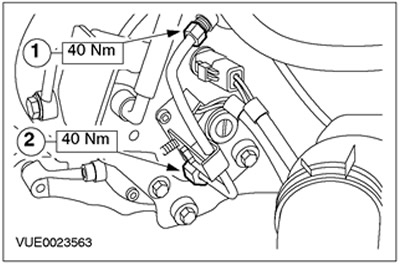
Tighten the nipple connections of the high pressure fuel supply lines.
- 1. Tighten the nipple connections of the high pressure fuel supply lines on the fuel manifold.
- 2. Tighten the nipple connection of the high pressure fuel supply line on the fuel pump.
15. Install the high pressure fuel line bracket.
16.
CAUTION: Use a new piece of clear plastic tubing with the special tool.
Remove the plug from the fuel pump return line connector, and using the special tool prime the fuel pump until clean fuel flows into the vacuum pump reservoir.
- Discard plugs as they are no longer needed.

17. Remove the special tool.
18. Connect the fuel return line from the fuel pump to the fuel filter.
19.
NOTE: Using silicone gasket and sealant, seal the fuel pump pulley against the fuel pump sprocket.
NOTE: Apply gasket material to the outer edge of the bolt holes in the fuel pump pulley.
Install the fuel pump pulley.
20. Remove lint free material from generator.
21. Install a new timing belt. Refer to Section 303-01A / 303-01B / 303-01C / 303-01D / 303-01E for more information.
Visitor comments