|
STATES |
DETAILS/RESULTS/ACTIONS |
|
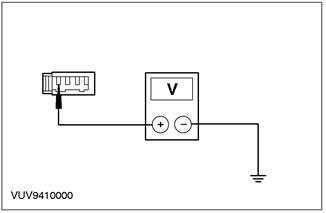
A1: CHECK VOLTAGE IN TRANSMITTER POWER CIRCUIT - ELECTRICAL CIRCUIT 15-GL37A (GREEN/BLACK) |
|
|
1Enter the OFF position. |
|
|
2Disconnect the PATS Transmitter - C390. |
|
|
3Enter the ON position. |
|
|
4Using a digital multimeter, measure the voltage between PATS transmitter C390 pin 1, circuit 15-GL37A (Green/Black), harness side and ground. |
|
• Is the voltage more than 10V? |
|
|
→ Yes |
|
|
Go to A2 |
|
|
→ No |
|
|
REPAIR circuit 15-GL37A (Green/Black). REPEAT self-test. CLEAR DTCs. |
|
|
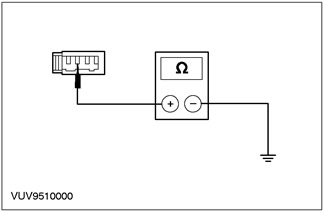
A2: CHECK TRANSMITTER GROUND CIRCUIT FOR OPEN - CIRCUIT 91-GL1 (BLACK/YELLOW) |
|
|
1Enter the OFF position. |
|
|
2Using a digital multimeter, measure the resistance between PATS transmitter C390 pin 2, circuit 91-GL1 (Black/Yellow), harness side and ground. |
|
• Is the resistance less than 5 ohms? |
|
|
→ Yes |
|
|
Go to A3 |
|
|
→ No |
|
|
REPAIR circuit 91-GL1 (black/yellow). REPEAT self-test. CLEAR DTCs. |
|
|
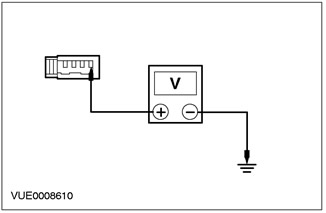
A3: CHECK VOLTAGE AT PATS TRANSMITTER - CIRCUIT 8-GL37 (WHITE/GREEN) |
|
|
1Enter the ON position. |
|
|
2Using a digital multimeter, measure the voltage between PATS transmitter C390 pin 4, circuit 8-GL37 (White/Green), harness side and ground. |
|
• Is the voltage more than 10V? |
|
|
→ Yes |
|
|
Go to A5 |
|
|
→ No |
|
|
Go to A4 |
|
|
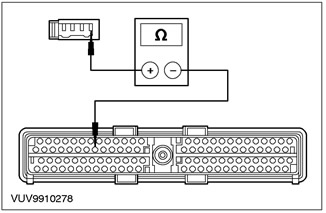
A4: CHECK ELECTRICAL CIRCUIT 8-GL37 (WHITE/GREEN) FOR OPEN |
|
|
NOTE:When installing a new PCM, the coded ignition keys need to be reprogrammed |
|
|
1Enter the OFF position. |
|
|
2Disconnect PCM C415. |
|
|
3Using a digital multimeter, measure the resistance between PATS transmitter C390 pin 4, circuit 8-GL37 (Gray/Orange), harness side and PCM C415 pin 53, harness side. |
|
• Is the resistance greater than 10,000 ohms? |
|
|
→ Yes |
|
|
INSTALL a new PCM. Refer to Section 303-14 for additional information. REPROGRAM the coded ignition keys. Refer to Key Programming in this section for additional information. REPEAT the self-test. CLEAR the DTCs. |
|
|
→ No |
|
|
REPAIR circuit 8-GL37 (white/green). CLEAR DTCs. REPEAT self-test. CHECK system operation. |
|
|
A5: CHECK TRANSMITTER TRANSMITTER CIRCUIT VOLTAGE - ELECTRICAL CIRCUIT 10-GL37 (GRAY/ORANGE) |
|
|
1Connect PCM - C415. |
|
|
2Connect the PATS Transmitter - C390. |
|
|
3Enter the OFF position. |
|
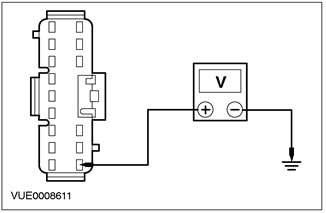
|
4Using a digital multimeter, measure the voltage by gently touching the probe between pin 1 of C63, circuit 10-GL37 (gray/orange), and ground. |
|
• Is the voltage more than 8V? |
|
|
→ Yes |
|
|
Go to A7 |
|
|
→ No |
|
|
Go to A6 |
|
|
A6: CHECK TRANSMITTER ELECTRICAL CIRCUIT FOR OPEN - ELECTRICAL CIRCUIT 10-GL37 (GRAY/ORANGE) |
|
|
1Disconnect Line Connector - C63. |
|
|
2Disconnect the Transmitter - C390. |
|
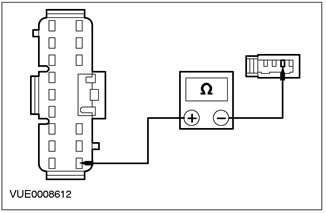
|
3Using a digital multimeter, measure the resistance between PATS transmitter pin 3 C390, circuit 10-GL37 (gray/orange), harness side, and pin 1 C63, harness side. |
|
• Is the resistance less than 5 ohms? |
|
|
→ Yes |
|
|
INSTALL a new PATS transmitter. For additional information, refer to Module - Transmitter in this section. REPEAT the self-test. Clear the DTCs. |
|
|
→ No |
|
|
REPAIR electrical circuit 10-GL37 (gray/orange). CHECK for proper system operation. |
|
|
A7: CHECK TRANSMITTER RECEIVE CIRCUIT FOR OPEN - CIRCUIT 10-GL37 (GRAY/ORANGE) |
|
|
1Enter the OFF position. |
|
|
2Disconnect PCM C415. |
|
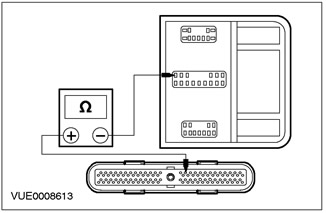
|
3Using a digital multimeter, measure the resistance between PCM pin 15 C415, circuit 10-GL37 (Gray/Orange), harness side, and pin 11 C61, harness side. |
|
• Is the resistance less than 5 ohms? |
|
|
→ Yes |
|
|
INSTALL a new PCM. Refer to Section 303-14 for additional information. REPROGRAM the coded ignition keys. Refer to Key Programming in this section for additional information. REPEAT the self-test. Clear the DTCs. |
|
|
→ No |
|
|
REPAIR circuit 10-GL37 (Gray/Orange). REPEAT self-test. CLEAR DTCs. CHECK system for proper operation. |
|
PINPOINT TEST B: THE ANTI-THEFT SYSTEM IS NOT FUNCTIONING - THE ENGINE DOES NOT CRANK BUT THE ANTI-THEFT SYSTEM LED CORRECTLY DISPLAYS THE SYSTEM STATUS.
|
STATES |
DETAILS/RESULTS/ACTIONS |
|
B1: CHECK STARTING SYSTEM GROUNDING |
|
|
1Enter the OFF position. |
|
|
2Disconnect the Starter Relay. |
|
|
3Enter the START position. |
|
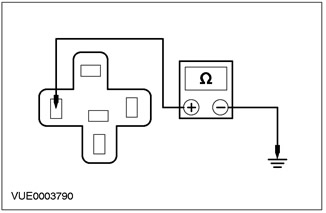
|
4Using a digital multimeter, measure the resistance between pin 2 of the starter disable relay, circuit 31S-BB16 (black/red), harness side, and ground while holding the key in position III. |
|
• Is the resistance less than 5 ohms? |
|
|
→ Yes |
|
|
PERFORM DIAGNOSIS of the starting system. Refer to Section 303-06 for additional information. |
|
|
→ No |
|
|
Go to B2 |
|
|
B2: CHECK ELECTRICAL CIRCUIT 31S-BB16 (BLACK/RED) FOR OPEN |
|
|
NOTE:When installing a new PCM, the coded ignition key must be reprogrammed. Turn ignition switch OFF then ON. DOWNLOAD DTCs. If PATS DTCs are reported, GO to Powertrain Control Module (PCM) Diagnostic Trouble Code (DTC) List. If no DTCs are reported, PATS is OK. |
|
|
1Enter the OFF position. |
|
|
2Disconnect PCM C415. |
|
|
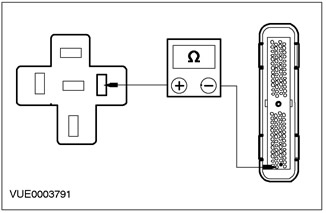
3Using a digital multimeter, measure the resistance between PCM C415 pin 27 (use pin 32 on the 60-pin PCM connector) and starter inhibit relay pin 2, circuit 31S-BB16 (Black/Red). |
|
• Is the resistance less than 5 ohms? |
|
|
→ Yes |
|
|
INSTALL a new PCM. Refer to Section 303-14 for additional information. REPROGRAM the coded ignition keys. Refer to Key Programming in this section for additional information. CHECK the system for proper operation. |
|
|
→ No |
|
|
REPAIR electrical circuit 31S-BB16 (black/red). CHECK for proper system operation. |
|