Bosch starter
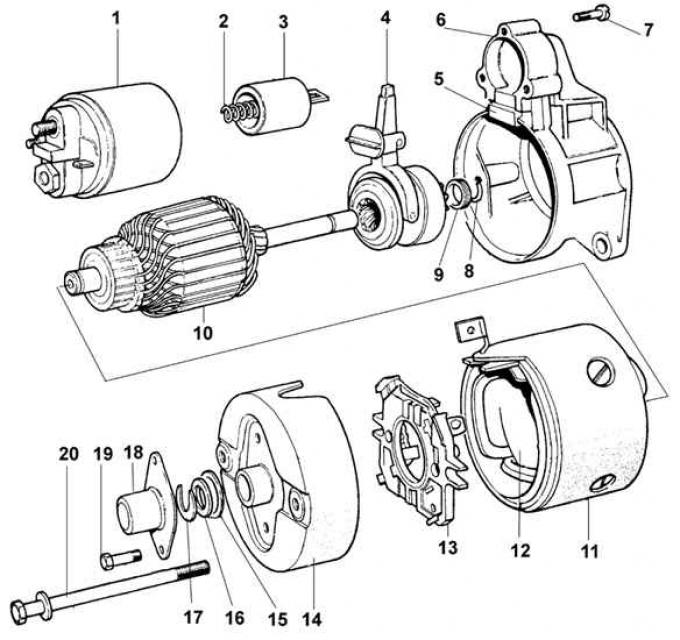
1 – electromagnetic starter housing; 2 – spring; 3 – electromagnetic starter anchor; 4 – lever; 5 – rubber insert; 6 – lid; 7 – screw for fastening the electromagnetic starter; 8 – retaining ring; 9 – ring; 10 – starter anchor; 11 – starter housing; 12 – windings; 13 – collector brush block; 14 – collector cover; 15 – sealing ring; 16 – washer; 17 – retaining ring; 18 – protective cover; 19 – protective cover mounting bolt; 20 – starter tightening bolt
Bosch Starter Collector Brush Block
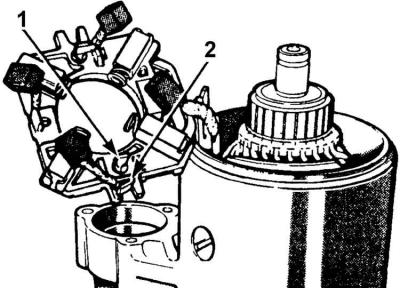
1 – external contact, 2 – terminal
Bosch GF starter
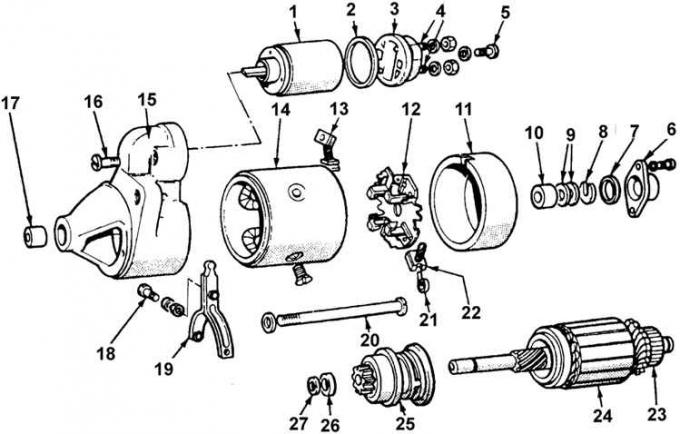
1 – electromagnetic starter; 2 – gasket; 3 – lid; 4 – contacts; 5 – screw; 6 – protective cover; 7 – sealing ring; 8 – retaining ring; 9 – washer; 10 – bushing; 11 – collector cover; 12 – collector brush holder; 13 – stator winding terminal; 14 – starter housing; 15 – front cover; 16 – screw; 17 – bushing; 18 – lever axle bolt; 19 – lever; 20 – starter tightening bolt; 21 – brush pressure spring; 22 – brush; 23 – collector; 24 – starter anchor; 25 – drive gear with overrunning clutch; 26 – ring; 27 – retaining ring
Bosch DW starter with gearbox
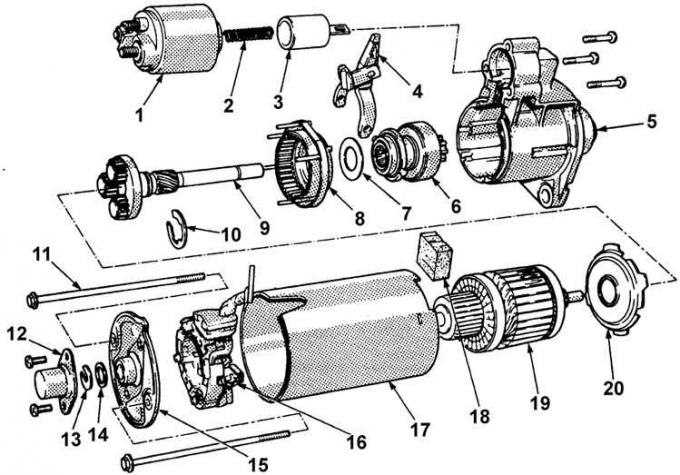
1 – electromagnetic starter; 2 – spring; 3 – electromagnetic starter anchor; 4 – lever; 5 – front cover; 6 – drive gear with overrunning clutch; 7 – gasket; 8 – external gear of the reducer; 9 – drive shaft with planetary gears; 10 – retaining ring; 11 – starter tightening bolt; 12 – protective cover; 13 – retaining ring; 14 – ring; 15 – plate; 16 – collector brush holder; 17 – starter housing; 18 – rubber gasket; 19 – starter anchor; 20 – lid
Lucas Starters
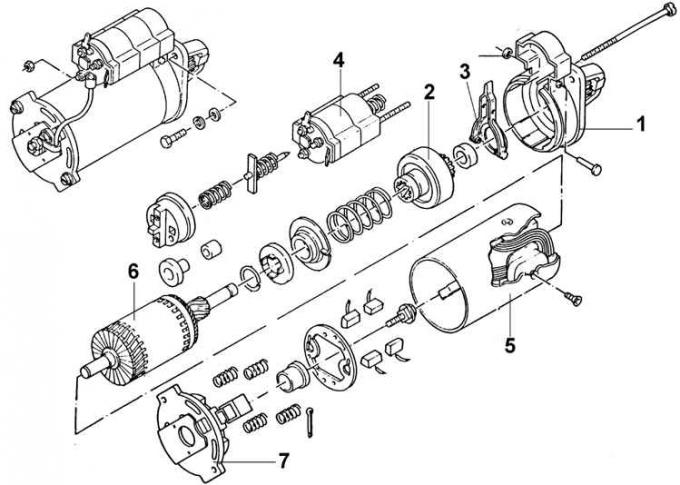
1 – head; 2 – drive unit; 3 – drive lever; 4 – electromagnetic switch; 5 – stator; 6 – rotor; 7 – back cover with brush holder
Cajavec starter
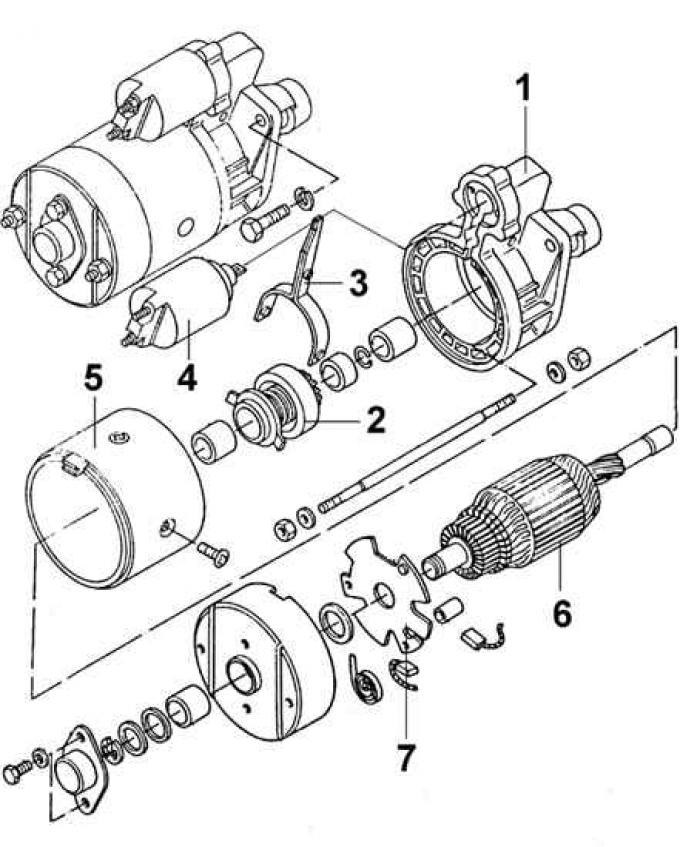
1 – head; 2 – drive unit; 3 – drive lever; 4 – electromagnetic switch; 5 – stator; 6 – rotor; 7 – brush holder
Nippondenso starter
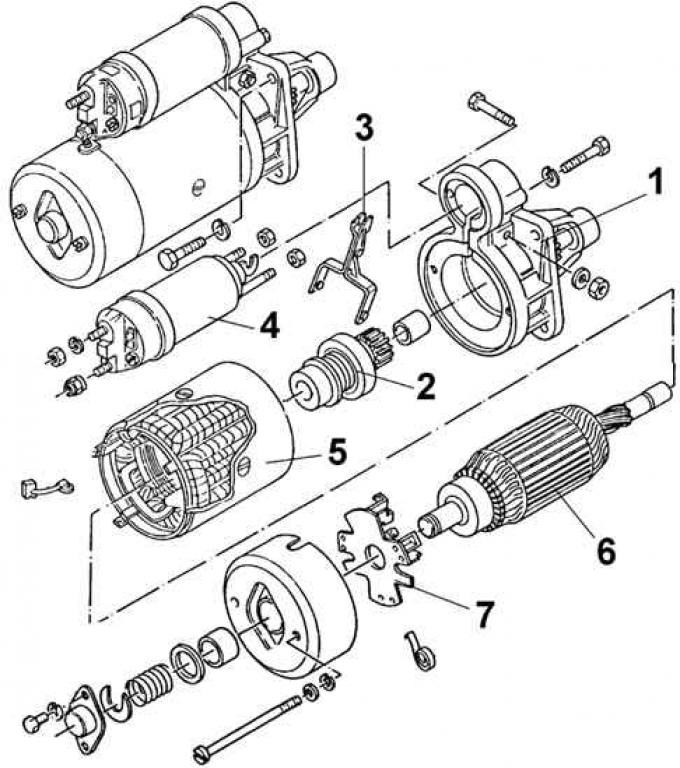
1 – head; 2 – drive unit; 3 – drive lever; 4 – electromagnetic switch; 5 – stator; 6 – rotor; 7 – brush holder
After disassembling the starter, you should check:
- the condition of the brushes, their wear, and the freedom of movement of the brushes in the brush holders;
- the pressing force and position of the brush springs;
- a type of collector that should be cleaned with a rag soaked in gasoline or trichloroethylene and sanded with fine-grained sandpaper;
- condition of self-lubricating bearing bushings; if replacement is necessary, new bushings should be soaked in engine oil (SAE 30 or 40 viscosity) for at least 20 minutes before installing them in the starter.
Checking the electromagnetic starter
1. Disconnect the ground wire from the battery and all wires from the electromagnetic starter.

2. Connect the battery with a 3 W test lamp connected in series to the housing and the power connector of the electromagnetic starter winding (1 - threaded contact for connecting the wire from the battery, 2 - threaded contact to the starter motor, 3 - power connector of the electromagnetic starter winding).
3. If there is no break in the winding, the light bulb should light.
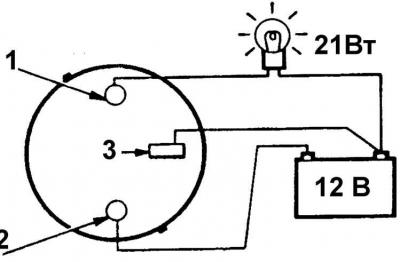
4. To check the starter contacts, connect the battery with a 12–21 W test lamp connected in series to the threaded contacts of the electromagnetic starter and an additional wire to the power connector of the electromagnetic starter winding (1 - threaded contact for connecting the wire from the battery, 2 - threaded contact to the starter electric motor, 3 - power connector of the electromagnetic starter winding).
5. When connecting an additional wire to the power connector of the electromagnetic starter winding, the electromagnetic starter should operate and the light should come on.