Contents: Removal ↳ Installation ↳
Special tool
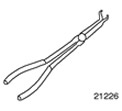 | Spark Plug Pliers 303-622 (21226) |
| Name | Specification |
| Silicone grease | ESE-M1C171-AA |
| Clamps |
Removal
1. Standard preparatory activities:
- Please mark the radio key code.
- Mark the preset radio stations.
2.
CAUTION: Disconnect the ground cable from the battery.
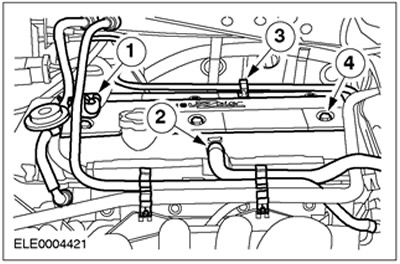
Remove the cylinder head cover plate (if equipped).
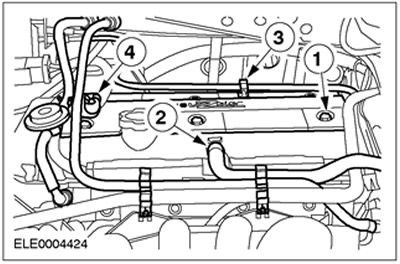
- 1. Release the fuel lines.
- 2. Disconnect the crankcase ventilation hose.
- 3.Release the EVAP canister vacuum line bracket.
- 4. Unscrew the bolts.
3.
CAUTION: When disconnecting the spark plug connector, do not pull on the wire. If necessary, remove the ignition coil to avoid bending the wire. Before disconnecting the spark plug connector, twist it slightly to release the seal.
CAUTION: Disconnect the spark plug connector using straight-line force only.
CAUTION: Do not damage the cylinder head cover gasket as it cannot be replaced individually.
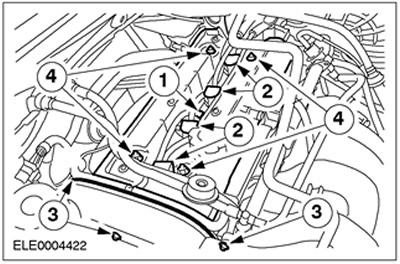
Remove the cylinder head cover by moving it straight up.
- 1. Disconnect the plug connector of the cylinder head temperature sensor (CHT).
- 2. Disconnect the high tension wires from the spark plugs.
- Release the CHT sensor plug connector clamp.
- For angled spark plug connectors, use special tool 303-622.
- 3. Remove the three bolts of the upper timing belt cover.
- 4. Unscrew and remove the nuts.
Installation
1.
CAUTION: To avoid damaging the spark plug connector seal, use a blunt object (such as a plastic zip tie) to apply silicone grease.
CAUTION: Connect the spark plug connector by applying a straight force to it.
NOTE: Coat the inside of the spark plug connector with silicone grease to a depth of (5-10) mm.
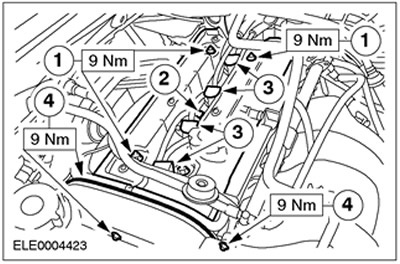
Install the cylinder head cover.
- 1. Screw on the nuts.
- 2. Connect the plug connector of the SNT sensor.
- 3. Connect the spark plug connector.
- 4.Install the three timing belt upper cover bolts.
2. Install the cylinder head cover plate (if removed).
- 1. Screw in the bolts.
- 2.Connect the PCV hose.
- 3. Secure the EVAP canister vacuum line bracket.
- 4. Secure the fuel lines.
3. Standard finishing operations:
- Connect the ground wire to the battery.
- If necessary, secure the wires using cable ties.
- Enter the radio key code.
- Program radio station presets.
- Set the clock.
- Perform a road test to allow the PCM to collect data.
This article is a copy from the website FordBook