Windshield wiper motor
- Turn off the ignition
- Disconnect the connector.
- Using the connecting wire, prepare the testing procedure according to the following description.
- Use an external 12V continuous current source capable of handling 10A minimum, or use battery voltage with a fuse.
1. Check the wiper motor in LOW SPEED mode.
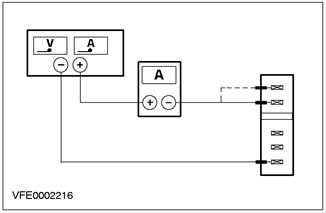
- Connect the positive terminal of the power source to the positive terminal of the digital multimeter.
- Connect the negative terminal of the power source to pin 1 of the wiper motor.
- Connect the negative terminal of the digital multimeter to pin 5 of the wiper motor. The wiper motor will operate in low speed mode.
Measure the current
Is the reading on the digital multimeter close to 1.5A? If so, proceed to step 2.
If not, INSTALL a new windshield wiper motor.
2. Check the wiper motor in HIGH SPEED WIPER mode (Figure VFE0002216)
- Connect the positive terminal of the power source to the positive terminal of the digital multimeter.
- Connect the negative terminal of the power source to pin 1 of the wiper motor.
- Connect the negative terminal of the digital multimeter to pin 4 of the wiper motor. The wiper motor will operate in high speed mode.
Measure the current
Is the reading on the digital multimeter close to 2.2A? If so, proceed to step 3.
If not, INSTALL a new windshield wiper motor.
3. Check the wiper motor in the OFF position
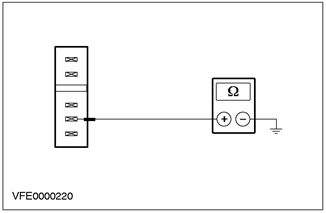
Measure the resistance at the windshield wiper motor, between pin 2 and the wiper motor housing.
Is the resistance less than 2 ohms? If so, proceed to step 4.
If not, GO to step 4 and REPEAT this inspection step (If still not, INSTALL a new windshield wiper motor).
4. Check the OFF POSITION function of the wiper motor.
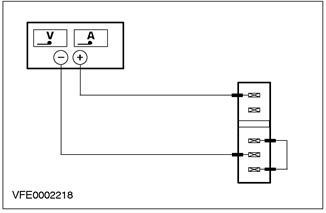
- Connect the positive terminal of the power source to pin 5 of the wiper motor.
- Connect the negative terminal of the power source to pin 2 of the wiper motor.
- Connect the jumper wire to the windshield wiper motor, between pin 1 and pin 3.
Determine the state
Does the wiper motor move to the OFF position?
If yes, the windshield wiper motor is OK.
If not, INSTALL a new windshield wiper motor.
Rear window wiper motor
- Turn off the ignition.
- Disconnect the connector.
- Using the connecting wire, prepare the testing procedure according to the following description.
- Use an external 12V continuous current source capable of handling 10A minimum, or use battery voltage with a fuse.
1. Check the wiper motor in the ON position.
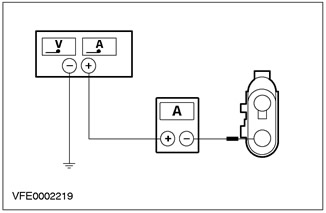
- Connect the positive terminal of the power source to the positive terminal of the digital multimeter.
- Connect the negative terminal of the power source to the wiper motor housing.
- Connect the negative terminal of the digital multimeter to pin 2 of the wiper motor. The wiper motor will operate.
Measure the current
Is the reading on the digital multimeter close to 1.5A? If so, proceed to step 2.
If not, INSTALL a new rear window wiper motor.
2. Check the OFF POSITION function of the wiper motor
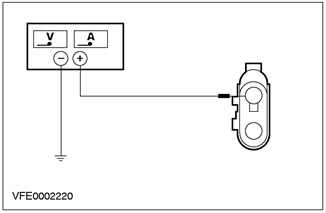
- Connect the positive terminal of the power source to pin 1 of the wiper motor.
- Connect the negative terminal of the power source to the wiper motor housing.
Determine the state
Does the wiper motor move to the OFF position?
If yes, the rear window wiper motor is OK.
If not, INSTALL a new rear window wiper motor.
Relay
- Windshield wiper relay
- Rear Window Wiper Relay
1. Check the relay contact in normal condition (closed position)
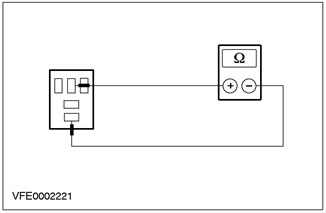
Measure the resistance on the relay between pin 3 and pin 4.
Is the resistance less than 1 ohm? If yes, go to step 2. If no, INSTALL a new relay.
2. Check the relay contact in normal condition (open position)
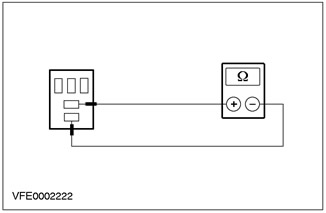
Measure the resistance on the relay between pin 3 and pin 5.
Is the resistance greater than 10 kOhms? If yes, go to step 3. If no, INSTALL a new relay.
3. Check the relay contact in the active state (closed position)
Using the connecting wire, prepare the testing procedure according to the following description.
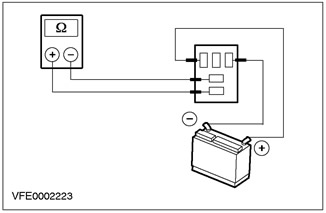
- Connect the positive battery terminal to pin 1 of the relay.
- Connect the negative battery terminal to pin 2 of the relay.
Measure the resistance on the relay between pin 3 and pin 5.
Does the relay switch (with a distinct click) when battery voltage is applied and the resistance is less than 1 ohm?
If yes, the relay is OK. If no, INSTALL a new relay.
Windscreen wiper/washer switch
|
Functions to be tested |
Pins connected to digital multimeter |
Switch position |
Target indicators |
|
INTERMITTENT CLEANING |
6 and 10 |
"in one touch" |
more than 10 kOhm |
|
off |
more than 10 kOhm |
||
|
Intermittent cleaning |
less than 1 Ohm |
||
|
low speed cleaning |
more than 10 kOhm |
||
|
high speed cleaning |
more than 10 kOhm |
||
|
7 and 9 |
"in one touch" |
more than 10 kOhm |
|
|
off |
less than 1 Ohm |
||
|
Intermittent cleaning |
less than 1 Ohm |
||
|
low speed cleaning |
more than 10 kOhm |
||
|
high speed cleaning |
more than 10 kOhm |
||
|
1 and 6 |
"in one touch" |
more than 10 kOhm |
|
|
off |
more than 10 kOhm |
||
|
Intermittent cleaning |
See adjustable intermittent cleaning |
||
|
low speed cleaning |
more than 10 kOhm |
||
|
high speed cleaning |
more than 10 kOhm |
||
|
ADJUSTABLE INTERMITTENT CLEANING |
1 and 10 |
1 |
1 kOhm |
|
2 |
10 kOhm |
||
|
3 |
20 kOhm |
||
|
4 |
30 kOhm |
||
|
5 |
40 kOhm |
||
|
6 |
47 kOhm |
||
|
"IN ONE TOUCH" |
6 and 9 |
"in one touch" |
less than 1 Ohm |
|
off |
more than 10 kOhm |
||
|
Intermittent cleaning |
more than 10 kOhm |
||
|
low speed cleaning |
more than 10 kOhm |
||
|
high speed cleaning |
more than 10 kOhm |
||
|
LOW SPEED CLEANING |
6 and 9 |
"in one touch" |
more than 10 kOhm |
|
off |
more than 10 kOhm |
||
|
Intermittent cleaning |
more than 10 kOhm |
||
|
low speed cleaning |
less than 1 Ohm |
||
|
high speed cleaning |
more than 10 kOhm |
||
|
high speed cleaning |
6 and 8 |
"in one touch" |
more than 10 kOhm |
|
off |
more than 10 kOhm |
||
|
low speed cleaning |
more than 10 kOhm |
||
|
low speed cleaning |
more than 10 kOhm |
||
|
high speed cleaning |
less than 1 Ohm |
||
|
Windshield washer |
2 and 6 |
off |
less than 1 Ohm |
|
Included |
more than 10 kOhm |
||
|
2 and 3 |
off |
more than 10 kOhm |
|
|
Included |
less than 1 Ohm |
||
|
REAR WINDOW WASHER |
3 and 5 |
off |
less than 1 Ohm |
|
rear window cleaner |
more than 10 kOhm |
||
|
rear window washer |
more than 10 kOhm |
||
|
4 and 6 |
off |
less than 1 Ohm |
|
|
rear window cleaner |
less than 1 Ohm |
||
|
rear window washer |
more than 10 kOhm |
||
|
3 and 4 |
off |
more than 10 kOhm |
|
|
rear window cleaner |
more than 10 kOhm |
||
|
rear window washer |
less than 1 Ohm |
||
|
5 and 6 |
off |
more than 1 Ohm |
|
|
rear window cleaner |
less than 1 Ohm |
||
|
rear window washer |
less than 1 Ohm |
(The original source of the publication is on the website FordBook.ru)