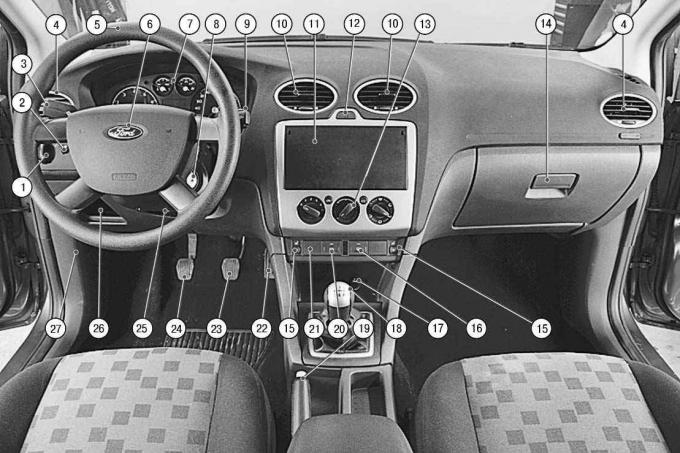
Pic. 1.7. Instrument panel and controls
The instrument panel contains the following controls and gauges (see fig. 1.7).
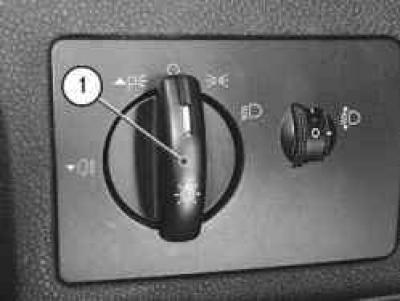
1 - outdoor lighting switch. Turn the knob to select one of the following positions:
0 - outdoor lighting off;
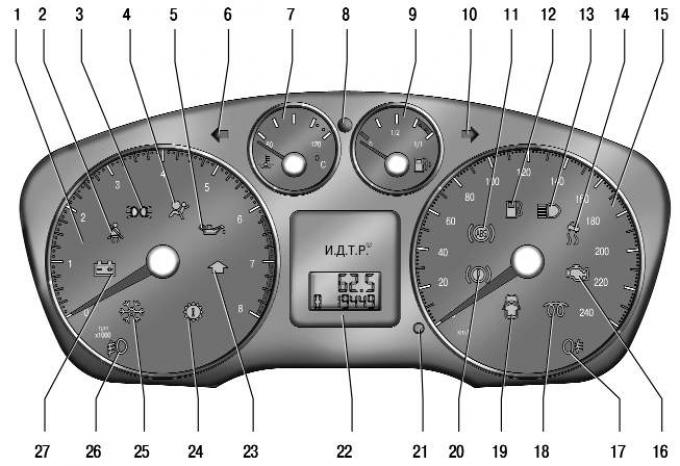
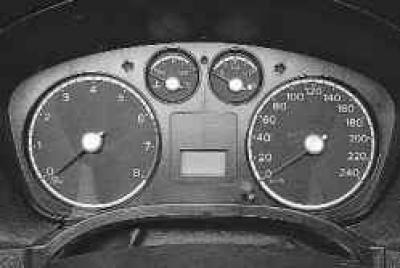
Pic. 1.8. instrument cluster
NOTE: When the side lighting is switched on, the indicator lamp 3 lights up in the instrument cluster (see fig. 1.8).
– the dipped/high beam headlights are on;
NOTE: When the high beam headlights are switched on, the control lamp 13 lights up in the instrument cluster (see fig. 1.8).
AUTO - automatic mode of turning on the dipped headlights depending on the illumination (on vehicles equipped with an automatic dipped-beam system);
NOTE: The ignition must be on for the automatic dipped beam mode to work (The key in the ignition switch must be in position «II»).
NOTE: In AUTO mode, the high beam headlights can only be turned on if the system has turned on the low beam.
NOTE: In AUTO mode, the fog lights and taillight will not turn on. To turn them on, turn the switch knob to theposition
To turn on the rear fog light, turn the switch knob to the
NOTE: When the rear fog lamp is turned on, the indicator lamp 17 lights up in the instrument cluster (see fig. 1.8).
To turn on the fog lights, turn the switch knob to the
NOTE: When the fog lamps are turned on, the indicator lamp 26 lights up in the instrument cluster (see fig. 1.8).
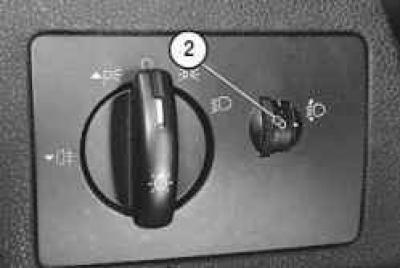
2 - headlight electrocorrector regulator. By turning the knob, depending on the load of the car, the angle of inclination of the headlight beam is changed in such a way as to prevent dazzling of oncoming drivers. Alignment of the mark on the regulator knob and the number on the scale ensures the appropriate adjustment of the position of the headlights for the following vehicle loading options:
0 - one driver or driver and passenger in the front seat;
1 - all seats are occupied;
2 - one driver and cargo in the trunk;
3 - all seats are occupied and cargo is in the trunk;
4 - all seats are occupied, cargo is in the trunk, the car is operated with a trailer.
NOTE: When operating a vehicle with a trailer, it may be necessary to turn the electrocorrector control one position more (for example, instead of pos. 2 set pos. 3).
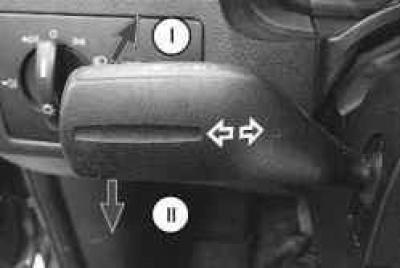
3 – the lever of the switch of external illumination and indexes of turn. The switch lever can take the following positions:
I - right turn indicators are on (fixed position);
II - left turn indicators are on (fixed position).
When moving the lever to the position «I» or «II» indicator lamp 10 or 6 flashes in the instrument cluster (see fig. 1.8). When the steering wheel is returned to the straight-ahead position, the lever automatically returns to its original position. When changing lanes, to turn on the turn signal, simply push the lever in the direction of the position «I» or «II» only until the moment of tangible resistance, without fixing the lever, and release. The direction indicators in this case will flash three times.
To switch between high and low beam headlights (outdoor lighting switch knob 1, shown in fig. 1.7 must be in position) move the switch lever toward the handlebar two positions and release.
NOTE: When the main beam is switched on, the control lamp 13 lights up in the instrument cluster (see fig. 1.8).
To signal high beam headlights, move the switch lever one position towards the steering wheel (outdoor lighting switch knob 1, shown in fig. 1.7 must be in position) and let go.
NOTE: When the main beam is switched on, the control lamp 13 lights up in the instrument cluster (see fig. 1.8).
If, with the ignition off, move the switch lever one position to the steering wheel and release it, the headlights off delay function is activated: the dipped headlights will turn on, which will turn off 30 minutes after the last door is closed. To turn off the headlights, move the switch lever one position toward the steering wheel and release it again.
NOTE: If the switch (lock) ignition is in position «0» or «I», when the exterior lights are on, when the driver's door is opened, a buzzer will sound to remind you to turn off the lights.
Depending on the equipment, the lever may also have a SET/RESET button and a MENU switch. Turning the MENU switch selects the desired on-board computer menu screens or settings, and the SET/RESET button is used to enter submenus or adjust settings.

4 - side nozzles of the ventilation and interior heating system. Designed to direct the flow of air from the heater, air conditioner or ventilation system. The direction of the air flow is changed by moving the handle a, installed in the center of the nozzle, to the right or left or by turning it up and down. A handle b is installed under the grate to adjust the amount of air supplied through the nozzle. When the handle is turned all the way to the left, the damper closes completely, blocking the air flow. When the handle is turned all the way to the right, the damper opens completely (maximum air flow).
5 - steering wheel.
6 - key for turning on the sound signal. To give a sound signal, press the button to turn it on.
7 - a combination of devices (cm. «instrument cluster»).
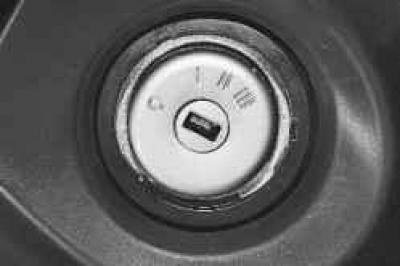
8 - switch (lock) ignition, integrated with the anti-theft device, is located on the right side of the steering column. The key in the lock can occupy one of four positions:
– 0 (blocking) – the ignition is off, with the key removed, the anti-theft device is turned on.
To ensure that the steering shaft is locked, turn the steering wheel to the right or left until it clicks.
To turn off the anti-theft device, insert the key into the ignition switch and, while slightly turning the steering wheel to the right and left, turn the key to position «I»;
WARNING: Do not turn off the ignition or remove the key from the lock while driving: the steering will be locked and the car will become uncontrollable.
– I (optional equipment) – the ignition is off, the key cannot be removed, the steering is unlocked. The power supply circuits for the sound signal, outdoor lighting, high-beam headlights, radio equipment, cigarette lighter, etc. are turned on;
– II (included) – the ignition is on, the key cannot be removed, the steering is unlocked. Ignition, instruments and all electrical circuits are on;
– III (starter) – the ignition and starter are on, the key cannot be removed, the steering is unlocked. This position of the key is not fixed; when released, the key returns to the position under the action of the spring force «II».
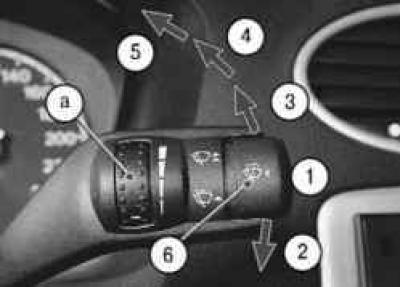
9 - switch lever of the cleaner and washer of the windshield and glass of the tailgate (on cars with station wagon and hatchback bodies) turns on electrical circuits when the ignition is on.
The lever can be moved to the following positions:
1 - wiper off;
2 - wiper blades will make one cycle;
3 - intermittent wiper operation is enabled. The delay time between cycles is regulated by the rotary switch a: the lowest position is the minimum interval between cycles, the highest position is the maximum;
NOTE: Depending on equipment, the intermittent wiper may be replaced with an automatic wiper. In this case, moving the selector lever to position 2 activates automatic mode. In this case, handle a regulates the sensitivity of the rain sensor: the lowest position - high sensitivity (the brushes will turn on when there is a small amount of water on the windshield), highest position - low sensitivity (the wipers will turn on when a large amount of water is detected on the windshield).
NOTE: Vehicles may be equipped with a windshield wiper that has a pause between cycles in intermittent operation based on vehicle speed. When the vehicle slows down or comes to a stop, the delay between wiper cycles increases by one step. When the vehicle speed increases, the delay time returns to the settings set by the driver. Moving the lever while the wiper is operating will turn it off. If the vehicle speed is greatly reduced or the vehicle comes to a stop, the system is reactivated.
4 - the first one is on (low) wiper speed;
5 - the second one is on (high) wiper speed;
6 - button for turning on the washer. When you press the button along with the washer, the wiper will automatically turn on, the brushes of which will perform several work cycles after the button is released.
NOTE: If the vehicle is equipped with a headlight washer, pressing the button while the headlights are on will also turn on the headlight washer.
When the lever is moved one position towards the steering wheel, the tailgate glass cleaner is activated.
NOTE: The tailgate glass wiper turns on automatically (depends on configuration) when reversing when the wiper lever is in position 2, 3, 4 or 5.
When moving the lever to the steering wheel by two positions, the tailgate glass washer is switched on.
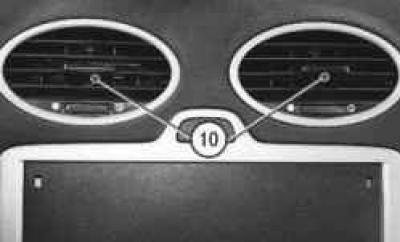
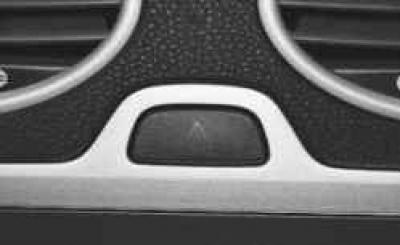
10 - central heater nozzles.
11 - a place to install the radio.
12 - alarm switch.
NOTE: The alarm works in any position of the key in the switch (castle) ignition.
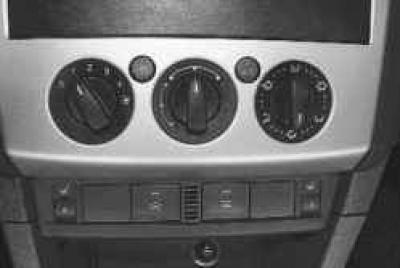
13 - heating system control unit (conditioning) and interior ventilation, cm. «Heating (conditioning) and interior ventilation».
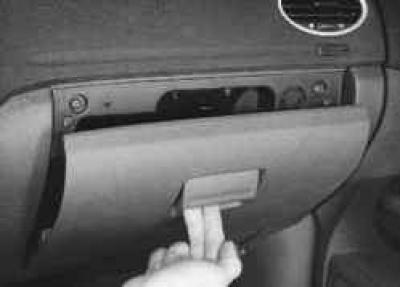
14 - glove box. Serves for storing small things and opens when you press the lock handle up.
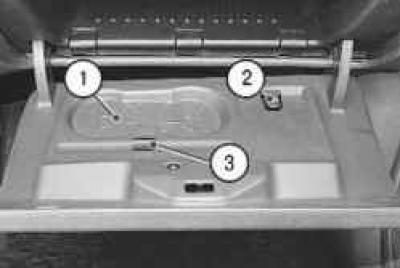
On the inside of the lid are cupholders 1, paper clip 2 and pen clip 3.
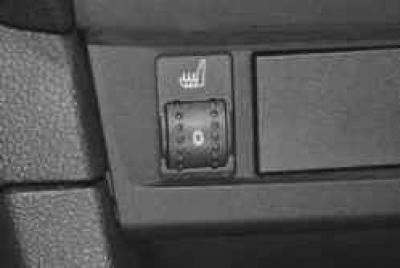
15 - front seat heating controls (left - driver, right - passenger). The seat heating can only be switched on when the ignition is on (position «II»). When the regulator is set to «0», electric heating off. Pregnant «3» the maximum heating is switched on to quickly warm up the seats in the cold season. Intermediate positions determine the different intensity of heating.
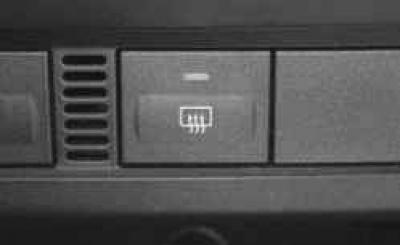
16 - rear window electric heating switch.
By pressing the button (The key in the ignition switch must be in position «II») the rear window heating is switched on, at the same time the control lamp in the button lights up. Pressing the button again turns off the heating.
WARNING: The heating element draws a very high current. Therefore, to avoid excessive discharge of the battery, turn on the electric defrost when the engine is running and only for the time necessary to defog the rear window.
WARNING: To avoid damaging the heater filaments, do not use scrapers or other sharp objects, or detergents with abrasive substances to clean the inside of the rear window.
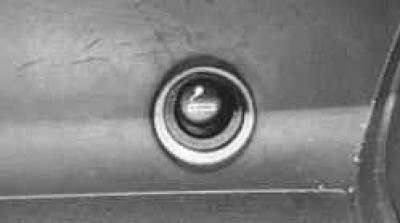
17 - cigarette lighter.
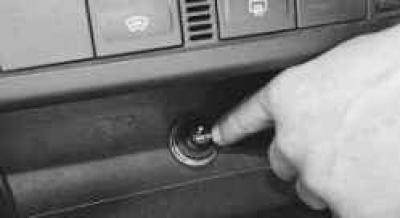
To use the cigarette lighter, press the button on its moving part (ignition key in position «I» or «II»). After heating the spiral for 10–20 s, the movable part will automatically return to its original position with a click.
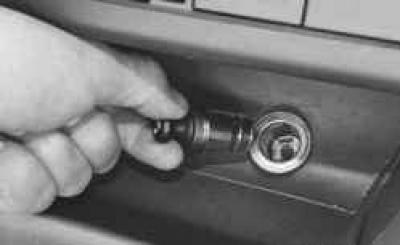
After that, remove the cigarette lighter for use.
WARNING: The cigarette lighter can be turned on again after 20 seconds at the earliest.
WARNING: Do not forcefully press the cigarette lighter.
WARNING: Do not use the cigarette lighter socket to connect powerful electrical appliances (electric coffee maker, etc.) – this may cause damage to the electrical equipment of the vehicle.
WARNING: If the cigarette lighter button does not return to its original position after 30 seconds after switching on, remove the cigarette lighter from the cartridge to prevent the coil from burning out.
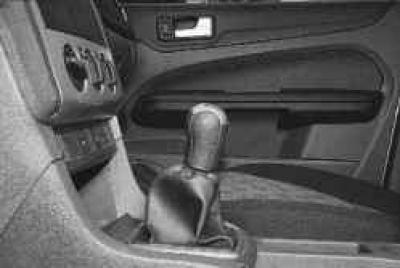
18 - gearbox control lever (cm. «Gearbox control»).
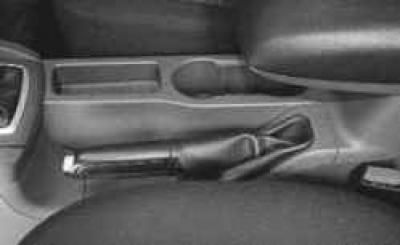
19 - parking brake lever.
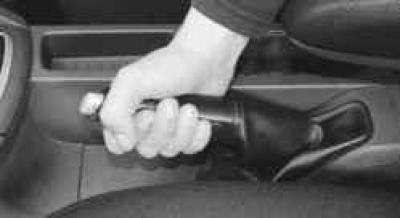
In order to slow down the car with a parking brake, lift the lever all the way up - the control lamp in the instrument cluster will light up in red.
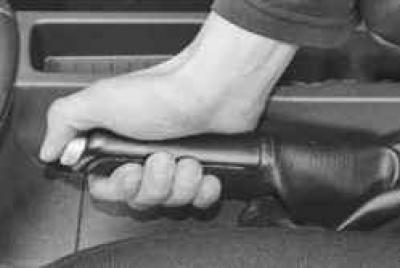
In order to brake the car, pull the lever up a little, press the button at the end of the lever handle and lower the lever all the way down - the control lamp should go out.

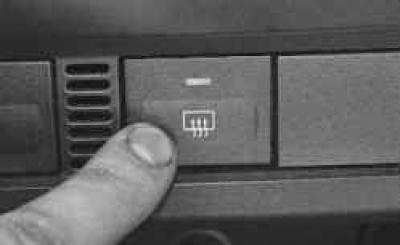
20 – the switch of an electric heating of a windshield. By pressing the button (the engine must be running) the heating of the windshield and washer jets is turned on, at the same time the control lamp in the button lights up. Pressing the button again turns off the heating. Also, the electric heating switches off automatically after a short period of time.
21 - ESP dynamic stabilization system switch (if available).
22 - accelerator pedal.
23 - brake pedal.
24 - clutch pedal.
25 - steering column lock lever (cm. «Steering wheel adjustment»).
26 - shelf for small items.

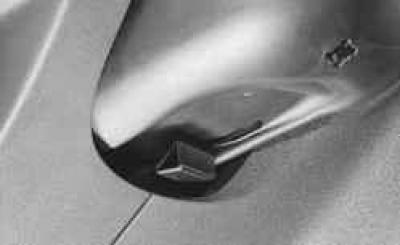
27 - button for emergency shutdown of fuel supply (on vehicles with petrol engines).
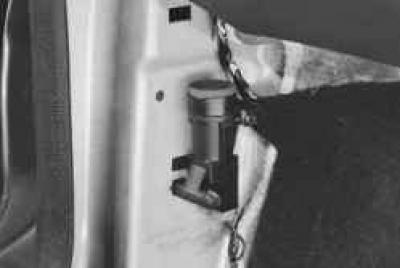
NOTE: This is what the emergency fuel shutoff button looks like (body side trim removed for clarity).
Visitor comments