Contents: Removal ↳ Installation ↳
Engine mount holders
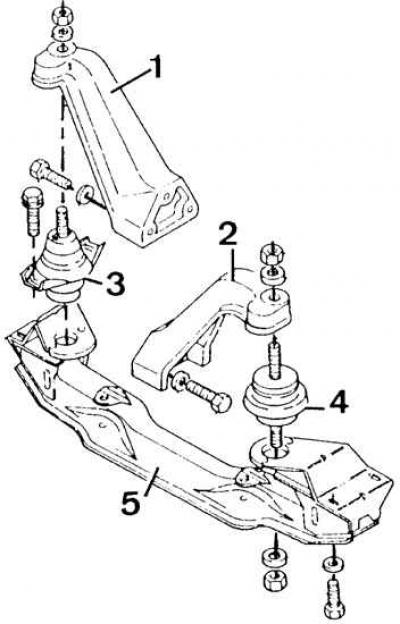
1 – right holder, 2 – left holder, 3 – right metal-rubber connector, 4 – left metal-rubber connector, 5 – engine mount crossmember
Removal
1. Disconnect and remove the battery. Remove the hood.
2. Remove the air filter and plug the air inlet of the intake manifold.
3. Drain the coolant from the cooling system (see subsection 4.2.11.5.1) and remove the radiator together with the holder.
4. Disconnect the vehicle's interior heater lines.
5. Disconnect the fuel hoses.
6. Disconnect the electrical wires from the engine.
7. Disconnect the front exhaust pipe from the exhaust manifold.
8. Remove the auxiliary power steering pump without disconnecting the lines from it and hang it from the fender.
9. Disconnect the accelerator pedal cable from the fuel pump.
10. Remove the starter.
11. Unscrew the bolts securing the suspension holders from the engine and support the valve timing system under the clutch housing.
12. Unscrew the bolts connecting the engine to the gearbox.
13. Attach the cable to the lifting brackets at the front and rear of the cylinder head.
14. Using a hoist, move the engine forward and disconnect it from the transmission, then lift the engine up and remove it from the vehicle's engine bay.
Installation
1. Install the engine in the engine compartment and check that it is correctly installed relative to the gearbox.
2. Tighten the engine to gearbox bolts and then the engine mount bolts.
3. Connect the cooling system hoses and fill it with the appropriate fluid.
4. Connect the accelerator pedal cable to the fuel pump and adjust its tension.
5. Connect the fuel hoses and bleed air from the fuel system.
6. Install and connect the battery; install the air filter and hood.
7. Start the engine and check its operation.
(The original version can be found on the website: www.fordbook.ru)