Valve arrangement
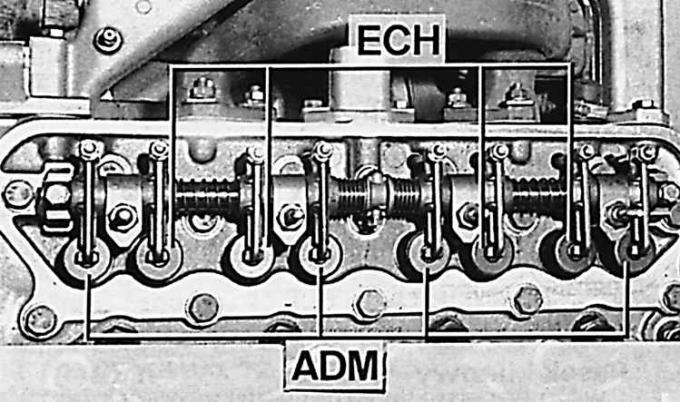
ADM – intake valves, ESN – exhaust valves
The valve clearance should be checked and, if necessary, adjusted on a cold engine after it has been off for about four hours. It is recommended to perform these procedures every 20,000 km of the vehicle's mileage, but not less often than once every two years.
1. Disconnect the ground cable from the battery.
2. Remove the air filter.
3. Unscrew the four nuts securing the cylinder head cover and remove the cover.
4. Adjust the valve clearance in the sequence shown in the table after turning the crankshaft so that the exhaust valves are in order as fully open as possible.
Attention! The working valve clearance (measured on a cold engine) is: 0.30 mm for the intake valve and 0.35 mm for the exhaust valve.
5. To adjust the valve clearance, loosen the lock nut of the adjusting bolt of the corresponding valve lever while holding the adjusting bolt with a screwdriver, and then turn the adjusting bolt until a feeler gauge plate of the appropriate thickness fits tightly between the end of the lever and the head of the valve stem. In this position, tighten the lock nut of the adjusting bolt while holding this bolt with a screwdriver.
6. Install the cylinder head cover and air filter.
7. Connect the ground wire to the battery.
Valve clearance adjustment sequence
| Maximum opening of the exhaust valve | Adjusting the intake valve clearance | Adjusting the exhaust valve clearance |
| 1st cylinder | 3rd cylinder | 4th cylinder |
| 3rd cylinder | 4th cylinder | 2nd cylinder |
| 4th cylinder | 2nd cylinder | 1st cylinder |
| 2nd cylinder | 1st cylinder | 3rd cylinder |
Attention! The first cylinder is located on the flywheel side.