Tensioner
Note: On models prior to 05.1998, please note that if the belt needs to be removed for the first time since the vehicle left the factory, a tensioner spring and locking pin must be purchased to install at assembly.
Withdrawal
1. To access the tensioner, just remove the top and middle covers (paragraph 9). In this case, the procedure described below must be performed in order to correctly restore the timing setting after changing the belt tension.
2. Loosen belt tension (paragraph 10, paragraph 1-14).
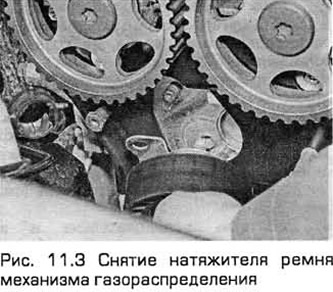
3. Turn out a bolt of a tensioner and pull out a tensioner, having released a spring (if available) (see fig. 11.3). Check tensioner and spring (paragraph 10, item 16).
Installation
4. Installation (if it is done for the first time) screw the tensioner spring lock pin into the head of the block and tighten it to the required torque. Hook the spring onto the pin and back cover of the tensioner. Then install the tensioner by connecting its back cover to the ledge. Insert the hex wrench into the center of the tensioner and turn it clockwise as far to the side as possible to eliminate the spring force. Then tighten the bolt to fix the tensioner.
5. On release models from 05.1998, hook the tensioner onto the metal cover and insert the bolt.
6. Install by checking the position of the camshafts and the tension of the belt (paragraph 10).
Toothed pulleys for crankshafts and camshafts
Withdrawal
7. Any of these pulleys can be removed once the respective covers have been removed. However, immediately after changing the belt tension, it is necessary to complete the procedure (described in paragraph 10) removing/installing the belt to restore the timing.
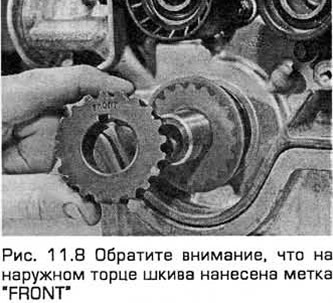
8. When the belt is removed, the camshaft pulleys can be disconnected by unscrewing their bolts (see paragraph 10). The crankshaft toothed pulley can be removed from the end of the shaft after removing the toothed belt and accessory drive pulley. Note that on the end of the pulley, closest to the end of the shaft, there is a mark "FRONT", and behind the pulley is a thrust washer. Remember which side this washer is installed (see fig. 11.8). Pay attention to the segment key. If it is loose, then it must be removed and stored with the pulley.
9. Check the pulleys as indicated in item 16 paragraph 10.
Installation
10. Installation - in the reverse order of removal.
Toothed belt guide pulleys
Withdrawal
11. Remove timing belt covers (paragraph 9).
12. Turn out bolts and remove pulleys. Check their status (paragraph 10).
Installation
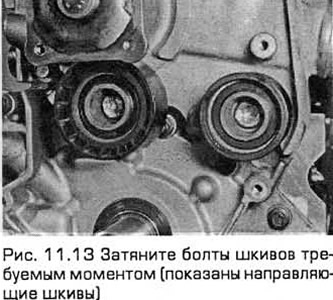
13. Installation - in the reverse order of removal. Torque pulley bolts (see fig. 11.13).
Visitor comments