Applying the information in this chapter
1. The chapter describes the repair procedures that are performed on the engine installed in the car, and contains only the technical requirements corresponding to these procedures. Since these procedures are performed on the engine installed in the vehicle, when the engine is removed from the vehicle and mounted on a stand, some of the previous removal steps must be skipped.
2. Information related to engine/transmission removal and installation and engine repair can be found in chapter 2B. It also contains technical requirements related to these procedures.
General description of the engine
3. Engine, also known as "ZETEK", and earlier "ZETA" (used internally by Ford) - four-cylinder in-line, mounted transversely in front of the car. Wherein (grip and) transmission located on the left side of the engine (see fig. 1.3. a,b).
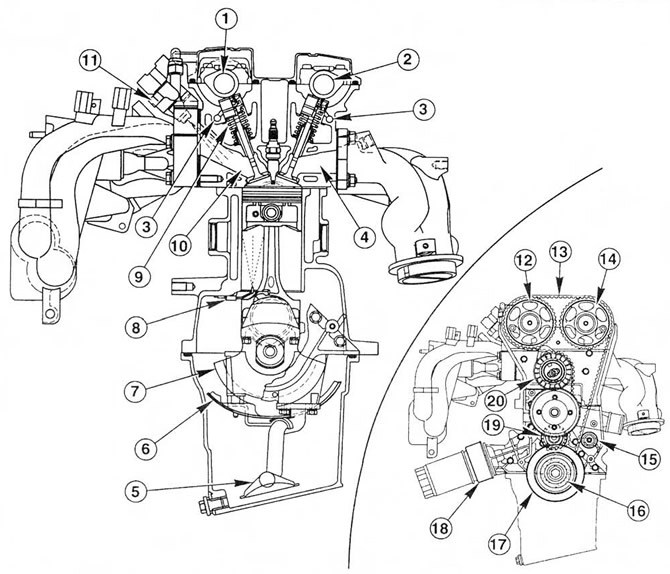 Pic. 1.3, a. Cross section of the engine (The figure on the right shows the components of a toothed belt drive mechanism.
1. Intake camshaft 9 Exhaust camshaft
2. Oil lines
4. Exhaust tract
5. Strainer and oil pickup pipe
6. Oil deflector
7. Crankshaft
8. Nozzle (in the presence of) cooling the piston crown with oil splashes
9. Inlet valve
10. Inlet tract
11. Fuel injector
12. Intake camshaft sprocket
13. Timing belt of the timing mechanism
14. Toothed pulley of the exhaust camshaft
15. Guide pulley (front) timing belt timing mechanism
16. Crankshaft pulley - rear
17. Crankshaft pulley (accessory drives)
18. Oil cooler (in the presence of)
19. Guide pulley (rear) timing belt timing mechanism
20. Timing belt tensioner
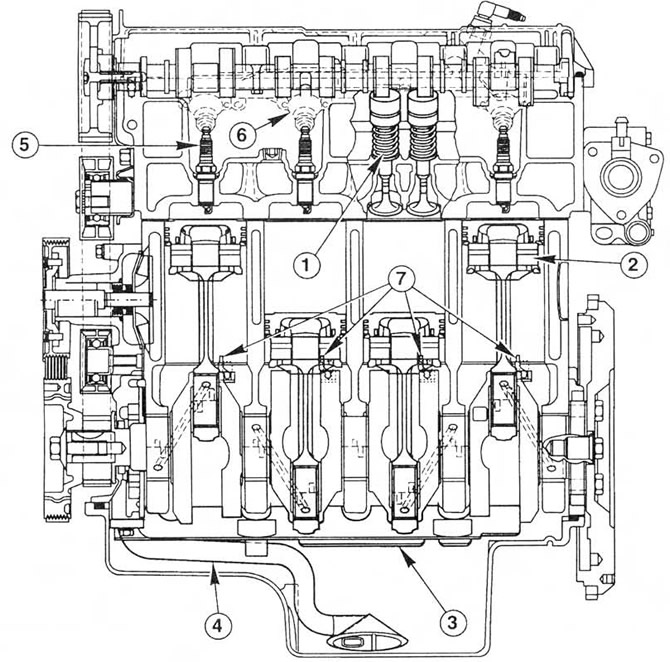 Pic. 1.3, b. Longitudinal section of the engine
1. Exhaust valve
2. Piston
3. Oil deflector
4. Strainer and oil pickup pipe
5. Spark plug
6. Fuel injector
7. Nozzles (in the presence of) cooling the piston crown with oil splashes
4. With the exception of the plastic timing belt covers and the forged steel block/crankcase, all major engine castings are made of aluminum alloy.
5. The crankshaft is supported by 5 main bearings. The upper shell of the central main bearing contains thrust washers for absorbing axial forces and providing axial play of the crankshaft. The connecting rods are mounted on liners with a horizontal split of the lower heads. The pistons are connected to the connecting rods with pins installed with an interference fit in the lugs of the small heads of the connecting rods. Pistons made of aluminum alloy have three rings: two compression rings and one oil scraper. During the manufacturing process, the cylinders and piston skirts are measured and divided into three sizes. This is necessary to ensure the necessary clearance between the piston and the cylinder. Repair dimensions for subsequent regrinding are not provided.
6. The intake and exhaust valves are closed by the action of helical springs. The valves are mounted in guides that are pressed into the head of the block in the same way as the valve seat inserts.
7. Two camshafts are driven from one toothed belt. Each of these shafts actuates eight valves through self-adjusting hydraulic lifters. This eliminates the need to monitor and adjust valve clearances. Each camshaft is supported by five bearings, which are formed by joint boring of the block head and bearing caps (bolted). Therefore, covers are not supplied separately from the block head and it is also impossible to use covers from another engine.
8. The cooling system pump is bolted to the right end of the cylinder block and is located inside the timing belt. This pump, as well as the power steering pump and alternator, are driven by a multi V-groove flat belt from the crankshaft pulley.
9. When servicing the motor, be aware that it has many fasteners that require a slotted or hex wrench. In order not to damage the fasteners when unscrewing and during installation, securely tighten them to the required torque, you will also need a set of spline sockets with adapters.
Lubrication system - general description
10. Lubrication is carried out using a pump that is installed on the right end of the crankshaft. This pump draws oil through a strainer located in the sump and delivers oil through a cassette type full flow filter mounted outside the engine. Some engines have an oil cooler mounted on the oil filter support and thus the clean oil entering the engine passages is cooled by the main engine cooling system. From the filter, oil enters the line of the cylinder block / crankcase and then through the channels to the main bearings of the crankshaft and to the head of the block (see fig. 1.10).
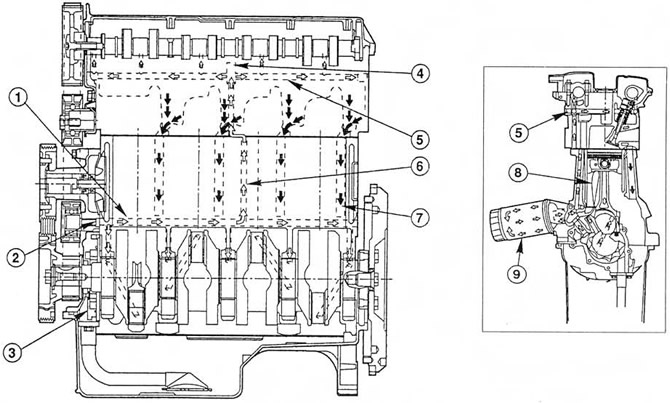 Pic. 1.10 Engine lubrication system - (the picture on the right shows a cross section)
1. Main oil line
2. From the oil filter
3. Oil pump
4. 6 lok head lubrication system valve
5. Oil line of the block head
6. Oil supply to the block head
7. Oil drain
8. Nozzle jet (in the presence of) cooling the piston crown with oil splashes
9. Oil filter (oil cooler not shown)
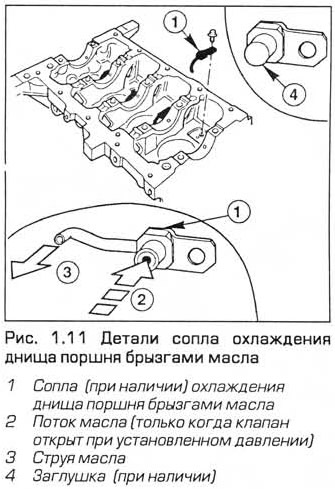
11. Oil enters the connecting rod bearings through drillings inside the crankshaft. On engines of some variants, the bottom of each piston is cooled by a jet of oil falling under the bottom from a nozzle. Oil enters these nozzles through the channels of the crankshaft. Oil is supplied to the nozzles through spring-loaded valves that open only when there is sufficient pressure to reliably lubricate other engine components. If such nozzles are not installed on the engine, they are replaced by plugs. Thus, the channels are closed, but they can be cleaned during repairs (see fig. 1.11).
12. The cylinder head has two oil lines (one on the intake side and the other on the exhaust side) for continuous oil supply of camshaft bearings and hydraulic gap compensators. A valve mounted on the top surface of the head in the middle of the exhaust valves prevents oil from flowing out of these lines when the engine is turned off. The valve contains a vent located in the upper end to release air bubbles from the system when the engine restarts.
13. When oil pressure is applied to the crankshaft bearings, camshaft bearings, and hydraulic lifters, the camshaft cams and valves are splash lubricated, as are all other engine components.
Valve clearances - general information
14. The clearance between the valve face and the valve mechanism is necessary to compensate for the expansion of various engine components when it is heated to normal operating temperature.
15. On older engines, it was necessary to regularly check and adjust valve clearances.
16. The engines described in this book are equipped with hydraulic lifters, which work under the pressure of the lubrication system and allow you to automatically compensate for the gap between the camshaft cam and the corresponding valve stem. Therefore, adjustment and checking of valve clearances is not required. At the same time, only high-quality oils of a regulated viscosity that meet technical requirements must be used in the engine, and the oil must be changed in accordance with the maintenance schedule. If these instructions are violated, oil channels and hydraulic lifters may become clogged with dirt or deposits of burnt oil particles. As a result, the performance of the system is reduced. In the worst case, one or more expansion joints may fail, requiring costly repairs,
17. When starting a cold engine, oil is supplied to all engine components and especially to hydraulic lifters with a slight delay. Therefore, valve components may knock for some time (about 10 sec), after which the noise disappears. This is normal and should not cause concern.
18. If the car has been sitting for several days, then the valve components may knock for a little longer than usual, as oil drains from the components and bearings located at the top of the engine. In this case, in order not to damage the engine, you should not work at high speeds until all expansion joints are filled with oil and begin to work normally. When the vehicle is stationary, maintain high idle (maximum 2000-2500 rpm) for 10-15 seconds, or until the noise disappears. Do not operate above 3000 rpm until the expansion joints are filled with oil and the noise disappears.
19. If you suspect valve train knocking, or if a slight knock coming from the top of the engine does not go away after warming it up to normal operating temperature, contact your dealers. Depending on the mileage as well as the conditions of use, the vehicle may make more or less noise than other similar vehicles. Only an experienced auto mechanic with knowledge of such engines can determine if the noise level is normal for a car with the appropriate mileage or if there is a malfunction. If the compensators are defective, they must be replaced (paragraph 13).
Visitor comments