Contents: Right cuff ↳ Left cuff ↳
Note: Do not attempt to remove these seals unless you have removed the oil pump or seal housing. as they are too soft and access is limited. To avoid damaging the seal housing and/or crankshaft journal, follow these instructions.
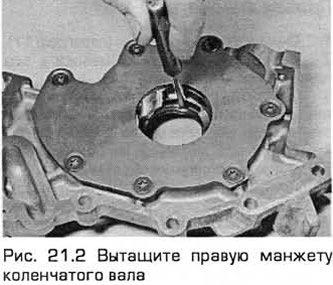
Right cuff
1. Remove the oil pump (paragraph 17).
2. Pull the cuff out of the pump from its rear side (see Fig. 21.2).
3. Clean the seal housing and crankshaft, removing any burrs or sharp edges that could cause the seal to fail.
4. Install the oil pump (paragraph 17). Lubricate the edges of the new cuff.
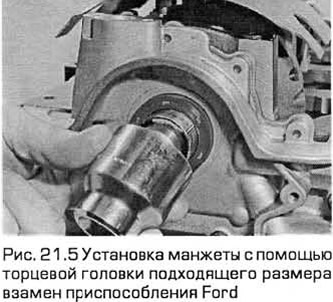
5. To seat the seal in place, it is recommended to use the device (Ford 21-093A) together with the crankshaft pulley bolt. Another option is to take a bushing of the appropriate size, as well as a washer and a crankshaft pulley bolt (see Fig. 21.5).
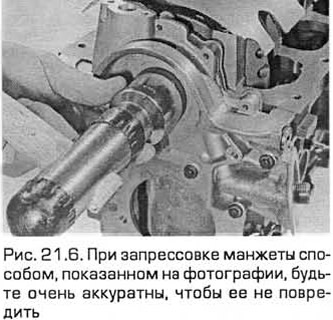
6. If you do not have such tools at hand, press the cuff into place by hand. Drive the cuff flush with the pump body using a soft-faced hammer and a bushing of slightly smaller diameter than the cuff, which should be supported on its outer diameter (see Fig. 21.6). Be careful when pressing the cuff without distorting it and do not damage it.
7. Wash off the remaining oil. The remaining operations are in the reverse order of removal. Check for oil leaks immediately after starting the engine.
Left cuff
8. Remove the transmission (relevant part of Chapter 7).
9. Where necessary, remove the clutch (Chapter 8).
10. Remove the flywheel/faceplate bolts (paragraph 22).
11. Remove the tray (paragraph 16).
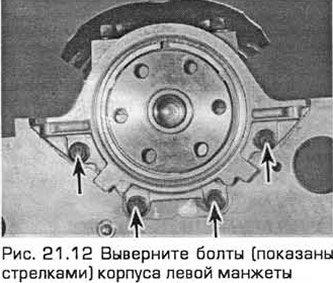
12. Unscrew the bolts of the cuff housing (see Fig. 21.12). Remove and discard the gasket.
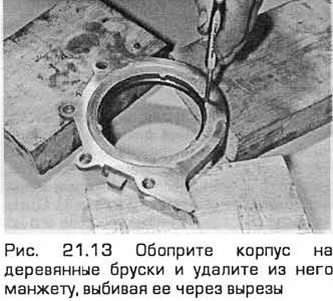
13. Support the body on wooden blocks and knock out the cuff from the back side (see Fig. 21.13).
14. Clean the seal housing and crankshaft from burrs and sharp edges that could cause seal failure. Also clean the mating surfaces of the cylinder block/crankcase and the seal housing with a scraper to remove any old gasket residue. Do not scratch or damage the material being cleaned. After cleaning, degrease these surfaces with a solvent.
15. Using thick grease, stick the new gasket to the cylinder block/crankcase. Then move the cuff body to the installation location (see Fig. 21.15).

16. Using a ruler and feeler gauges, make sure that the housing is precisely centered relative to the crankshaft and installed without distortions so that its joint surface is below (at a distance of 0.3...0.8 mm) the joint surface of the cylinder block/crankcase. This distance should be the same on each side of the crankshaft. Without moving the gasket, move the housing to the required position and tighten its bolts to the required torque (see Fig. 21.16).

17. Make sure that the housing is installed correctly. If necessary, unscrew its bolts again and repeat the entire procedure to install the housing in the required position.
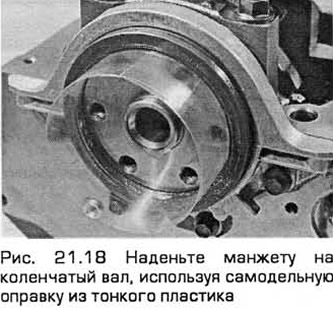
18. When installing the seal, it is recommended to use a tool (Ford 21-141) and two flywheel mounting bolts to press the seal into place. Another option is to make a guide from thin plastic or something similar. Then lubricate the edges of the new seal and the crankshaft shoulder with grease and insert the seal over the plastic guide onto the crankshaft shoulder (see Fig. 21.18). Use your hand to press the seal evenly into the housing. Use a soft-faced hammer to drive the seal flush with the housing.
19. Wipe off any remaining oil or grease. The remaining operations are performed in the reverse order of removal. After starting the engine, check for oil leaks.