Contents: Digital watch ↳ Fuel Computer (Early Version) (3) ↳ Fuel Computer/Multifunction Clock… ↳ Multifunctional watch ↳ Fuel computer ↳ Tachometer (4) ↳ Direction indicator lights (5) ↳ Speedometer (6) ↳ Total kilometer counter (7) ↳ Fuel gauge (8) ↳ Coolant temperature gauge (9) ↳ Fuel reserve indicator lamp (11) ↳ Display (12) ↳ Heating and ventilation system (13) ↳ Rear window defroster (14) ↳ Windscreen heater (15) ↳ Automatic cruise control indicator… ↳ High beam indicator lamp (22) ↳ Coolant level indicator lamp (23) ↳ Windscreen washer fluid level… ↳ Automatic vehicle speed control… ↳ Battery Charging Indicator Light (29) ↳ Oil pressure indicator light (30) ↳ Handbrake and very low brake fluid… ↳ Headlight corrector with manual… ↳ Brake pad wear indicator light (33) ↳ Anti-lock Brake System (ABS) Warning… ↳ Instrument illumination level… ↳ Outdoor Light Switch (36) ↳ Glow plug indicator (40) ↳ Airbag (41) ↳
Instrument cluster (early version - full)
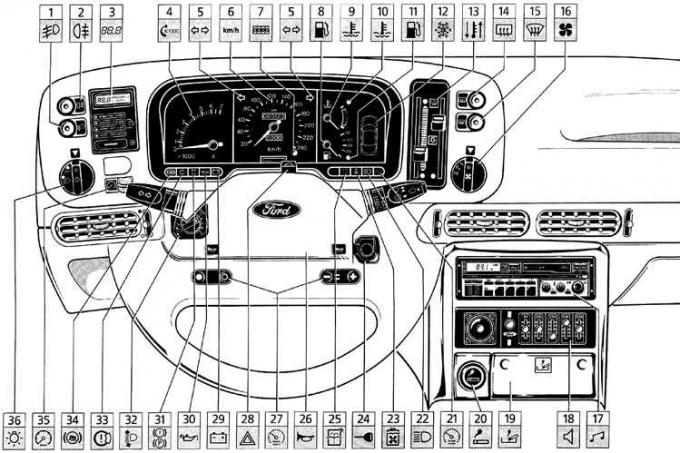
1 – front fog lights; 2 – rear fog lights; 3 – fuel computer; 4 – tachometer; 5 – direction indicator; 6 – speedometer; 7 – mileage counter and reset button for daily mileage counter; 8 – fuel level indicator; 9 – temperature indicator; 10 – Overheating indicator lamp; 11 – Fuel reserve indicator lamp; 12 – display; 13 – Temperature and air distribution control; 14 – rear window heater; 15 – front glass heater; 16 – Fan control handle; 17 – radio receiver; 18 – amplifier; 19 – ashtray; 20 – cigarette lighter; 21 – Automatic cruise control indicator lamp; 22 – High beam indicator lamp; 23 – Coolant level indicator lamp; 24 – ignition switch; 25 – Windscreen washer fluid level indicator light; 26 – sound signal; 27 – Automatic cruise control; 28 – turning on the hazard warning lights; 29 – Battery charging indicator light; 30 – Oil pressure indicator light; 31 – Handbrake and very low brake fluid level indicator light; 32 – headlight corrector; 33 – brake pad wear indicator lamp; 34 – ABS warning light; 35 – Instrument panel backlight control; 36 – External lighting switch
Instrument cluster (early version)
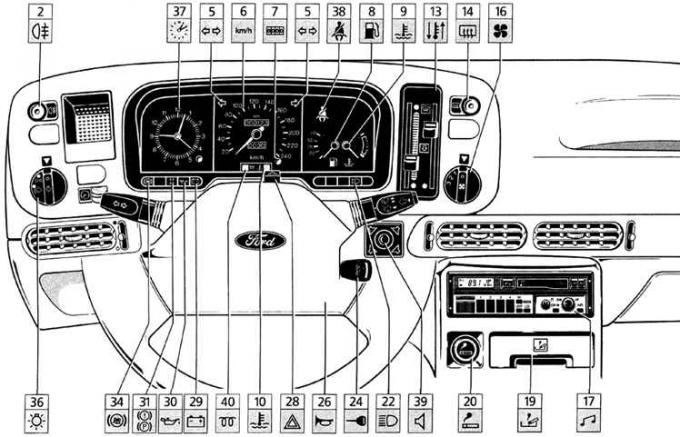
2 – rear fog lights; 5 – direction indicator; 6 – speedometer; 7 – mileage counter and reset button for daily mileage counter; 8 – fuel level indicator; 9 – temperature indicator; 13 – Temperature and air distribution control; 14 – rear window heater; 16 – Fan control handle; 17 – radio receiver; 19 – ashtray; 20 – cigarette lighter; 22 – High beam indicator lamp; 24 – ignition switch; 26 – sound signal; 28 – turning on the hazard warning lights; 29 – Battery charging indicator light; 30 – Oil pressure indicator light; 31 – Handbrake and very low brake fluid level indicator light; 34 – ABS warning light; 36 – External lighting switch; 37 – hours; 38 – Seat belt indicator; 39 – sound distributor; 40 – glow plug indicator
Instrument cluster (later version – full)

3 – fuel computer; 4 – tachometer; 5 – direction indicator; 6 – speedometer; 7 – mileage counter and reset button for daily mileage counter; 8 – fuel level indicator; 9 – temperature indicator; 12 – display; 13 – Temperature and air distribution control; 14 – rear window heater; 15 – front glass heater; 16 – Fan control handle; 18 – radio receiver; 19 – ashtray; 20 – cigarette lighter; 21 – Automatic cruise control indicator lamp; 22 – High beam indicator lamp; 23 – Coolant level indicator lamp; 24 – ignition switch; 25 – Windscreen washer fluid level indicator light; 26 – sound signal; 27 – Automatic cruise control; 28 – turning on the hazard warning lights; 29 – Battery charging indicator light; 30 – Oil pressure indicator light; 31 – Handbrake and very low brake fluid level indicator light; 32 – headlight corrector; 33 – brake pad wear indicator lamp; 34 – ABS warning light; 35 – Instrument panel backlight control; 36 – External lighting and fog lamp switch; 41 – Airbag indicator
Instrument cluster (early version - full)
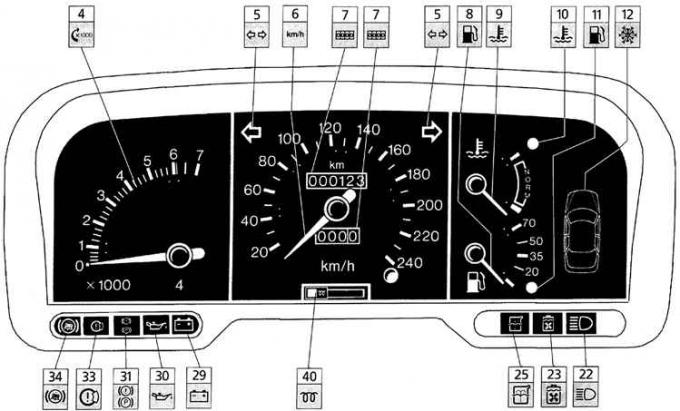
4 – tachometer; 5 – direction indicator; 6 – speedometer; 7 – mileage counter and reset button for daily mileage counter; 8 – fuel level indicator; 9 – temperature indicator; 11 – Fuel reserve indicator lamp; 12 – display; 22 – High beam indicator lamp; 23 – Coolant level indicator lamp; 25 – Windscreen washer fluid level indicator light; 29 – Battery charging indicator light; 30 – Oil pressure indicator light; 31 – Handbrake and very low brake fluid level indicator light; 33 – brake pad wear indicator lamp; 34 – ABS warning light; 40 – glow plug indicator
Instrument cluster (early version)
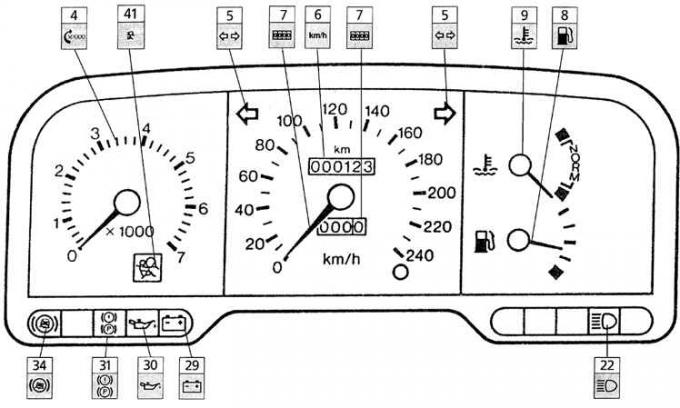
4 – tachometer; 5 – direction indicator; 6 – speedometer; 7 – mileage counter and reset button for daily mileage counter; 8 – fuel level indicator; 9 – temperature indicator; 22 – High beam indicator lamp; 29 – Battery charging indicator light; 30 – Oil pressure indicator light; 31 – Handbrake and very low brake fluid level indicator light; 34 – ABS warning light; 41 – Airbag indicator
Instrument cluster (late version – full)

4 – tachometer; 5 – direction indicator; 6 – speedometer; 7 – mileage counter and reset button for daily mileage counter; 8 – fuel level indicator; 9 – temperature indicator; 11 – Fuel level indicator light; 12 – display; 22 – High beam indicator lamp; 21 – Automatic cruise control indicator lamp; 23 – Coolant level indicator lamp; 25 – Windscreen washer fluid level indicator light; 29 – Battery charging indicator light; 30 – Oil pressure indicator light; 31 – Handbrake and very low brake fluid level indicator light; 33 – brake pad wear indicator lamp; 34 – ABS warning light; 41 – Airbag indicator
Please note: The following description is general for the three types of instrument panels and instrument cluster.
Digital watch
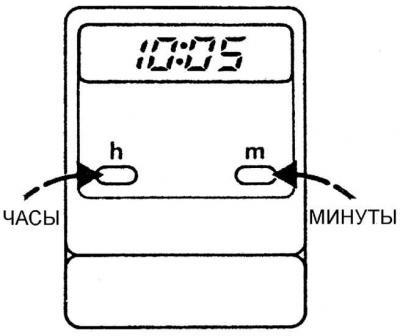
The watch shows the time up to 12 or 24 hours. To determine the watch operating mode, you must press both buttons simultaneously. When 1:00 is displayed on the screen, the watch is set to 12-hour mode, and when 0:00 is displayed, the watch is set to 24-hour mode.
When setting the time, to move forward an hour, you must press the left button. To move forward minutes, you must press the right button. Holding down the button accelerates the countdown of hours or minutes.
To set the time accurately, press both buttons and release them when the time signal sounds.
Fuel Computer (Early Version) (3)

A – instantaneous fuel consumption, B – average fuel consumption from the last press of the computer buttons, C – fuel consumption at start in liters from the last press of the computer buttons, D – power reserve in kilometers on the remaining fuel in the tank, E – function selection. When pressed, all 4 functions are changed. Each function is indicated on the display, F – (M) button for switching to the metric or English imperial system, G – (C) call button
The computer displays and updates fuel consumption, range and economy information. It is equipped with a button press signal and fuel reserve signal. The computer backlight is turned on when the outside lights are turned on and is controlled by the dimmer.
The computer receives initial data from a sensor in the fuel tank and based on fuel consumption over the previous 10–20 minutes of engine operation. Constantly changing engine operating conditions change fuel consumption, which can be continuously monitored. This data, received by the driver, makes it easier to control the car. The driver is informed by an audible signal of the remaining fuel at 80, 40 and 20 kilometers of the car's mileage. This signal is turned on by pressing button 3 and turns off automatically after five signals. The remaining fuel in the tank is 5 liters when the remaining mileage indicator shows 0 km. The computer again calculates the range in kilometers when at least 9 liters of fuel are poured into the fuel tank.
Fuel Computer/Multifunction Clock (Late Version) (3)

1 – clock display, 2 – clock function selection button, 3 – fuel computer display, 4 – computer function selection button, 5 – reset button, 6 – setup button, 7 – control button
Multifunctional watches can show:
- time (hours and minutes);
- calendar;
- stopwatch;
- outside air temperature.
The fuel computer can show:
- car mileage;
- average speed;
- instantaneous fuel consumption;
- average fuel consumption;
- range on remaining fuel.
Clock function selection button. Press the button until the corresponding indicator appears on the clock display.
Button for selecting computer functions. It is necessary to press the button until the corresponding indicator appears on the fuel computer display.
The reset button (R) is used to reset the stopwatch and computer readings, and to set the time and calendar on the watch.
The set button (S) is used to set the time and calendar, start and stop the stopwatch, and switch the temperature units (°C or°F).
The control button is used to switch the operation of the reset and set buttons on the clock or computer display.
Multifunctional watch
Setting the time
1. To set the time, turn on the ignition and press the control button until the arrow indicating the operating mode (12 or 24 hours) appears on the clock display.
2. By pressing the clock function selection button, you need to set the time mode.
3. Press the setting button (S) to select the clock mode. The "am" indicator corresponds to the hours before noon, and "pm" to the hours after noon.
4. Press the reset button (R) to select AM or PM mode.
Setting the clock
5. To set, set the time display, then press the set button (S) twice to make the hour digit flash, and then press the reset button (R) to set the hour display.
Setting the minutes
6. To set, set the time display, then press the set button (S) three times to make the minute digit flash, then press the reset button (R) to set the minute digit.
7. After setting the time, you need to press the button to select the clock functions.
Setting the calendar
8. To set it, press the function selection button to set the calendar on the watch display.
Setting the month
9. To set, press the set button (S), which will cause the month digit to flash, and then press the reset button (R) to set the month.
Setting the day of the week
10. To set, press the set button (S) twice to make the day of the week number flash, and then press the reset button (R) to set the day of the week.
11. After setting the calendar, you need to press the button to select the clock functions.
Stopwatch
12. To set it, press the function selection button to set the stopwatch on the watch display.
13. Pressing the set button (S) starts the stopwatch, and pressing the set button (S) again stops the stopwatch. Subsequent presses of the set button (S) start and stop the stopwatch. Pressing the reset button (R) resets the stopwatch. The stopwatch can continue to operate when switching to any other watch function, and the stopwatch symbol will flash.
Outside air temperature
14. To set it up, press the function selection button to set the temperature measurement on the clock display.
15. Pressing the setting button (S) switches between temperature units (°C or°F).
Fuel computer
The information display function is selected by pressing the computer function selection button.
Vehicle mileage. The display shows the vehicle mileage (up to 999 km) since the last reset to zero. Resetting the mileage to zero is done by pressing the reset button (R).
Average vehicle speed. The display shows the average vehicle speed over the last 1000 km or since the last reset to zero. Resetting to zero is done by pressing the reset button (R).
Instantaneous fuel consumption. The display shows instantaneous fuel consumption, i.e. the fuel consumption of the engine at the current moment.
Average fuel consumption. The display shows the average fuel consumption since the last reset to zero. Resetting the display to zero is done by pressing the reset button (R).
Range on remaining fuel. The display shows the distance in kilometers that the car can travel on the fuel remaining in the tank under the same driving conditions. When the display shows 0 km, an audible signal will sound.
Tachometer (4)
The maximum rotation speed is 6000 rpm. Short-term exceeding of the rotation speed of 6000 rpm is permissible. Exceeding the rotation speed of 7000 rpm is prohibited.
Direction indicator lights (5)
The light flashes when the corresponding turn signal is turned on. If one of the turn signal lights burns out, the turn signal indicator light starts flashing at double the frequency.
Speedometer (6)
The speedometer shows the instantaneous speed of the vehicle.
Temporary kilometer counter (7)
The time counter is reset to zero by pressing the button located under the scale.
Total kilometer counter (7)
Shows the total mileage of the vehicle.
Fuel gauge (8)
The gauge scale is divided into 4 parts of the fuel tank volume. Its volume is 70 dm³. The gauge shows the amount of fuel in the tank even when the ignition is turned off.
When the indicator arrow enters the red sector of the scale, there are approximately 10 liters of fuel left in the tank.
Coolant temperature gauge (9)
At normal engine temperature, the pointer should be in the "NORM" sector of the scale.
Overheating indicator (diesel) (10)
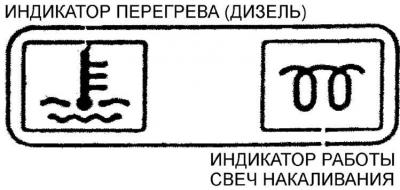
Flashing indicator indicates engine overheating. In this case, you must immediately stop the car, let the engine idle and determine the cause of overheating.
Fuel reserve indicator lamp (11)
When the light comes on, it warns that there is approximately 8 liters of fuel remaining in the tank.
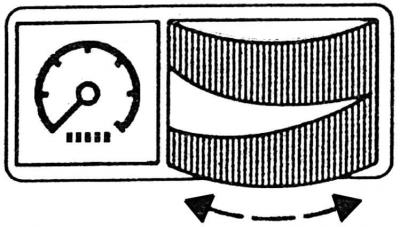
Display (12)
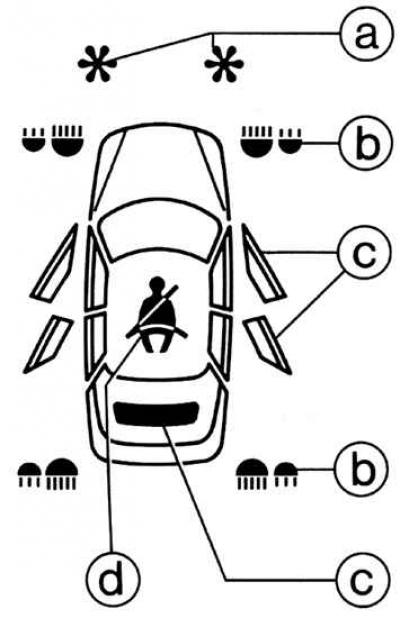
The display only works when the ignition is turned on. The display shows information about the state of the brakes, exterior lights, door and trunk closure, and outside air temperature. All functions are checked after the ignition is turned on for 5 seconds. If a malfunction of any of the monitored systems is detected, the corresponding symbol lights up on the display.
Brakes: If one brake circuit fails, the corresponding symbol will flash for 30 seconds.
Outside temperature (a). The yellow symbol on the display warns that the outside temperature is between 4 and 1°C, and the red symbol warns that the air temperature is below 0°C. The inertia of the temperature display is about 10 seconds.
Exterior Light Bulb (b) Not Working: Lighting of the bulb symbols indicates a faulty bulb, fuse or electrical circuit to the bulb.
Doors (c): If the doors or the boot are not fully closed, the corresponding symbol lights up on the display.
Unfastened seat belt (d).
Heating and ventilation system (13)
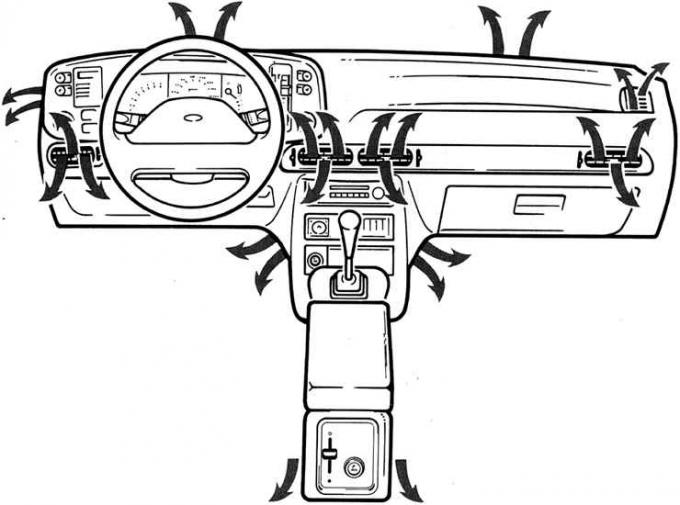
The temperature and direction of air supply (to the windshield or feet) are adjusted by switches. The volume and direction of air supply in the middle and side nozzles are adjusted by grooved wheels. The front door windows are blown by nozzles rigidly fixed to the panel.

Three-stage heater fan switch:
- o – fan is off,
- I – low fan speed,
- II – average fan speed,
- III – high fan speed
Fan positions 2 and 3 are used to quickly warm up the interior in cold weather or ventilate the interior in hot weather.
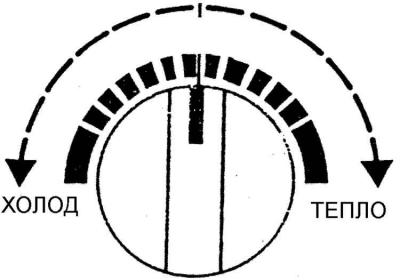
Handle for adjusting the temperature of the air supplied to the passenger compartment: Turn to the left – cold air, turn to the right – hot air.
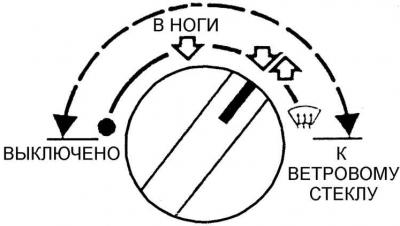
Air flow distributor: To remove condensation from the windshield or to defrost it, set the control knobs to the extreme right position.
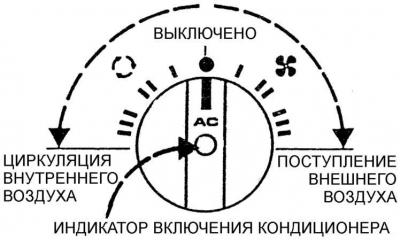
Air Conditioning: On models with air conditioning, the three-stage heater fan switch has six positions, in addition to neutral. Turning the knob clockwise ventilates the interior with outside air in the normal mode. Turning the knob counterclockwise ventilates the interior with inside air.
To turn on the air conditioner, you must press the fan switch handle. The air conditioner only works when the engine is running, and all windows must be closed.
Rear window defroster (14)
The rear window heater is activated only when the ignition is on and switches off automatically after approximately 10 minutes of operation. If the vehicle is equipped with electrically heated mirrors, they are activated together with the rear window heater.
Windscreen heater (15)
The heater is used to defrost the windshield and washer, and to eliminate fogging of the glass. The heater only operates when the ignition is on and automatically switches off after approximately 4 minutes of operation.
Automatic cruise control indicator light (21)
Lights up when the vehicle's cruise control system is activated.
High beam indicator lamp (22)
Lights up when the high beam headlights are turned on.
Coolant level indicator lamp (23)
The light indicates that the coolant level in the expansion tank has dropped to the "MIN" mark. The coolant level must be restored immediately. If the need to top up the coolant occurs frequently, the cooling system must be checked for leaks.
Windscreen washer fluid level indicator light (25)
The light comes on to warn you that the remaining windshield washer fluid is 1/4 of the full tank.
Automatic vehicle speed control system (27)
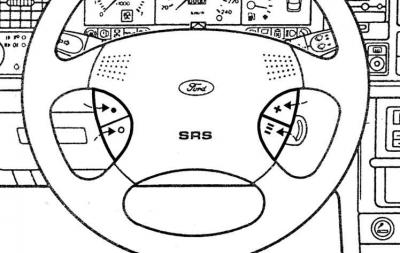
The control buttons are indicated by arrows.
The automatic cruise control system is activated by pressing the top button on the left side of the steering wheel.
The automatic cruise control system is switched off by pressing the lower button on the left side
steering wheel. The system switches off automatically if:
- the speed of the car is less than 40 km/h;
- engine speed will exceed 5700 rpm.
The car speed is memorized by pressing the upper button on the right side of the steering wheel (with the sign). Pressing and holding this button leads to a gradual increase in the car speed. After releasing the button, the previous car speed is restored.
To reduce the vehicle speed in the automatic cruise control mode, press the lower button on the left side of the steering wheel (with the - sign) and hold it until the desired speed is reached, then release it. Pressing this button again will restore the vehicle's previous speed.
Attention! Pressing any control pedal immediately disables the automatic cruise control system. To restore automatic cruise control, press the lower button on the left side of the steering wheel (with the - sign).
The indicator light indicates that the vehicle's automatic cruise control system is on.
Battery Charging Indicator Light (29)
This light comes on when the ignition is turned on and should go out after the engine starts. If the battery charge indicator light comes on while driving, it indicates a fault in the charging system. You should immediately turn off the engine and check the tension of the alternator drive belt and the fastening of the battery clamps. If everything is normal, but the light remains on, seek assistance from your nearest service station.
Oil pressure indicator light (30)
The oil pressure indicator light on the instrument cluster comes on when the ignition is turned on and should go out after the engine starts. If this light comes on while driving, you should stop immediately and check the oil level. If the level is normal and the light still comes on, you should contact a repair shop.
Handbrake and very low brake fluid level indicator light (31)
When this light comes on, it indicates:
- with the handbrake applied;
- the brake fluid level in the reservoir is too low. In this case, you should check the brake fluid level, top it up and contact a service station to determine the cause of the decrease in brake fluid.
The lighting of this light while driving may also indicate the failure of one brake circuit, which will lead to a decrease in braking efficiency.
If the handbrake indicator light, the very low brake fluid level indicator light and the anti-lock brake system indicator light come on at the same time, you must stop the vehicle immediately and correct the fault in the brake system or seek assistance at the nearest service station.
Headlight corrector with manual adjustment (32)
By turning the knob, the angle of the headlight beam is adjusted depending on the vehicle load. Turning the knob counterclockwise lowers the beam of light down (when the vehicle is loaded), and vice versa, turning the knob clockwise raises the beam of light. The initial position "0" corresponds to the vehicle being loaded with only the driver and a front passenger.
Brake pad wear indicator light (33)
If this light comes on, you need to replace the brake pads as soon as possible.
Anti-lock Brake System (ABS) Warning Light (34)
When this light comes on, it indicates that there is a fault in the anti-lock braking system. The braking system continues to operate in the normal braking mode.
If the handbrake indicator light, the very low brake fluid level indicator light and the anti-lock brake system indicator light come on at the same time, you must stop the vehicle immediately and correct the fault in the brake system or seek assistance at the nearest service station.
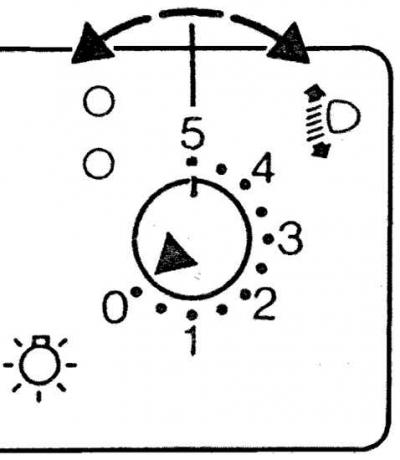
Instrument illumination level regulator (35)
By turning the instrument illumination level control knob, you can set the desired instrument illumination intensity.
Outdoor Light Switch (36)
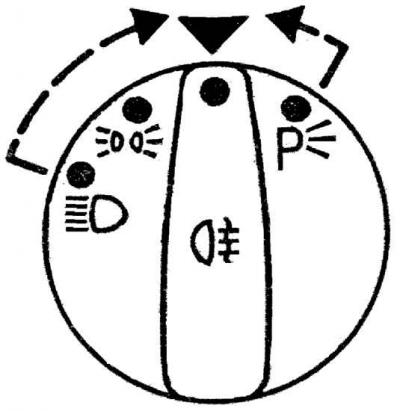
The switch has four fixed positions when the handle is turned and two fixed positions when the handle is pulled.
Initial position: all external lighting is off.
Turn the knob counterclockwise one position - only the left side lights are on. This position is used when stopping at night with the engine off to save electricity.
Turn the knob clockwise one position – the parking lights are on.
Turning the knob clockwise to two positions – the parking lights and headlights are on. The headlights only work when the ignition is on.
Attention! If the parking lights are not turned off and the driver's door is open, a buzzer will sound.
Turning the knob clockwise two positions and pulling the knob out one position turns on the parking lights, headlights and front fog lights.
Turning the knob clockwise two positions and pulling the knob out two positions turns on the parking lights, headlights and rear fog lights.
Attention! On cars without front fog lights, the handle can only be pulled out to one position. When the handle is pulled out, the corresponding indicator lights come on.
Glow plug indicator (40)
This light comes on when the ignition is turned on. When it goes out, the engine can be started.
Airbag (41)
After turning on the ignition, the light should light for 5 seconds, which indicates that the airbag control system is working properly.
Information for this article was taken from the website FORDBOOK.RU