For replacement of the oil pan on vehicles manufactured by until May 1998 do the following:
- on a 2-liter engine, remove the heat shield. To do this, release the hose clamp, unscrew the upper screws and remove the clamp. Remove the dipstick and unscrew the lower screws. Remove the shield;
- on a 1.6- or 1.8-liter engine, remove the heat shield by unscrewing the upper and lower screws. Remove the oil level dipstick;
- disconnect the lambda probe connector (in the area of one of the cooling system hoses);
- unscrew the neutralizer from the exhaust manifold;
- lift the engine (using a lifting device);
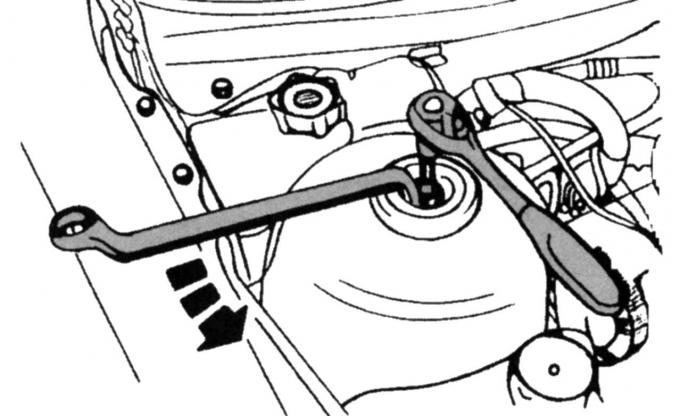
Fig. 118. Loosening the shock absorber strut mount
- loosen the nut in the middle of the right shock absorber strut by five turns (Fig. 118);
- place the front of the car on supports and unscrew the protective trim from below (nine screws);
- unscrew the screws securing the neutralizer to the exhaust pipe, unhook both rubber loops on the left and right and remove the neutralizer;
- disconnect the right wishbone from the steering knuckle;
- remove the thrust bearings of the right drive shaft;
- on vehicles equipped with a manual transmission, unscrew and knock out the middle screw of the right engine mount stop;
- on vehicles equipped with an automatic transmission, unscrew and knock out the middle screw of the left and right stops;
- disconnect and press the pipeline mounting clamp from the oil pan;
- unscrew the drain plug from the oil pan and drain the oil into a container;
- raise the engine by approximately 70–75 mm;
- unscrew the screws securing the oil pan from the clutch housing on the clutch side and remove the intermediate plate;
- unscrew and lower the oil pan;
Note: When installing the oil pan, use a new sealing gasket and sealant. Further operations must be carried out within 10 minutes to prevent the sealant from drying out.
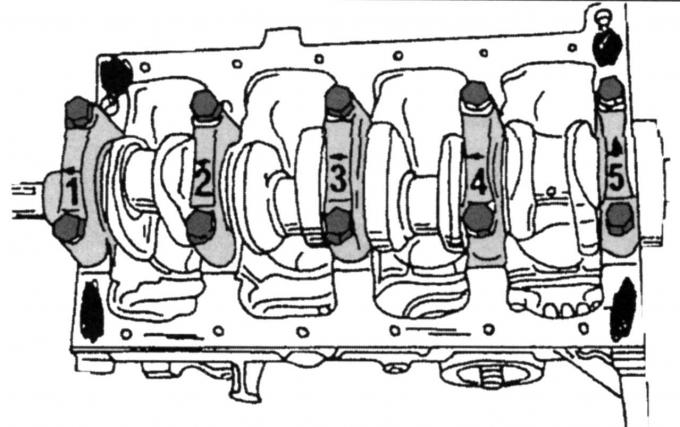
Fig. 119. Places of sealant application
- lubricate the joints between the oil pump and the cylinder block, as well as between the rear flange and the cylinder block with sealant (Fig. 119);
- connect the oil filler pipe with a new seal (10 Nm);
- attach the oil pan without displacing the sealing gasket, but so that it is still possible to move the oil pan to the side;
- move the pan towards the flywheel so that the surfaces of the oil pan and cylinder block are flush;
- tighten a few screws;
- tighten the remaining screws evenly to 22 Nm;
- screw in the drain plug and fill the engine with oil;
- lower the car;
- tighten the front engine mount brackets to 83 Nm;
- carry out further installation in the reverse order of removal.
To replace the oil pan on vehicles manufactured by since May 1998. do the following:
- place the front of the car on supports and drain the oil;
- unscrew the oil pan mounting screws and separate the pan from the lower surface of the crankcase. After it separates from the crankcase, turn it a quarter turn and remove it;
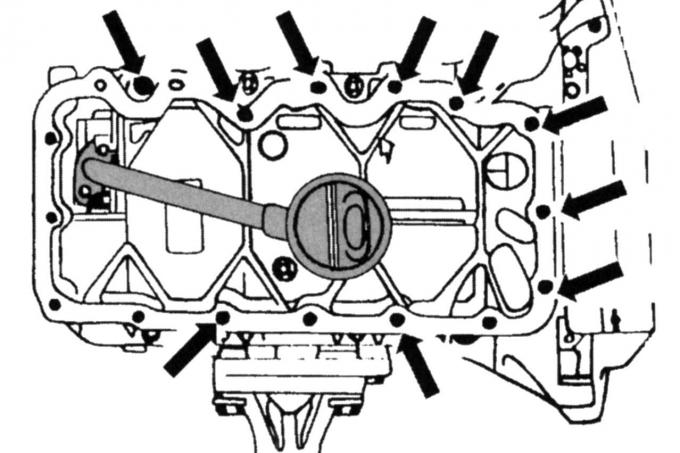
Fig. 120. Places for screwing in studs
- clean the mating surfaces without damaging them;
Warning: Installing the oil pan is a critical operation, since sealant must not get into the various existing "blind" holes. To do this, screw in ten studs 20 mm long and 6 mm in diameter (M6) into the crankcase in the places shown in Fig. 120.
- apply a 3mm wide bead of sealant to the oil pan;
- place the oil pan on the screwed studs and press firmly;
- screw the screws into the still free threaded holes and tighten them by hand;
- unscrew the studs one by one and replace them with screws;
- tighten the screws first to 6 Nm (starting from the middle);
- on the second pass, tighten the screws to a torque of 10 Nm;
- lower the car;
- fill the engine with oil.