Contents: Main headlight ↳ Fog light ↳ Front turn signal light ↳ Tail light, vehicles with a… ↳ Side direction indicator light ↳ Number plate light, vehicles with a… ↳ Additional brake light ↳
Caution: Before replacing an incandescent lamp, switch off the corresponding consumer using the switch.
Main headlight
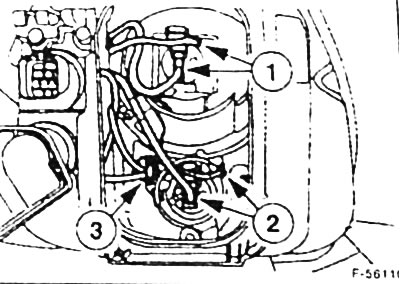
Open the engine compartment hood. Unfasten and remove the plastic cover from the back of the headlight. When working with the right headlight, to ensure better access to its back, first slightly lift the expansion tank of the cooling system, unfasten and press the filler pipe of the headlight washer fluid reservoir to the side.
Disconnect the multi-pin plug connector of the defective headlight bulb. Bulb locations: 1 - low beam, 2 - high beam, 3 - parking light.
To replace the low beam bulb, squeeze and release the wire spring clip. Insert the new bulb so that the protrusion on the bulb frame fits into the corresponding grooves in the reflector.
Note: Do not hold the lamp by the glass, but only by the frame.
Secure the lamp with a wire spring clamp. Connect the multi-pin plug connector of the lamp socket.
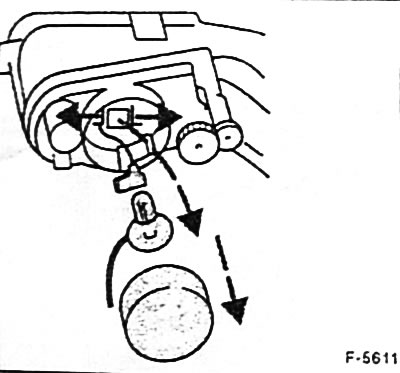
Replacing the low beam bulb, turn the bulb holder to the left and remove it.
Remove the incandescent lamp from the holder, disconnect the plug connector and replace the lamp.
Replacing the parking light bulb: remove the socket, remove the bulb from the socket and replace it with a new one. Put the socket back in place.
Place and secure the plastic cover to the back of the headlight.
When working with the right headlight, attach the headlight washer fluid reservoir filler pipe.
Check the headlight adjustment at the service station.
Fog light
Remove the front turn signal light next to the fog light.
Remove the Phillips head screw from the front and remove the fog light assembly.
Remove the rubber cover from the back of the reflector. Squeeze and release the spring wire clips.
Remove the headlight bulb. Disconnect the plug connector.
Connect the plug connector of the new lamp.
Insert the new incandescent lamp so that the protrusions on the reflector fit into the corresponding slots in the lamp socket.
Note: Do not hold the lamp by the glass, but only by the frame.
Secure the pump with wire spring clips. Replace the rubber cover.
Place the fog light in place and secure it with a Phillips-head screw.
Install the front turn signal light.
Check the headlight adjustment at the service station.
Front turn signal light
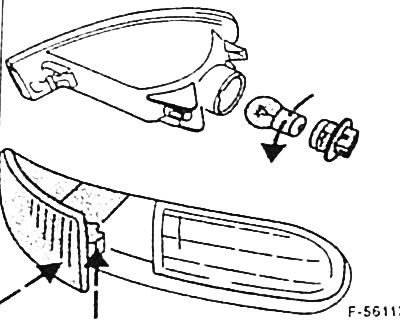
Press the light towards the outside of the car and pull it forward at the same time. This releases the retaining spring and allows the light to be removed.
Turn the indicator lamp socket to the left and pull it out of the lamp.
The turn signal lamp bulb is easily pressed into the socket, turned to the left and removed.
Insert a new lamp into the socket and turn it to the right to secure it.
Insert the socket with the lamp into the flashlight and turn it to the right to secure it.
Insert the turn signal lamp from the outside into the wing and press it from the front until it locks into place.
Tail light, vehicles with a pronounced angle between the rear window and the luggage compartment
Note: Replacing the rear light on the TURNIER model is described on p. 171.
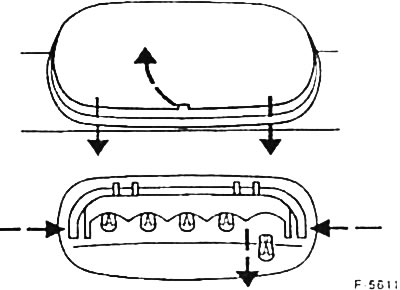
Open the boot lid. Remove the lamp cover from the boot side. The covers in the boot trim can be released and secured using a coin. The arrangement of the lamps in the rear lights:
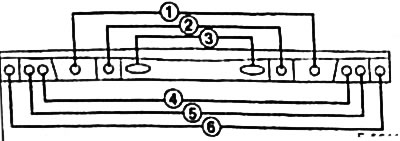
1 - parking lights
2 - fog lights
3 - reversing lights
4 - side lights
5 - brake signal
6 - direction indicator lights
Turn the cartridge of the defective pump to the left and remove it.
The defective lamp can be easily pressed into the socket, turned to the left, and removed.
Insert a new incandescent lamp into the socket and turn it to the right to secure it.
Insert the socket into the flashlight housing. The mounting position is determined by the corresponding guides. Turn the socket to the right and fix it.
Side direction indicator light
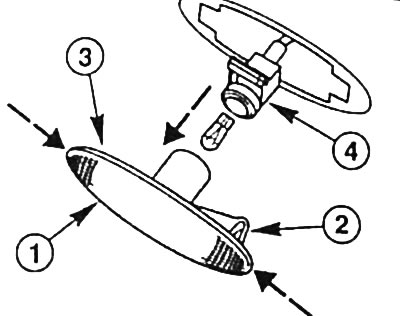
Press the body of the flashlight "1" forward or backward against the force of the spring of the plastic holder "2".
Note: The plastic holder can be mounted at the front or rear.
On the other side of the lantern housing, press "3" in the direction away from the wing and remove.
Turn the flashlight body to the left relative to socket "4" and disconnect it from the socket.
Remove the incandescent bulb from the socket and replace it.
Slide the flashlight body onto the lamp socket and turn it to the right to secure it.
First insert the flashlight housing with the "3" side into the wing opening, then press forward or backward against the force of the spring of the plastic holder "2" and fix it.
Number plate light, vehicles with a pronounced angle between the rear window and the luggage compartment
Note: Replacing the license plate light for the TURNIER model is described on p. 171.
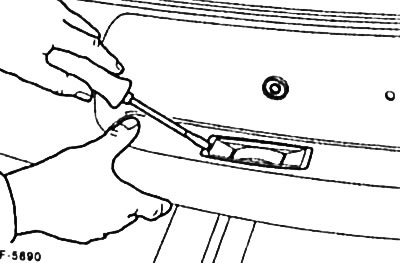
Using a screwdriver, loosen and remove the light housing from the bumper trim.
Turn the lamp holder to the left and remove it.
Remove the incandescent bulb from the socket and replace it.
Insert the cartridge into the flashlight body and turn it to the right to secure it.
Press the lamp housing into the bumper trim.
Additional brake light
Remove the lamp housing for the Limousine model by moving it forward, and for the TURNER model by moving it downwards, and lift the cover. Unfasten the lamp panel from the side.
Remove and replace the defective lamp with a glass base; the lamp is simply inserted into the panel.
Secure the lamp panel and insert the lamp housing into place.