Contents: Removal ↳ Installation ↳
Cars with a gently sloping rear end, cars with a pronounced angle between the rear window and the luggage compartment up to 8/94.
Removal
Open the luggage compartment lid. Fold the luggage compartment carpet back.
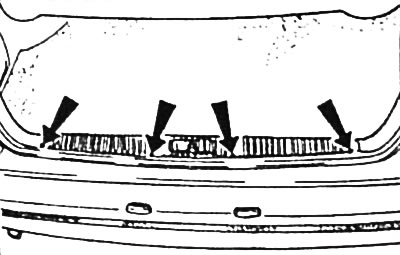
Unscrew the 4 "arrow" screws securing the rear wall trim and remove the trim.
Vehicles with a gently sloping rear end: remove the side trim of the luggage compartment.
Left side: Remove the warning triangle. Unfasten the 3 lower clips and remove the upper Phillips-head mounting screws. Remove the side trim.
Right side: Remove the side jack. Unfasten the 2 lower clamps and remove the upper Phillips-head mounting screws. Remove the side trim.
Remove the cover from the tail light housing.
Remove the rear light cover.
Remove the lamp holder, see chapter "Replacement of incandescent lamps for outdoor lighting".
Disconnect the rear light multi-pin connector.
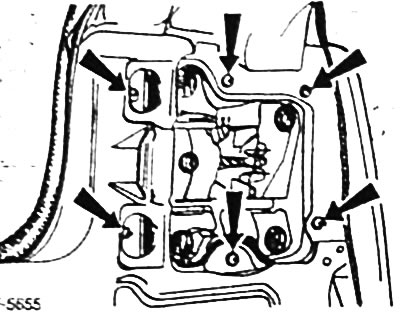
Loosen the nuts securing the "arrow" (for a car with a gently sloping rear part of the body - 6 pieces, for a car with a pronounced angle between the rear window and the luggage compartment - 4 pieces) and remove the rear light together with the sealing gasket.
Installation
Place the sealing gasket on the tail light. Position the tail light and tighten the mounting nuts.
Connect the multi-pin connector of the rear light.
Install the lamp holder, see chapter "Replacement of incandescent lamps for outdoor lighting".
Place and secure the rear light housing.
Install onto the rear light housing and close the cover.
Vehicles with a gently sloping rear end: install the side trim of the luggage compartment.
Left side secure the 3 lower clamps and tighten the upper Phillips head mounting screws.
Insert warning triangle.
Right side: Secure the 2 lower clamps and tighten the upper Phillips head mounting screws. Insert the side jack.
Place and secure the rear wall trim.
Lay down the carpet in the luggage compartment.