Warning: Before you begin, read the warning in paragraph 1 this chapter.
Removal
1. The fuel tank does not have a drain plug. Therefore, it is best to remove it when it is almost empty (see Fig. 9.1).

2. First disconnect the negative battery cable and pump out the remaining fuel from the tank with a syringe. Another option is to disconnect the injection line from the fuel filter (chapter 1) and attach a piece of hose to it so that when the ignition is turned on, the fuel pump pumps fuel from the tank into a clean container. The container must be large enough. Precautions must also be taken to prevent the risk of fire.
Note: Before disconnecting or opening any fuel system component, relieve any residual pressure (paragraph 2), equalize the pressure in the tank by removing the cap of its neck, and also disconnect the negative battery cable (chapter 5 paragraph 1).
3. Remove the bolts or fold forward (depending on the version) the rear seat cushion (Chapter 11). Remove the plug from the rear of the vehicle that covers the fuel pump/fuel level indicator sensor.
4. Disconnect the fuel pump/gauge sensor electrical connector and disconnect the fuel drain line (red) from the pump assembly (see paragraph 9).
5. Support the front wheels with wedges. Raise the rear and place it on supports.
6. Preliminarily study the location of the tank elements by looking at the bottom from below.
Warning: If the vehicle is supported only by a jack, do not work underneath it!
7. Remove the fuel filter or disconnect the outlet pipe from it (see chapter 1).
8. Remove the exhaust system from its rubber mounts. Lower the system onto a secure support so as not to create tension in the connection of the inlet pipe to the exhaust manifold (paragraph 17) or remove the system entirely.
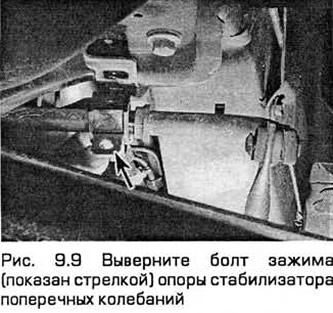
9. Remove the bolts holding the rear suspension stabilizer bar mounts (see Fig. 9.9). Move the stabilizer bar, tilting it back as far as possible. If there is not enough space, remove the stabilizer bar (Chapter 10).
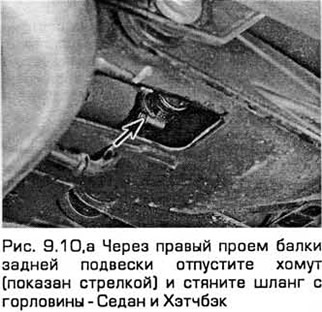
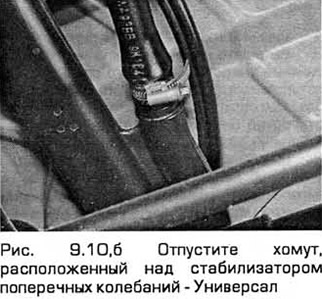
10. On models produced before 01/1997, disconnect the ventilation hose from the plastic fuel filler neck as follows:
- a) On Sedan and Hatchback models, release the clamp through the right opening of the rear suspension beam and pull the hose off the filler neck. This requires a reliable tool, small hands and experience (see Fig. 9.10, a).
- b) On station wagon models, loosen the clamp located above the rear suspension anti-roll bar and pull the hose off the filler neck (see Fig. 9.10.6).
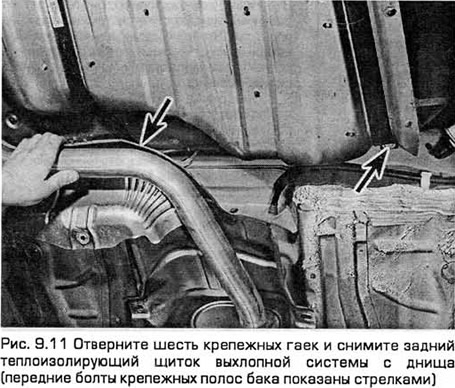
11. Unscrew the six mounting nuts and remove the rear exhaust system heat shield from the bottom (see Fig. 9.11).
12. Support the tank with a mobile jack or something else, placing a reliable and rigid gasket under the tank.
13. Remove the bolt from the front of each mounting strip and rotate the strips downwards so that they hang under their own weight and do not interfere with the removal of the tank. Note the ground wire located under the bolt of the left strip. Before installing the tank, you will need to clean the joint surfaces to ensure good contact between the wire and the strip.
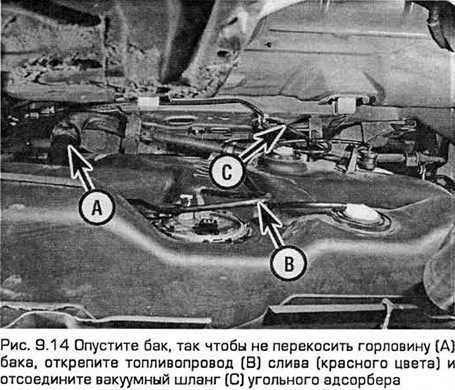
14. Lower the tank until the fuel drain line (red) can be unfastened from the top of the tank. Then disconnect the charcoal canister vacuum hose from the fitting located at the top of the tank at the rear (see Fig. 9.14). On models produced since 01/1997, disconnect the filler line from the tank. To avoid any doubts during subsequent installation, mark the fuel lines, hoses and the corresponding fittings. Plug the hoses to prevent dirt from getting in and to prevent fuel leaks from them.
15. Remove the tank from the car, freeing it from the filler neck. After removing the tank, unhook the fastening strips (by turning them 90°) and make sure that they, as well as the joints under them on the bottom, are in good condition.
16. After removing the tank, you can pull out the neck. It is secured with a screw located in the opening of the neck, as well as two bolts on the bottom of the body.
Inspection
17. The fuel tank must be repaired by a specialist. Even after flushing the fuel system, explosive vapors may remain in it and cause a fire during tank repair.
18. If the tank is removed from the vehicle, it must not be placed near an open flame or where sparks are generated, to prevent ignition of the fuel vapors contained therein. Be especially careful when using a gas torch inside a garage.
Installation
19. Installation - in the reverse order of removal.
The text is available on the specified website info portal: www.fordbook.ru