|
STATES |
DETAILS/RESULTS/ACTIONS |
|
A1: CHECK THE BATTERY |
|
|
1Perform a Battery Capacity Test with FDS 2000 |
|
|
• Is the battery OK? |
|
|
→ Yes |
|
|
Go to A2 Proceed to PINPOINT TEST A |
|
|
→ No |
|
|
INSTALL a new battery. CHECK that the system is operating correctly. |
|
|
A2: CHECK FUSE 10 (10A) |
|
|
1CHECK Fuse 10 (10A) in the battery junction box. |
|
|
• Is fuse 10 (10 A) good? |
|
|
→ Yes |
|
|
Go to A3 Proceed to PINPOINT TEST A |
|
|
→ No |
|
|
INSTALL a new 10A fuse. CHECK the system for proper operation. If the problem persists, check for a short to ground. |
|
|
A3: CHECK THE CHARGING SYSTEM |
|
|
1Perform a Charge Test using the FDS 2000. |
|
|
• Is the generator output power normal? |
|
|
→ Yes |
|
|
DIAGNOSE the charging system warning lamp. Refer to Section 413-01 for additional information. |
|
|
→ No |
|
|
Go to A4 Proceed to PINPOINT TEST A |
|
|
A4: CHECK GROUNDING |
|
|
1Enter the ON position. |
|

|
2Measure the voltage between the generator case and the negative battery terminal. |
|
• Is the voltage less than 0.5V? |
|
|
→ Yes |
|
|
Go to A5 Proceed to PINPOINT TEST A |
|
|
→ No |
|
|
CLEAN and TIGHTEN the alternator mount, engine ground strap to the chassis, and battery ground cable. CHECK for proper system operation. If the problem persists, INSTALL a new battery ground cable. |
|
|
A5: CHECK BATTERY WIRE |
|
|
1Enter the ON position. |
|
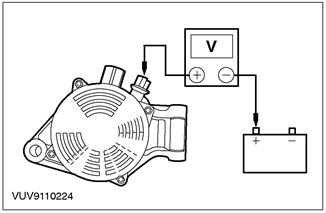
|
2Measure the voltage between the B+ terminal of the generator and the positive terminal of the battery. |
|
• Is the voltage less than 0.5V? |
|
|
→ Yes |
|
|
Go to A6 Proceed to PINPOINT TEST A |
|
|
→ No |
|
|
CLEAN and TIGHTEN the battery cable hardware. CHECK for proper system operation. If problem persists, INSTALL a new battery cable. |
|
|
A6: CHECK THE BATTERY POWER SUPPLY TO THE GENERATOR |
|
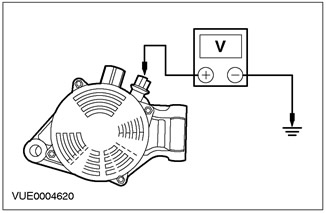
|
1Measure the voltage between the B+ pin of the generator, electrical circuit 30-BA6 (red), and ground. |
|
• Is the voltage equal to the battery voltage? |
|
|
→ Yes |
|
|
Go to A7 Proceed to PINPOINT TEST A |
|
|
→ No |
|
|
REPAIR circuit 30-BA6 (red) or circuit 50-BB10 (red). CHECK for proper system operation. |
|
|
A7: CHECK THE CURRENT SUPPLIED TO THE GENERATOR REGULATOR |
|
|
1Enter the OFF position. |
|
|
2Disconnect the Generator - C870. |
|
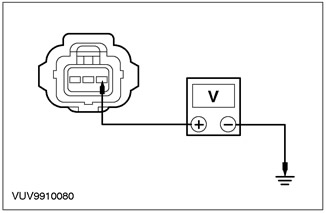
|
3Measure the voltage between pin 3 C870 of the generator, circuit 30-BA10 (red), harness side, and ground. |
|
• Is the voltage more than 10V? |
|
|
→ Yes |
|
|
Go to A8 Proceed to PINPOINT TEST A |
|
|
→ No |
|
|
If fuse F10 is good, REPAIR circuit 30-BA10. CHECK for proper system operation. |
|
|
A8: CHECK POWERTRAIN CONTROL MODULE AND GENERATOR COMMUNICATION CIRCUIT |
|
|
1Connect the Generator - C870. |
|
|
2Connect the diagnostic tool.FDS 2000 |
|
|
3Enter the ON position. |
|
|
4Retrieve PCM diagnostic trouble codes (DTCs). |
|
|
• Are any DTCs issued? |
|
|
→ Yes |
|
|
Use FDS 2000 to diagnose PCM and communication components. |
|
|
→ No |
|
|
REPAIR or INSTALL a new alternator. CHECK that the system is operating correctly. |
|
PINPOINT TEST B: RADIO INTERFERENCE
|
STATES |
DETAILS/RESULTS/ACTIONS |
|
B1: ISOLATE THE GENERATOR |
|
|
1Remove the accessory drive belt. Refer to Section 303-05 for additional information. |
|
|
2Enter the ON position. |
|
|
3Run the engine for a few seconds with the radio on. |
|
|
• Does the interference persist? |
|
|
→ Yes |
|
|
For additional information, see Section 415-00. |
|
|
→ No |
|
|
CLEAN and TIGHTEN all support points and electrical fittings, power and ground wires. CHECK for proper system operation. If interference persists, INSTALL a new alternator. |
|