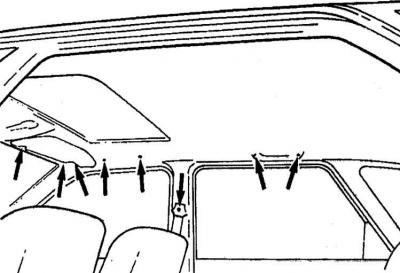
Screws for ceiling handles, seat belt anchors and sun visors
1. Open all doors, sunroof and hood.
2. Remove ground wire from battery.
3. Remove the seal from the upper edges of the doorways and from the pillars.
4. Remove the upholstery along the edge of the sunroof opening.
5. Remove rear door hinge covers.
6. Remove the rear light bulb.
7. Remove ceiling handles and sun visors.
8. Remove the front interior light bulb, sunroof handle and upper console.
9. Unscrew the upper anchorage of the seat belts.
10. Remove the top trim from the pillars. This upholstery is attached with one screw on each side of the vehicle.
11. Unscrew the fastening screws and detach the upholstery panels from the rest of the uprights.
12. Remove the upper part of the instrument panel.
13. Remove the headlining through the tailgate, peeling it off around the perimeter of the hatch opening.
14. Installation is carried out in the reverse order of removal, while the ceiling upholstery is attached around the perimeter of the hatch opening with double-sided adhesive tape.
Visitor comments