Contents: Removal ↳ Installation ↳
High-powered and all-wheel drive vehicles are equipped with rear disc brakes. The brake calipers also serve as a parking brake.
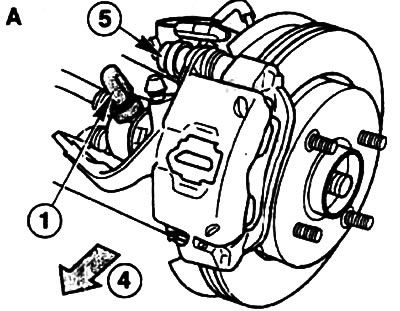
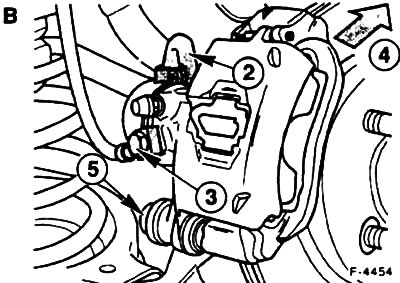
Due to the fact that the cars have different rear suspension and different design of the axle, on the Limousine "A" the brake caliper is located in front. and on the Turnier "B" behind the axle axle. Arrows "4" in both pictures show the direction of travel. In both cases, the brake calipers are attached in the same way, only the fastening parts are turned. 1 - Parking brake cable lever, 2 - Parking brake cable lever, 3 - Hollow bolt for fastening the brake hose.
Removal
Mark the position of the wheels on the hub with paint so that they can be installed in the same place during assembly. Loosen the wheel nuts on the lowered car. Raise the rear of the car and remove the rear wheels.

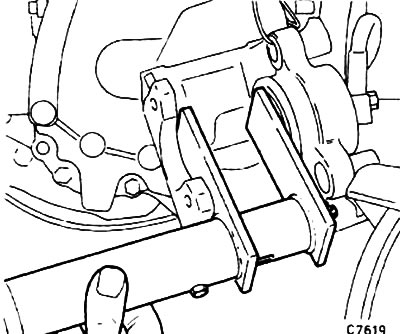
Use a small screwdriver to remove pin "3" from pin "1".
Please note! The picture shows a Turnier. On the Limousine the cotter pin is on the lower pin.
If necessary, disconnect the brake hose from the holder to avoid strain on it.
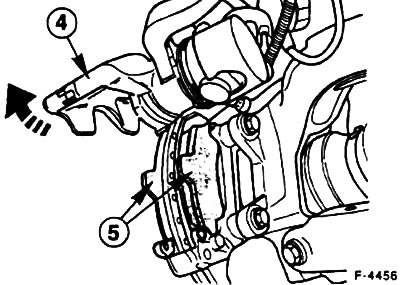
Limousine: Rotate the brake caliper "4" up away from the brake caliper.
Turnier: Turn the brake caliper "3" down away from the brake caliper.
Firmly clamp the brake hose with a suitable hose clamp and loosen the hose connection on the brake caliper.
Caution: It is important that a suitable hose clamp is used that will not damage the hose.
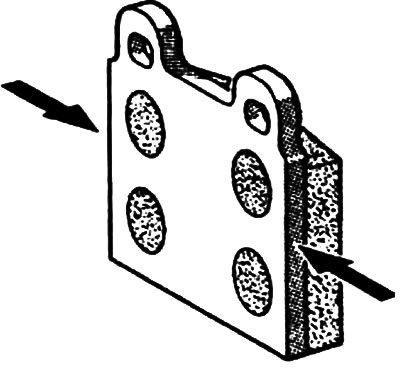
Remove the pads "5" from the brake caliper.
Attention! If you intend to install the same pads back, mark their location when removing them. Changing the pads around is unacceptable, as this will lead to uneven braking. Use only original FORD pads or those approved for use by the FORD factory. Replace all disc brake pads at the same time, even if only one pad has reached the wear limit. Different wear of the pads is not a reason for complaints. If the difference in the outer pad is more than 2 mm, check the ease of movement of the piston, as well as the brake caliper in the guides, replace if necessary (service station work).
Installation
Caution! Do not press the brake pedal with the brake pads removed, otherwise the piston will be pushed out of the housing. If the piston is pushed out of the housing by accident, remove the bracket and assemble it in a specialized workshop.
Clean the guide surfaces and the shoe seating areas in the housing shaft with a suitable soft metal brush and vacuum or clean with a cloth soaked in alcohol. Do not use solvents containing mineral oils or sharp-edged tools for cleaning.
Before installing the pads, check the surface of the brake disc with your finger for scratches. Measure the thickness of the brake disc, see paragraph 15.3.
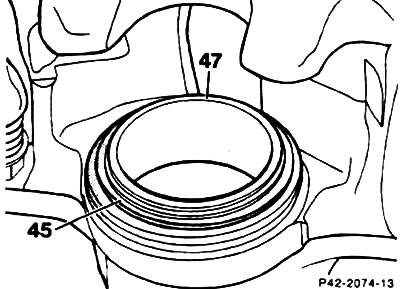
Check the dust cap "45" for scratches. Replace a damaged dust cap without delay, as the dirt that has penetrated will quickly lead to a leak in the brake caliper. In this case, it is necessary to remove and disassemble it (service station work).
Press the piston with a device. You can also use a block of hard wood (hammer handle) for this, but make sure that the piston does not warp, try not to damage the surface of the piston and dust cover.
Attention! When the piston is pressed, the brake fluid from the brake cylinder is squeezed into the expansion tank. Monitor the fluid level in the tank, if necessary, remove the fluid from the tank with a rubber bulb.
To collect brake fluid, use a vessel for removing air or a plastic vessel that will be used only for brake fluid. Do not use drinking glasses! Brake fluid is poisonous, do not suck out the fluid through the hose with your mouth under any circumstances. Use a rubber bulb. After replacing the brake pads, do not fill the fluid above the "MAX" mark on the reservoir, as the brake fluid expands when heated. Leaking brake fluid gets on the master cylinder, destroys the paintwork and promotes the formation of rust.
Attention! If the brake linings wear out quickly, check the ease of movement of the brake cylinder. To do this, insert a wooden block into the brake caliper and slowly press the brake pedal (assistant). The piston should move easily back and forth. When checking, the second caliper with the pads must be installed. Make sure that the piston is not completely squeezed out of the cylinder. If the piston moves tightly, replace the caliper (service station operation).
The following operation is not necessary, but is advisable: In order to eliminate the squeak of disc brakes, you can lubricate the rear surface of the pad and the sides of the "arrow" plate with a thin layer of grease (for example, Plastilube, Tunap VC 582/S, Cheevron SRJ/2, Liqui Moly LM-36 or LM-508-ASC). The paste should not get on the brake discs and linings under any circumstances. Otherwise, immediately wash off the grease and wipe the linings or disc with alcohol.
Install new pads into the brake caliper.
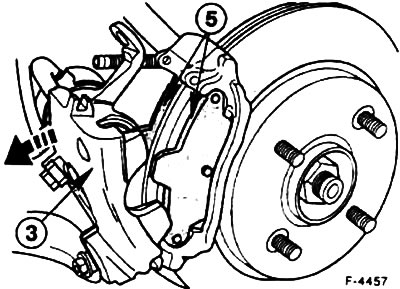
Fold the brake caliper down (Limousine) or up (Turnier) and apply pressure.
Install the mounting pin and secure it with a cotter pin.
Tighten the brake hose fastening, remove the hose clamp.
Remove air from the brake system, see item 15.12.
Install the rear wheels so that the marks made earlier match. Before installing the wheels, lubricate the centering surface on the wheel hub with a thin layer of consistent grease. Screw on the wheel mounting nuts. Lower the car and tighten the nuts crosswise to a torque of 100 Nm.
Attention! Press the brake pedal several times until you feel good pedal resistance. This will press the pads against the brake disc and take their working position.
Check the fluid level in the expansion tank and top up to the "MAX" mark if necessary.
Brake the car several times by lightly pressing the brake pedal from a speed of 80 km/h to 40 km/h.
Warning! Avoid unnecessary emergency braking during the first 200 km.
Note! Brake linings are disposed of as special waste.
The original can be found on the specified resource: FORDBOOK.ru