Contents: Removal ↳ Installation ↳
Removal
Attention! It is essential to replace all brake pads on one axle, even if only one pad is worn or oily.
Mark the position of the wheels on the hub with paint so that they can be installed in the same place during assembly. Loosen the wheel nuts on the lowered car. Raise the rear of the car and remove the rear wheels.
Release the parking brake.
If necessary, use a small screwdriver to remove the two stoppers from the wheel studs.
Remove the brake drum.
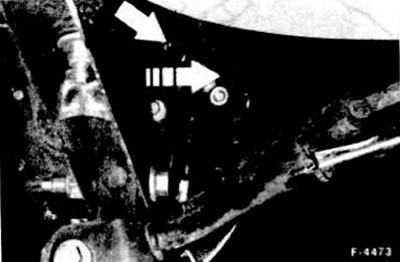
Attention! If the brake drum cannot be removed, compress the pads. To do this, remove the plug from the hole on the back of the caliper and press the cam of the adjustment lock "arrow" forward in the direction of travel with a small screwdriver. This eliminates automatic adjustment of the brake pads, and they converge under the action of the tension springs.
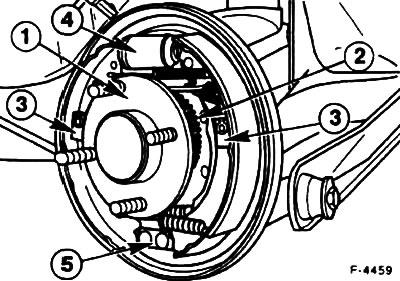
Remove the two pressure springs "3" downwards.
Disconnect the tension springs.
Caution! Before removing the brake pads, it is recommended to mark the position of the return springs and the thrust plate, mark the springs with adhesive tape to facilitate subsequent assembly.
Remove both pads from the wheel cylinder "4", being careful not to damage the dust caps. Remove the pads from the lower support "5".
Caution! When removing the pads from the brake cylinder, make sure that the pistons do not come out of the cylinder. If necessary, secure the pistons with a rubber ring so that they remain in the cylinder.
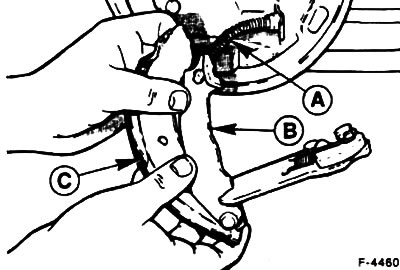
Rotate the rear brake shoe 90° and disconnect the parking brake cable from the shoe lever.
Installation
In principle, replace all four pads, install pads of the same manufacturer. Blow out the brake drum and caliper with compressed air or clean with alcohol.
Warning! Do not inhale harmful brake dust. When the brake pads are removed, do not press the brake pedal, as the pistons will fall out of the wheel cylinder. If the brake cylinder is wet with brake fluid, it must be replaced.
Check the working surface of the drum with your finger for grooves and protrusions. Replace the drum with an uneven working surface, and replace both drums as a matter of principle.
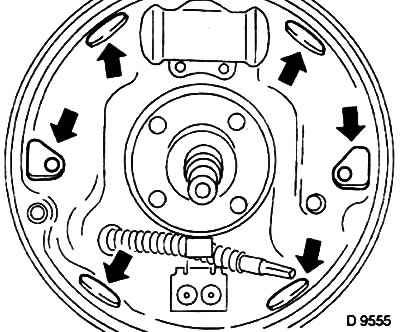
Clean the six contact surfaces of the caliper with the brake pads and lubricate them with a thin layer of heated grease, such as Thermopaul 1, before installing the pads. Before applying grease, clean these areas with a soft metal brush if necessary.
Connect the parking brake cable to the rear brake shoe lever.
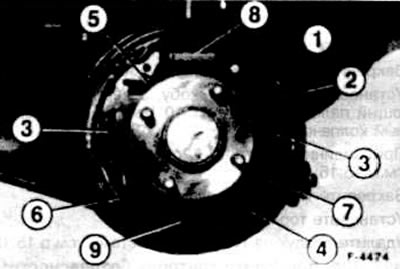
Install the rear brake shoe "7"
Install the thrust plate "5" and attach the upper tension springs -1/2-.
Install the front brake shoe "6" into the groove of the thrust plate, into the wheel cylinder "8", the stop "9" and press it against the brake caliper.
Caution! When installing the pads, do not damage the dust seals of the wheel cylinder.
Press the rear brake pad against the caliper. If necessary, secure it with a clamp.
Insert the rear shoe holder pin from the inside and insert the spring stopper "3". Compress the spring and rotate it 90° around the pin, holding the pin from turning from the rear side. Release the spring so that the pin is fixed.
Attach the tension springs.
Press the front pad against the caliper, securing it with a clamp if necessary.
Insert the holder pin from the inside and insert the spring lock. Compress the spring and rotate it 90° around the pin, holding the pin from turning from the back side. Release the spring so that the pin is fixed.
Remove the clamp if used.
Remove the rubber ring, if used, that holds the pistons in the wheel cylinder.
Install the brake drum and secure it, if necessary, with two stoppers, placing them on the threads of two opposite wheel studs.
Install the rear wheels so that the marks made earlier match. Before installing the wheels, lubricate the centering surface on the wheel hub with a thin layer of grease. Screw on the wheel mounting nuts. Lower the car and tighten the nuts crosswise to a torque of 100 Nm.
Press the brake pedal several times to center the brake pads.
[The original source of the publication is on the website FordBook.ru]