Contents: Removal ↳ Installation ↳
Removal
Mark the position of the front wheels on the hubs with paint. This will allow the balanced wheels to be installed again in their previous position. When loosening the wheel nuts, the car must be standing on the platform. Raise the front of the car onto jack stands and remove the front wheels.
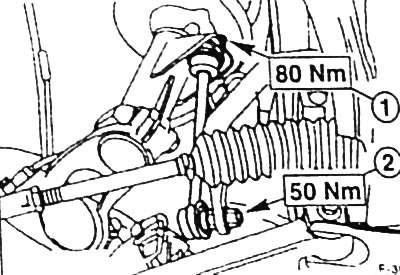
Unscrew the stabilizer connecting rod fastening. In doing so, first unscrew nut "2", and then nut -1 -
Unscrew the bolts securing the stabilizer clamps and remove the stabilizer together with the clamps.
Installation
Attach the stabilizer mounting clamps to the rubber mounts and tighten the bolts evenly to a torque of 80 Nm.
Caution: Make sure that the rubber support bushings are seated correctly and are not twisted.
Tighten the stabilizer connecting rod mount to the shock absorber strut to a torque of 80 Nm, then tighten the mount to the stabilizer to a torque of 50 Nm.
Place the front wheels so that the marks applied before removal match. First apply a thin layer of plastic grease for rolling bearings to the places where the wheels are seated on the wheel hubs. Do not lubricate the threads of the wheel studs. Tighten the wheels with nuts. Lower the car and tighten the wheel mounting nuts crosswise to a torque of 100 Nm.
[The text of the article was copied from the website: FordBook.ru]