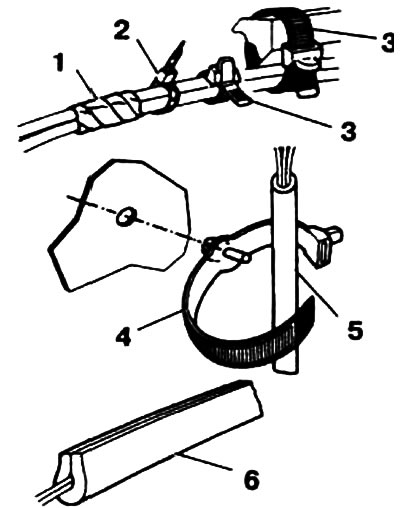
1. Insulating tape; 2. Tape loop; 3. Clamping tape; 4. Clamping band with fixing holes; 5. Protective hose; 6. Self-adhesive foam tape
Wires that, when fitting accessories, must be laid to the built-in set of wires in the car, should, if possible, always be laid along individual bundles using clamps for their fastening and rubber bushings. In order to prevent noise during driving and to avoid abrasion of the wires, newly laid wires should be reinforced with insulating tape, plastic mass, tape clamps for fastening them, etc. In this case, particular attention should be paid to that a minimum distance of 10 mm be maintained between brake lines and hardwired wires, and a minimum distance of 25 mm be maintained between brake lines and wires that vibrate with the engine and other parts of the vehicle.
When drilling holes in the body, it is then necessary to clean, prime and varnish the edges of the holes. The unavoidable chips generated during drilling must be completely removed from the body.
When carrying out all installation work that relates to electrical wiring, in order to prevent short circuits in the system, it is imperative to disconnect the battery ground wire (-), connecting its pole to the car body, and hang it aside.
Attention! If the wires are disconnected from the battery terminals, then under certain conditions the fault memory in the engine and gearbox control system and in the anti-lock system, as well as other electrical devices, such as a radio receiver and a clock, are taken out of service, and the accumulated values are erased. For specific guidance on this topic, see section "Removing the battery".
If additional electrical consumers are installed, then in each case it should be checked whether the existing three-phase alternator can still be additionally loaded. If required, it is necessary to provide for the installation of a new generator with a relatively large capacity.
Visitor comments