|
STATES |
DETAILS/RESULTS/ACTIONS |
|
H1: CHECKING THE VOLTAGE SUPPLIED TO THE AUDIO UNIT |
|
|
1Disconnect C443 from the audio unit. |
|
|
2Enter the ACCESSORY position. |
|
|
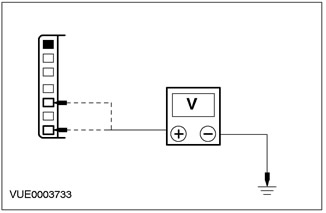
3Measure the voltage between pin 1 of audio unit connector C443, circuit 29-MD15 (OR/BLK), harness side and ground, and between pin 3 of audio unit connector C443, circuit 75-MD15 (GYN/GN), harness side and ground. |
|
• Is the voltage greater than 10 V in all cases? |
|
|
→ Yes |
|
|
Go to H2. |
|
|
→ No |
|
|
REPAIR circuit 29-MD15 (orange/black) or circuit 75-MD15 (yellow/green). CHECK for proper system operation. |
|
|
H2: CHECKING THE AUDIO UNIT GROUND CIRCUIT FOR OPENINGS |
|
|
1Enter the OFF position. |
|
|
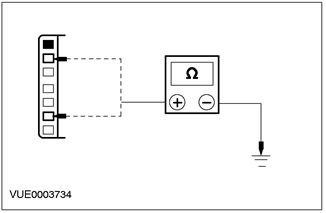
2Measure the resistance between pin 6 of audio unit connector C443, circuit 91-MD15 (black/green), harness side and ground, and between pin 2 of audio unit connector C443, circuit 91-MD34 (black/yellow), harness side and ground. |
|
• Is the resistance less than 5 Ohms in all cases? |
|
|
→ Yes |
|
|
INSTALL the new audio unit. CHECK the system for proper operation. |
|
|
→ No |
|
|
REPAIR electrical circuit 91-MD15 (black/green) or 91-MD34 (black/yellow). CHECK for proper system operation. |
|
PINPOINT TEST I: POOR RECEPTION QUALITY
|
STATES |
DETAILS/RESULTS/ACTIONS |
|
I1: CHECKING THE ANTENNA CABLE SHIELDING |
|
|
1Enter the OFF position. |
|
|
2Enter the OFF position. |
|
|
3Disconnect the Antenna Cable. |
|
|
4Disconnect the antenna cable from the audio unit. |
|
|
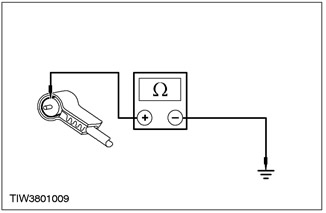
5Measure the resistance between the antenna cable ground plug (shield) and ground. |
|
• Resistance less than 1 Ohm? |
|
|
→ Yes |
|
|
Go to I2. |
|
|
→ No |
|
|
CLEAN and TIGHTEN the audio unit housing ground and the antenna base to body connection. If the fault is not corrected, INSTALL a new antenna cable. CHECK the system for proper operation. |
|
|
I2: CHECKING THE CENTRAL ANTENNA WIRE FOR AN OPEN CIRCUIT |
|
|
1Remove the antenna mast. |
|
|
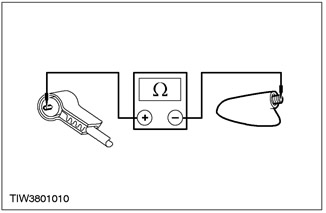
2Measure the resistance of the center conductor between the ends of the antenna cable. |
|
• Resistance less than 1 Ohm? |
|
|
→ Yes |
|
|
Go to I3. |
|
|
→ No |
|
|
INSTALL a new antenna cable. CHECK that the system is operating correctly. |
|
|
I3: CHECKING THE ANTENNA CABLE FOR A SHORT CIRCUIT |
|
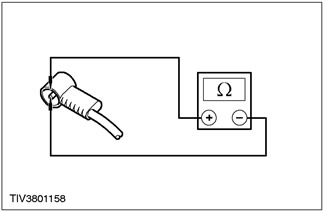
|
1Measure the resistance between the antenna center conductor and the antenna ground (shield). |
|
• Resistance greater than 10,000 ohms? |
|
|
→ Yes |
|
|
CLEAN and TIGHTEN the ground connections at the antenna base, on the audio unit housing and the battery ground wire to the body. If the problem persists, INSTALL a new audio unit. CHECK the system for proper operation. |
|
|
→ No |
|
|
INSTALL a new antenna cable. CHECK that the system is operating correctly. |
|
PINPOINT TEST J: POOR QUALITY/DISTORTED SOUND IN ONE OR MORE SPEAKERS (NOT ALL SPEAKERS)
|
STATES |
DETAILS/RESULTS/ACTIONS |
|
J1: CHECK SPEAKER RESISTANCE |
|
|
1Disconnect the non-working speaker. |
|
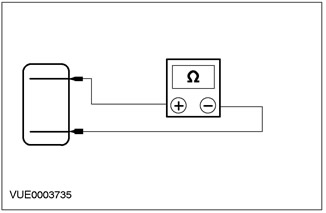
|
2Measure the resistance between pins 1 and 2 of the non-working speaker, on the element side. |
|
• Is the resistance approximately 4.0 ohms? |
|
|
→ Yes |
|
|
Go to J2. |
|
|
→ No |
|
|
INSTALL the new speaker. CHECK the system for proper operation. |
|
|
J2: CHECK SPEAKER INPUT FOR SHORT CIRCUIT "MASS" |
|
|
1Disconnect C443 from the audio unit. |
|
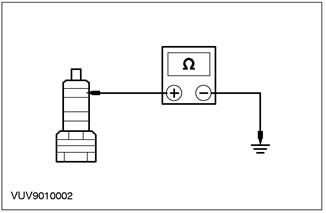
|
2Measure the resistance between pin 1 of the non-working speaker connector, on the wiring side, and ground. |
|
• Resistance greater than 10,000 ohms? |
|
|
→ Yes |
|
|
Go to J3. |
|
|
→ No |
|
|
REPAIR the speaker input circuit. CHECK the system for proper operation. |
|
|
J3: CHECK THE SPEAKER RETURN CIRCUIT FOR A SHORT CIRCUIT "MASS" |
|
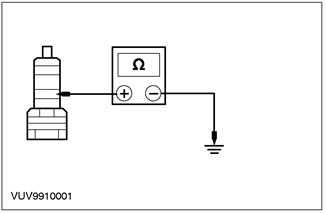
|
1Measure the resistance between pin 2 of the non-working speaker connector, on the wiring side, and ground. |
|
• Resistance greater than 10,000 ohms? |
|
|
→ Yes |
|
|
INSTALL a new speaker. CHECK the system for proper operation. If the problem persists, INSTALL a new audio unit. CHECK the system for proper operation. |
|
|
→ No |
|
|
REPAIR the speaker return circuit. CHECK the system for proper operation. |
|
PINPOINT TEST K: NO SOUND FROM ALL SPEAKERS
|
STATES |
DETAILS/RESULTS/ACTIONS |
|
K1: CHECK THE SPEAKER INPUT CIRCUIT FOR A SHORT CIRCUIT "MASS" |
|
|
1Enter the OFF position. |
|
|
2Disconnect C442 from the audio unit. |
|
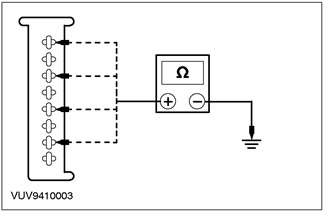
|
3Measure the resistance between the following audio unit connector pins and ground: - (Front left speaker) pin 1 of connector C442, electrical circuit 8-MD10 (white-black), on the wiring side, and ground. - (Rear left speaker) pin 3 of connector C442, electrical circuit 8-MD11 (white-green), on the wiring side, and ground. - (Front right speaker) pin 5 of connector C442, electrical circuit 8-MD17 (white-red), on the wiring side, and ground. - (Rear right speaker) pin 7 of connector C442, electrical circuit 8-MD18 (white), on the wiring side, and ground. |
|
• Is the resistance greater than 10,000 Ohms in all cases? |
|
|
→ Yes |
|
|
Go to K2. |
|
|
→ No |
|
|
REPAIR the electrical circuit concerned. CHECK the system for proper operation. |
|
|
K2: CHECK THE SPEAKER RETURN CIRCUIT FOR A SHORT CIRCUIT "MASS" |
|
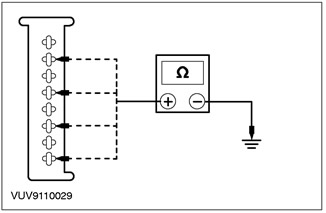
|
1Measure the resistance between the following audio unit connector pins and ground: - (Front left speaker) pin 2 of connector C442, electrical circuit 10-MD10 (gray-black), on the wiring side, and ground. - (Rear left speaker) pin 4 of connector C442, electrical circuit 10-MD11 (gray-white), on the wiring side, and ground. - (Front right speaker) pin 6 of connector C442, electrical circuit 10-MD17 (gray-red), on the wiring side, and ground. - (Rear right speaker) pin 8 of connector C442, electrical circuit 10-MD18 (gray), on the wiring side, and ground. |
|
• Is the resistance greater than 10,000 Ohms in all cases? |
|
|
→ Yes |
|
|
INSTALL the new audio unit. CHECK that the system is working properly. |
|
|
→ No |
|
|
REPAIR the electrical circuit concerned. CHECK the system for proper operation. |
|
PINPOINT TEST L: NO SOUND IN ONE OR MORE SPEAKERS (NOT ALL SPEAKERS)
|
STATES |
DETAILS/RESULTS/ACTIONS |
|
L1: CHECKING THE RESISTANCE OF THE SPEAKER CIRCUIT |
|
|
1Disconnect the non-working speaker. |
|
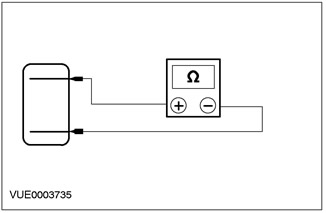
|
2Measure the resistance between pins 1 and 2 of the non-working speaker, on the element side. |
|
• Is the resistance approximately 4.0 ohms? |
|
|
→ Yes |
|
|
Go to L2. |
|
|
→ No |
|
|
INSTALL new speaker(s). CHECK system for proper operation. |
|
|
L2: CHECKING THE RESISTANCE OF THE SPEAKER CIRCUIT - WITH THE SPEAKER DISCONNECTED |
|
|
1Disconnect C442 from the audio unit. |
|
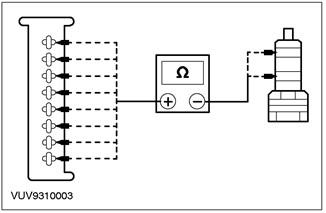
|
2Measure the resistance between the pins of the C442 connector of the audio unit and the connector of the non-working speaker(s). - (Front left speaker) pin 1 of connector C442, circuit 8-MD10 (white/black), harness side, and pin 2 of connector C937, circuit 8-MD28 (white), harness side. - (Front left speaker) pin 2 of connector C442, circuit 10-MD10 (gray-black), harness side, and pin 1 of connector C937, circuit 10-MD28 (gray), harness side. - (Front right speaker) pin 5 of connector C442, circuit 8-MD17 (white/red), harness side, and pin 2 of connector C938, circuit 8-MD28 (white), harness side. - (Front right speaker) pin 6 of connector C442, circuit 10-MD17 (gray-red), harness side, and pin 1 of connector C938, circuit 10-MD28 (brown), harness side. - (Rear left speaker) pin 3 of connector C442, circuit 8-MD11 (white/green), harness side, and pin 2 of connector C939, circuit 8-MD29 (white/green), harness side. - (Rear left speaker) pin 4 of connector C442, circuit 10-MD11 (gray/white), harness side, and pin 1 of connector C939, circuit 10-MD11 (gray/white), harness side. - (Rear right speaker) pin 7 of connector C442, circuit 8-MD18 (white), harness side, and pin 2 of connector C940, circuit 8-MD29 (white/green), harness side. - (Rear right speaker) pin 8 of connector C442, circuit 10-MD18 (gray), harness side, and pin 1 of connector C940, circuit 10-MD29 (gray/white), harness side. |
|
• Resistance less than 5 ohms? |
|
|
→ Yes |
|
|
INSTALL a new speaker. CHECK the system for proper operation. If the problem persists, INSTALL a new audio unit. CHECK the system for proper operation |
|
|
→ No |
|
|
REPAIR the electrical circuit concerned. CHECK the system for proper operation. |
|