NOTE: Carry out work on an inspection pit, overpass or, if possible, on a lift.
1. Remove the accessory drive belt.
2. Clamp the expansion tank hoses with a special device to prevent coolant leakage, and disconnect the hoses from the tank by removing the clamps from the hoses.
3. Place a secure support under the engine.
4. Remove the right powertrain mount (see Replacing the right powertrain suspension support).
5. Remove the front timing cover.
6. Set the gearshift lever to neutral position.
7. Install a special key (Fig. 5.43) on the timing belt pulley on the crankshaft, securing it with four bolts.
8. Turn the engine crankshaft until the marks on the VCT (variable valve timing) mechanisms of the camshafts are positioned as shown in Fig. 5.41.
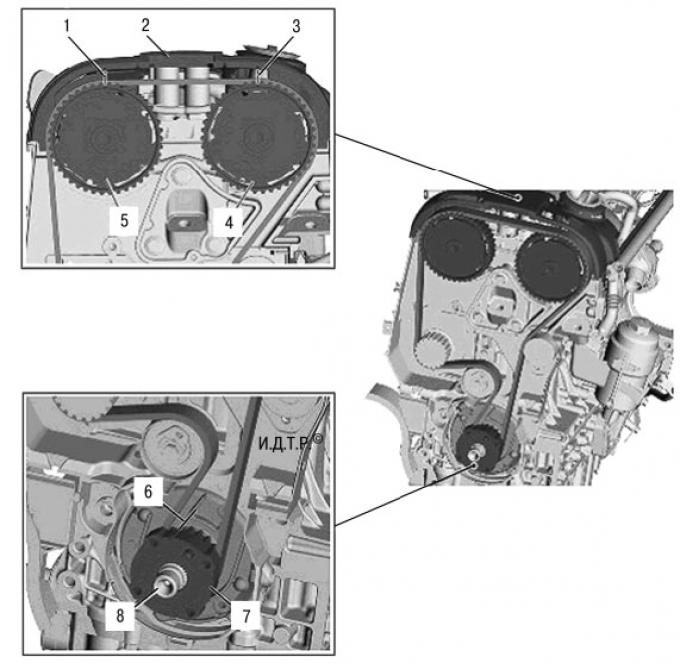
Fig. 5.41. Timing marks (camshaft phases): 1 – timing mark of the exhaust camshaft pulley; 2 – timing cover with timing marks; 3 – timing mark of the intake camshaft pulley; 4 – toothed pulley of the intake camshaft; 5 – toothed pulley of the exhaust camshaft; 6 – timing mark of the timing gear pulley on the crankshaft; 7 – toothed pulley of the timing belt on the crankshaft; 8 – crankshaft.
9. Secure the crankshaft from turning by engaging fourth gear in a manual transmission (or set the automatic transmission selector to the "P" position – parking), and brake the car with the parking brake.
10. Loosen the timing belt tension by loosening the tensioner's central bolt, inserting a hex key into the adjustment hole and turning the tensioner roller counterclockwise.
11. Remove the belt from the VCT timing pulleys, crankshaft and tensioner roller.
12. Put on the new belt.
NOTE: The timing belt should be installed starting from the crankshaft pulley, then to the idler pulley, intake and exhaust camshaft pulleys, water pump pulley, and finally to the timing belt tensioner pulley.
13. Set the tension roller position depending on the engine temperature (see Fig. 5.42) and tighten the central bolt of the timing belt tensioner. The tension roller spring will set the required tension of the timing belt.
14. Put the gearbox in neutral and check that the belt is installed correctly. To do this, turn the crankshaft two turns clockwise and check the position of the timing marks.
15. If the timing belt is installed correctly, install all removed parts in the reverse order of removal.
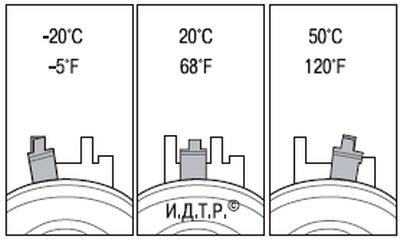
Fig. 5.42. Positions of the timing belt tensioner installation elements of the 2.5L Duratec-V15 engine at different engine temperatures.
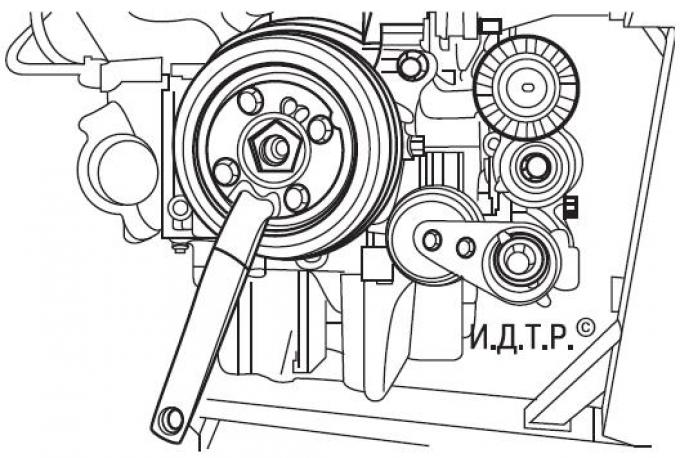
Fig. 5.43. Crankshaft turning key
A copy of the article is available on the website (FORDBOOK)