The order of these works on both sides is almost the same. The description for the left side is given as an example.


|
ORDER OF EXECUTION |
- Remove the front bumper cover and associated headlights as described above.
- Now securely place the front of the car on chocks, remove the appropriate wheel and…
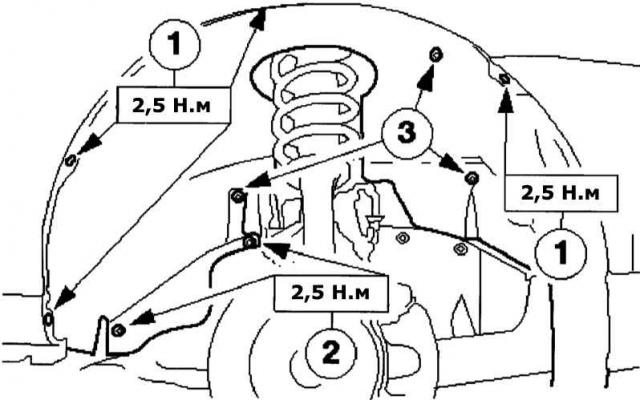
- …the wheel arch trim (screws and clamps are indicated by arrows).
Removing the wheel arch trim. 1 and 2 — Screws, 3 — Clamps. |
- Unscrew the two front screws - located behind the bumper cover - and..
- …disconnect the connector from the side turn signals.
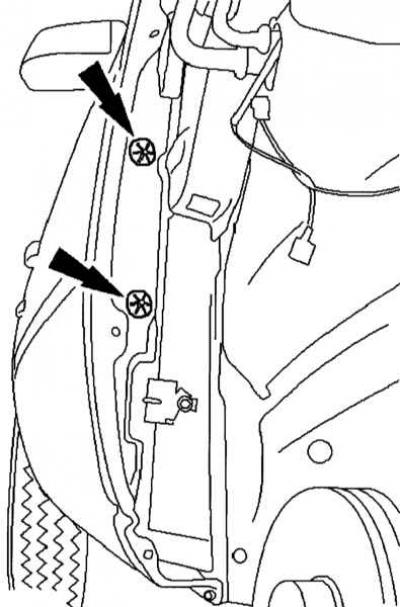
- Next, remove the sound insulation (screws are indicated by arrows).
Removing sound insulation (arrows). |
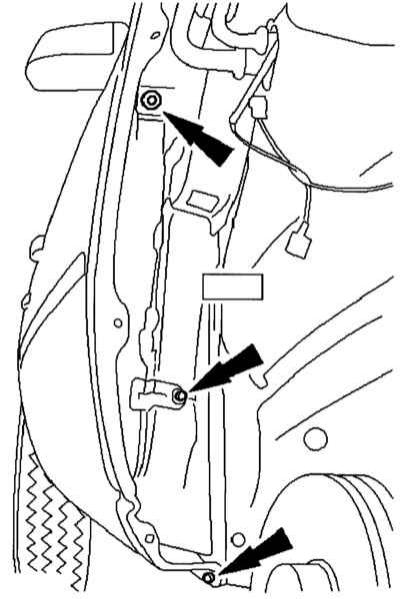
- Unscrew the wing screws (arrows) on the front pillar. Don't forget the top screw, it's not shown in the picture.
Remove the wing screws (arrows) on the front pillar. |
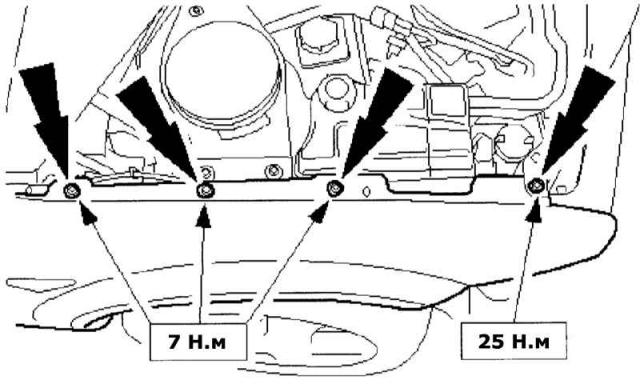
- Next, unscrew the screws (arrows) on the wheel wing and remove the grilles from the holes.
Unscrew the screws (arrows) on the wheel wing and remove the grille. |
- Before removing the wing, use a narrow spatula or sharp knife to carefully separate the contact surfaces from the body.
- Remove the wing and lower the car onto its wheels. Make sure your Mondeo is on as flat a surface as possible.
- Before installation, varnish the new wing and protect it from rust on the inner folds and in the contact area inside the wing.
- Clean the contact surfaces at the front and protect the defective areas with primer and topcoat. Allow the topcoat sufficient time to dry.
- Before installing the new wing, close the door and first align the wing with the door rebate.
- Next, insert all the screws and tighten them firmly into the wing rebate. Clean the threads first and lightly lubricate them. Check the door gap (4.0 mm±1.0 mm) and adjust if necessary.
- In the next step, tighten the screws on the front pillar from the middle to the edges. At the same time, align the position of the wing.
- Do the same with the screws on the wheel arch (tighten from the middle outward).
- After working with each screw, also check the gap with the engine hood (4.0 mm±1.0 mm).
- Finally, check all gaps and finally secure the wing.
- Carry out the installation in reverse order.
|
|