Trunk lid adjustment

            0


PROCEDURE
  1. Park your vehicle on a level surface and open the trunk lid.
  2. Loosen all the stub screws on the rear end plate (indicated by arrows).


    Loosen all stud screws (arrows) on the back end sheet.
  3. Remove the left upper cover gasket (arrow) And…


    Remove the cover gasket.
  4. ... unscrew the two buffers at the rear end of the trunk lid.
  5. Dismantle now the rotary damper of the trunk lid and..
  6. … align the cover hinge with the screws (arrows) on the side piece. Loosen the screws just enough to allow the cover to move.


    Align the cover hinge with the screws (indicated by arrows) on the side piece.
  7. Loosen the screws on the trunk lid just enough to allow the lid to move.
  8. Close the lid and install the spacer at the back (indicated by an arrow) 4 mm thick between the side edge of the tailgate and the side wall.


    Insert spacer (indicated by an arrow) 4 mm thick between the side edge of the tailgate and the side wall.
  9. Once the cover is aligned with the gap, remove the spacer and carefully lift the cover. Now it should not move in loops.
  10. Tighten the hinge screws now with a tightening torque of 23 Nm and..
  11. … then loosen the hinge screws (indicated by arrows) on the body so that it is possible to move the cover with force.


    Loosen slightly hinged screws (indicated by arrows) on the body.
  12. Close the lid and push it down in the hinge areas so that it has a clearance of 2 mm from the side walls.


    Create a gap of 2 mm.
  13. Carefully open the lid - the hinges must not slip - tighten the fixing screws to 23 Nm.
  14. Screw in both rear buffers until the closed trunk lid rests slightly.
  15. Carry out installation in reverse order.


PRACTICAL ADVICE

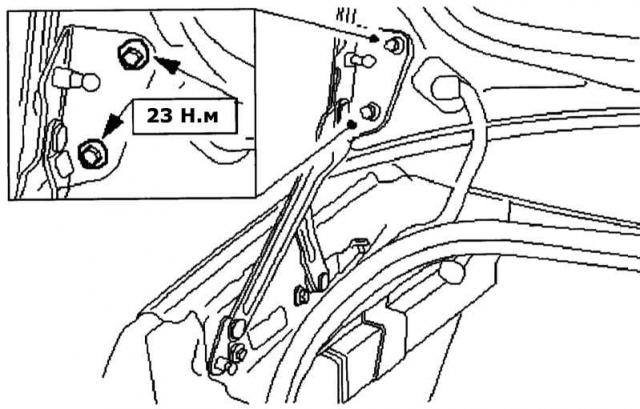
Removing the rear door


In order to fit more comfortably «entrails» rear door, already during disassembly, all disconnectable contacts «lengthen» with a rope. The wires are pulled out of the door, then from the other end, along with the already tied ropes. Ropes can long enough «hang out» on both sides, as new parts will be attached to them for installation. Installation is carried out in the reverse order - while the ropes are used as «pathfinder» for wires and hoses.

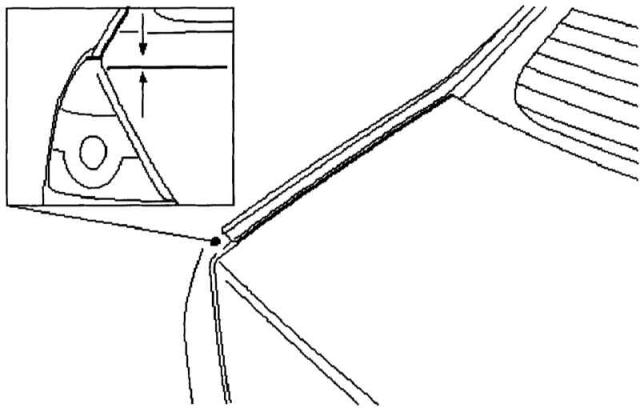
Replacing the rubber seal

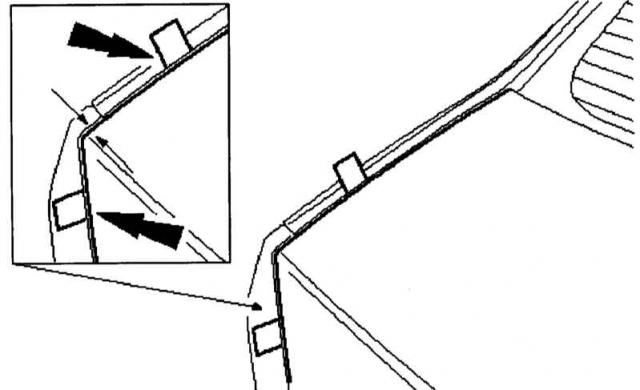
  1. If the rear door has already been removed, then immediately check also its seals: leaks «issue» traces of dust or water runoff on both sides of the sealing surfaces. If the seal has become brittle or cracked, donate a new fitting to your Mondeo. To do this, remove the old seal and clean the folds from the remnants of the old gasket and dirt.
  2. Squeeze out some new sealant (e.g. joint sealant, silicone) into a special groove. If you do not have a ready-made shaped part at hand, then install the seal in the middle of the lock and then press it along the edges. Trim the protruding ends properly with a side cutter. Apply some tension to this butt joint and then gently tap the seam with a rubber mallet.


Link to this page in different formats
HTMLTextBB Code


Visitor comments


No comments yet


Mondeo 4 
Mondeo 3 
Mondeo 2 
Mondeo 1 and 2 
Mondeo 1