


Contents: Removal ↳ Installation ↳
Removal
Neck flap
1. From inside the trunk, remove the trim retainers. Bend down the trim panel on the right side and insert the emergency release cable into the trunk.
2. Disconnect the drive rod from the damper and its stopper and remove the rod.
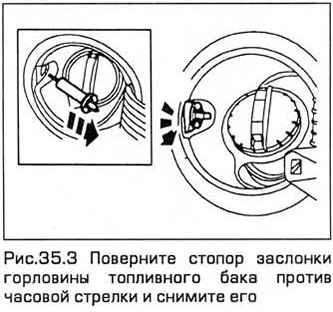
3. Pull out the elastic lock retainer, then (from outside the vehicle) turn the stopper counterclockwise and remove it (see Fig. 35.3).
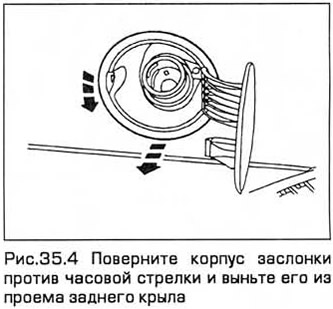
4. Remove the filler cap. Loosen the filler cap lock screw. Then turn the valve body counterclockwise by about 30° and remove it from the rear wing opening (see Fig. 35.4).
5. If necessary, the damper hinge mounting pins can be removed from the housing. Be careful: the damper and its housing are plastic.
Damper opening cable
Note: If the opening cable does not open the flap, it can be opened using the emergency flap opening cable located in the trunk. The opening cable may not work because it is broken, but because it is disconnected from the handle located next to the driver's seat.
6. From inside the trunk, remove the trim retainers. Bend the trim panel down on the right side.
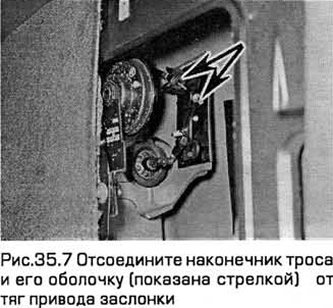
7. Disconnect the opening cable from the damper drive rods (see Fig. 35.7). Tie a rope to the end of the cable.
8. In the passenger compartment, in the area of the cable handle, next to the driver's seat, unfasten the trim (paragraph 29) and fold back the mat.
9. Unhook the end of the cable from the handle and unfasten the cable sheath from the floor. Gradually pull the cable into the passenger compartment. Then untie the rope from the cable.
10. When installing a new cable, pull it through with a rope.
Installation
11. Installation - in the reverse order of removal.