Contents: Removal ↳ Examination ↳
Removal
Caution The crankshaft can only be removed from a removed engine It is assumed that the gearbox, flywheel or drive plate, chain, cylinder head, oil pan, oil pump with oil suction pipe and mesh filter, oil deflector screen, oil pump, pistons with connecting rods and left crankshaft oil seal cover have already been removed from the engine.
Check the crankshaft axial play. Mount a dial indicator on the engine cylinder block and install the dial indicator tip into the end of the crankshaft (see Fig. 4D.56).
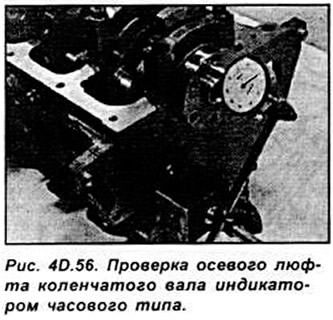
Move the crankshaft as far as it will go from the dial indicator. Set the pointer to "0" on the dial indicator. Then, using the lever, move the crankshaft toward the dial indicator and read the crankshaft clearance on the dial indicator. If the crankshaft clearance exceeds the permissible value, check the condition of the axle rings and install new axle rings if necessary.
If a dial indicator is not available, the crankshaft axial play can be checked using a set of feeler gauges.
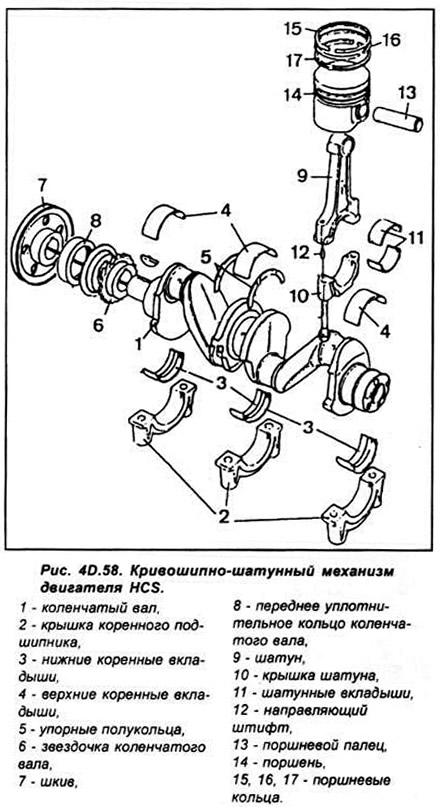
HCS and Endura-E engines
Check that the main caps are marked to indicate their correct location in the cylinder block. The caps also have arrows pointing towards the timing chain (see Fig. 4D.57).

Unscrew the mounting bolts and remove the main bearing caps.
Remove the crankshaft from the cylinder block, then remove the upper bearing halves. Keep them together with the corresponding heads for proper reinstallation. Remove the crankshaft oil seals.
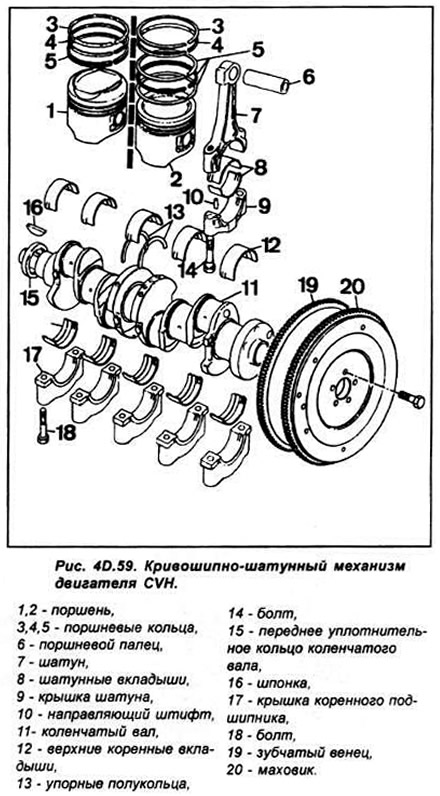
CVH and PTE engines
Check that the crankshaft main bearing caps have identification numbers. Each cap has an arrow pointing to the timing belt. Unscrew the mounting bolts and remove the crankshaft main bearing caps. Remove the crankshaft from the engine block. Remove the upper main bearing halves from the block and place them together with the corresponding cap for reinstallation. Also remove the half-shaft rings from each side of the center bearing.
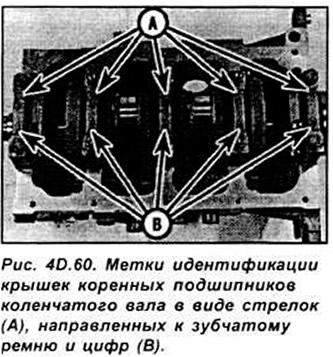
Zetec and Zetec-E engines
Check the identification marks on the main bearing caps. They are numbered sequentially, starting from the toothed belt side. There is also an arrow on the bearing caps pointing to the toothed belt (see Fig. 4D.60).
Unscrew the main bearing caps. Remove the crankshaft from the engine cylinder block.
Remove the upper half bearing shells and keep them together with the corresponding main bearing caps.
Examination
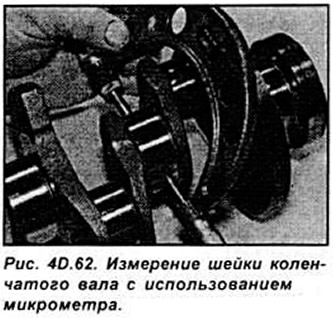
Clean the crankshaft thoroughly. Inspect the main and connecting rod journals for signs of wear, nicks or scratches. Check them for out-of-roundness using a micrometer. Before reinstalling the crankshaft, it is necessary to thoroughly clean it, including the internal oil passages. This can be done with a wire or by blowing with compressed air. Then insert an oil can into the appropriate oil passages and squeeze oil into them. It should appear from the next hole. Any blockage in the oil passage must be eliminated before installing the crankshaft.
Check the condition of the connecting rod bearings. A sign of damage to the connecting rod bearings is a regular, rhythmic, loud knocking noise from the crankshaft. The frequency depends on the engine speed. This knocking is especially noticeable when the engine is running under load. This sign is accompanied by a drop in oil pressure, although this is usually unnoticeable unless an oil pressure sensor is installed. Damage to the main bearing is usually indicated by noticeable vibration, especially at high engine speeds. This vibration is usually accompanied by a more significant drop in oil pressure and a rumbling noise. Bearing shells in good condition have a smooth surface and a uniform matte-silver color over the entire surface. Worn liners have areas of different colors where the metal has worn away and the substrate has become visible. Damaged liners have scratches or scoring. If the crankshaft itself is in good condition, then the problem can be easily solved by purchasing another set of bearings of the same size. If the crankshaft is being reground or replaced, then the bearing shells must also be replaced during this operation.
Check the condition of the crankshaft journals that operate in contact with the sealing rings.