Elements of the car body Ford Escort 5

Technical specifications
Tightening torques Front seat sled to the floor 25 Nm Upper seat belt mounting bolts 38 Nm Bolts of fastening of a bracket of the lower part of a belt 38 Nm Front Seat...
Tightening torques Front seat sled to the floor 25 Nm Upper seat belt mounting bolts 38 Nm Bolts of fastening of a bracket of the lower part of a belt 38 Nm Front Seat...
General information
The body and underframe on all models are made from forged and welded parts including front and rear crumple zones and a rigid center section. To protect against...
The body and underframe on all models are made from forged and welded parts including front and rear crumple zones and a rigid center section. To protect against...
Body Care
Checking the condition of the body should be done regularly. Otherwise, corrosion of individual sections of the body can lead to severe damage and further costly...
Checking the condition of the body should be done regularly. Otherwise, corrosion of individual sections of the body can lead to severe damage and further costly...
Caring for upholstery and rugs
Fabric covers Clean upholstered seats with a vacuum cleaner or a stiff brush. Heavily soiled seats should be cleaned with dry foam. Treat greasy and oily stains with...
Fabric covers Clean upholstered seats with a vacuum cleaner or a stiff brush. Heavily soiled seats should be cleaned with dry foam. Treat greasy and oily stains with...
Repair of minor body damage
Body scratch treatment If the scratch is superficial and does not reach the metal, wipe the area around the scratch with paint refresher or fine grit abrasive paste....
Body scratch treatment If the scratch is superficial and does not reach the metal, wipe the area around the scratch with paint refresher or fine grit abrasive paste....
Repair of severe damage to the body
In case of significant damage to the body and the need to replace a significant part of the parts, work must be done at the TO station. If the bodywork is damaged as a...
In case of significant damage to the body and the need to replace a significant part of the parts, work must be done at the TO station. If the bodywork is damaged as a...
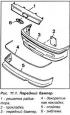
Bumpers
Withdrawal. Front bumper of cars up to 1996 release Remove the grille. Raise the front of the car and secure it on stands. Release the 6 connectors and 2 brackets and...
Withdrawal. Front bumper of cars up to 1996 release Remove the grille. Raise the front of the car and secure it on stands. Release the 6 connectors and 2 brackets and...
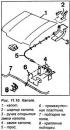
Hood
Withdrawal Open the hood and lock in the open position. Release the clips and remove the soundproof panel from the back of the hood. Remove the windshield washer nozzle...
Withdrawal Open the hood and lock in the open position. Release the clips and remove the soundproof panel from the back of the hood. Remove the windshield washer nozzle...

Bonnet lock cable
Withdrawal Open the hood and disconnect the cable from the hood latch. Disconnect the cable sheath from the lock (see fig. 11.11). Working from inside the vehicle,...
Withdrawal Open the hood and disconnect the cable from the hood latch. Disconnect the cable sheath from the lock (see fig. 11.11). Working from inside the vehicle,...
Hood lock
Open the hood and remove the cable from the groove in the hood latch. Remove the cable sheath from the hood latch. Unscrew 3 screws and remove the hood latch....
Open the hood and remove the cable from the groove in the hood latch. Remove the cable sheath from the hood latch. Unscrew 3 screws and remove the hood latch....

Door upholstery
Withdrawal. Cars up to 1996 release On models with manual power windows, fully close the window and mark the position of the power window handle. Release the mounting...
Withdrawal. Cars up to 1996 release On models with manual power windows, fully close the window and mark the position of the power window handle. Release the mounting...

Door glass
Withdrawal Remove the door upholstery and protective film. Using a lever, remove the inner and outer rubber seals at the bottom of the door window (see fig. 11.23)....
Withdrawal Remove the door upholstery and protective film. Using a lever, remove the inner and outer rubber seals at the bottom of the door window (see fig. 11.23)....

Power window
Remove the door upholstery and protective film. Remove glass. Carefully drill out the heads of the power window rivets with a 6mm drill bit. Remove the power window from...
Remove the door upholstery and protective film. Remove glass. Carefully drill out the heads of the power window rivets with a 6mm drill bit. Remove the power window from...

Door lock, lock cylinder and handles
Withdrawal Remove the door upholstery and protective film. Door lock cylinder Slide to the side and remove the door lock cylinder bracket. Disconnect the link from the...
Withdrawal Remove the door upholstery and protective film. Door lock cylinder Slide to the side and remove the door lock cylinder bracket. Disconnect the link from the...

Doors
Withdrawal Fully open the door, then rotate and disconnect the electrical connector from it (see fig. 11.40). Unscrew the screw Togh fixing the door latch (see fig....
Withdrawal Fully open the door, then rotate and disconnect the electrical connector from it (see fig. 11.40). Unscrew the screw Togh fixing the door latch (see fig....

Outside rear view mirror
Withdrawal Install the mirror glass with your hand all the way down. Insert a thin flathead screwdriver into the top outer corner of the mirror so that the blade of the...
Withdrawal Install the mirror glass with your hand all the way down. Insert a thin flathead screwdriver into the top outer corner of the mirror so that the blade of the...
Interior rear view mirror
Withdrawal Using a long, strong, thin thread or fishing line, cut off the layer of adhesive between the base of the mirror and the windshield. If you need to reinstall a...
Withdrawal Using a long, strong, thin thread or fishing line, cut off the layer of adhesive between the base of the mirror and the windshield. If you need to reinstall a...

Trunk lid
Withdrawal Open the trunk lid and mark the position of the hinges with a pencil. If equipped, disconnect the electrical connector and ground bus for the trunk lid...
Withdrawal Open the trunk lid and mark the position of the hinges with a pencil. If equipped, disconnect the electrical connector and ground bus for the trunk lid...
Trunk lid lock
Withdrawal. lock cylinder Open the trunk lid, unscrew the screw securing the lock cylinder fixing bracket. Remove the bracket. Disconnect the drive rod on the lock...
Withdrawal. lock cylinder Open the trunk lid, unscrew the screw securing the lock cylinder fixing bracket. Remove the bracket. Disconnect the drive rod on the lock...
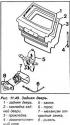
Backdoor
Withdrawal To facilitate the subsequent installation of electrical wires or water supply hoses, a cord should be tied to their ends before removal. After pulling out the...
Withdrawal To facilitate the subsequent installation of electrical wires or water supply hoses, a cord should be tied to their ends before removal. After pulling out the...

Rear door lock
Withdrawal. lock cylinder Open the tailgate, unscrew the 7 screws and remove the door trim. Unscrew the screw and remove the lock cylinder bracket or unscrew the 2 lock...
Withdrawal. lock cylinder Open the tailgate, unscrew the 7 screws and remove the door trim. Unscrew the screw and remove the lock cylinder bracket or unscrew the 2 lock...

Block of the system of central blocking of doors
Remove the negative terminal from the battery. Remove the trim from the engine compartment bulkhead on the driver's side. Remove the central locking system unit and...
Remove the negative terminal from the battery. Remove the trim from the engine compartment bulkhead on the driver's side. Remove the central locking system unit and...
Windshield
The windshield is glued directly into the frame. This ensures the best streamlining of the body and better sealing against water penetration. It also reduces drag and...
The windshield is glued directly into the frame. This ensures the best streamlining of the body and better sealing against water penetration. It also reduces drag and...
Overlays and emblems
Withdrawal Insert a nylon cord between the trim or emblem and the body and, moving it to the sides, cut the trim or emblem. Completely clean all traces of glue with...
Withdrawal Insert a nylon cord between the trim or emblem and the body and, moving it to the sides, cut the trim or emblem. Completely clean all traces of glue with...

Checking and adjusting the sunroof
Open and close the sunroof. The hatch cover must not jam when closing. Check. so that the sunroof cover matches the contour of the roof and adjust if necessary. Open the...
Open and close the sunroof. The hatch cover must not jam when closing. Check. so that the sunroof cover matches the contour of the roof and adjust if necessary. Open the...

Seats
Withdrawal. front seats Attention. On vehicles with automatic seat belt tensioners, care must be taken when working with the tensioner, which contains a powerful spring...
Withdrawal. front seats Attention. On vehicles with automatic seat belt tensioners, care must be taken when working with the tensioner, which contains a powerful spring...

Seat belts
Withdrawal Front belt on 3-door hatchback models Using a lever, remove the decorative cover from the top anchor of the front seat belt. Unscrew the mounting bolt, remove...
Withdrawal Front belt on 3-door hatchback models Using a lever, remove the decorative cover from the top anchor of the front seat belt. Unscrew the mounting bolt, remove...

Interior trim
Withdrawal Front pillar interior trim Remove the front door seal from the A-pillar. Unscrew the screw, release the brackets and remove the interior trim of the A-pillar....
Withdrawal Front pillar interior trim Remove the front door seal from the A-pillar. Unscrew the screw, release the brackets and remove the interior trim of the A-pillar....

Dashboard
Withdrawal Models up to 1996 release Remove the negative terminal from the battery. Remove the steering wheel. Remove the 2 upper and 4 lower screws and remove the upper...
Withdrawal Models up to 1996 release Remove the negative terminal from the battery. Remove the steering wheel. Remove the 2 upper and 4 lower screws and remove the upper...

Center console
Withdrawal Short console with manual transmission (models up to 1996). Unscrew the knob from the shift lever. Remove the lever guard and holder. Unscrew 4 screws and...
Withdrawal Short console with manual transmission (models up to 1996). Unscrew the knob from the shift lever. Remove the lever guard and holder. Unscrew 4 screws and...

Wheel arch liners
Raise the front of the car and secure it on stands. Remove the front wheel. Unscrew the 7 screws securing the wheel arch (see fig. 11.81). Press the top of the arch...
Raise the front of the car and secure it on stands. Remove the front wheel. Unscrew the 7 screws securing the wheel arch (see fig. 11.81). Press the top of the arch...

Radiator grille
Withdrawal Models up to 1993 release Open the hood. Unscrew the 4 screws on the top edge of the grille, lift it up and remove it from the installation slots on each side...
Withdrawal Models up to 1993 release Open the hood. Unscrew the 4 screws on the top edge of the grille, lift it up and remove it from the installation slots on each side...
This section is available on russian, bulgarian, belarusian, ukrainian, serbian, croatian, romanian, polish, slovak, hungarian
Escort 5
Escort 4
Escort 3
- General information
- User manual
- Maintenance
- Engine
- HCS and Endura-E engines
- CVH and PTE engines
- Zetec and Zetec-E engines
- Gasoline engines
- Diesel engines
- Diesel engines (since 1992)
- Cooling and heating
- Carburetors
- CFI fuel injection
- EFI fuel injection
- SEFI fuel injection
- Exhaust system
- Charging and starting system
- Ignition system
- Transmission
- Clutch
- Mechanical gearbox
- Automatic gearbox
- Drive shafts
- Chassis
- Brake system
- Car suspension
- Steering
- Body
- Electrical equipment
- Light and appliances
- Schematic diagrams
Escort 4
- General information
- User manual
- Maintenance
- Gasoline engines
- OHV engine repair
- CVH engine repair
- Fuel system
- Weber 2V carburetor
- KE-Jetronic injection system
- CFI injection system
- Ignition system
- Diesel engines
- Engine repair
- Fuel system
- High pressure pump
- Cooling and lubrication system
- Transmission
- Clutch
- Mechanical gearbox
- Automatic gearbox
- Drive shafts
- Chassis
- Suspension and wheels
- Steering
- Brake system
- Body
- Body elements
- Doors, locks and windows
- Electrical equipment
- Equipment and devices
- Lighting system
- Electrical circuits
Escort 3
- General information
- Maintenance
- Characteristics
- Engine
- Disassembly and assembly
- Cooling system
- Lubrication system
- Supply system
- Fuel injection «K-Jetronic»
- Transmission
- Clutch
- Mechanical gearbox
- Hydromechanical box
- Drive shafts
- Chassis
- Front suspension
- Rear suspension
- Steering
- Brake system
- Electrical equipment
- Starting and charging system
- Ignition system
- Ignition «Escort RS 1600»
- Light and appliances
- Schematic diagrams
FordBook.ru © 2014-2024 • Mobile version • Interesting to read • Sitemap: EN BG BY UA RS HR RO PL SK HU • Site search • Contact with administration
Focus 1 • Focus Turnier 1 • Focus 2 • Mondeo 1 • Mondeo 1 and 2 • Mondeo 2 • Mondeo 3 • Mondeo 4 • Escort 3 • Escort 4 • Escort 5 • Fiesta 2 • Fiesta 4 • Taurus 1 and 2 • Fusion • Scorpio 1 • Scorpio 2 • Sierra •
Focus 1 • Focus Turnier 1 • Focus 2 • Mondeo 1 • Mondeo 1 and 2 • Mondeo 2 • Mondeo 3 • Mondeo 4 • Escort 3 • Escort 4 • Escort 5 • Fiesta 2 • Fiesta 4 • Taurus 1 and 2 • Fusion • Scorpio 1 • Scorpio 2 • Sierra •