Contents: Removal ↳ Installation ↳
Removal
Front pillar interior trim
Remove the front door seal from the A-pillar. Remove the screw, release the clips and remove the A-pillar interior trim.
Interior trim of the central pillar
Remove the door seals from both sides of the B-pillar. Use a pry bar to remove the cover from the upper seat belt mount. Unscrew the bolt and remove the upper seat belt mount with the gasket.
On 5-door models, remove the 2 screws securing the B-pillar interior trim. Use a pry bar to remove the B-pillar interior trim.
Interior trim of the central pillar on hatchback models
Turn the rear seat cushion forward and lower the backrest. Unscrew the 3 screws securing the speaker and disconnect the wire from it. Unscrew the 2 Torx screws and remove the rear seatback latch. Unscrew the rear seat belt lower mount bolt. Unscrew the rear seat belt upper mount bolt and remove it along with the gasket. Remove the door seals from the rear pillar.
On three-door models, remove the rear trim. Unscrew the screws and remove the rear pillar interior trim, passing the seat belt through it.
Interior trim of the rear pillar on sedan models
Rotate the rear seat cushion forward and fold the seatback down.
Separate and remove the rear panel from the interior.
Remove the rear seat belt lower mounting bolt.
Unscrew the rear seat belt upper mounting bolt and remove it together with the gasket.
Remove the 2 screws securing the rear pillar interior trim. Remove the door seal from the rear pillar. Remove the interior trim from the rear pillar, passing the seat belt through the trim.
Interior trim of the rear pillar on estate models
Rotate the rear seat cushion forward and fold the seatback down.
Unscrew the rear seat belt upper mounting bolt and remove it together with the gasket.
Using a lever, remove the rear pillar interior trim.
Rear panel on sedan models
Fold down the back of the rear seat. If present, separate and remove the rear speakers.
Remove the screw and remove the seat belt guide trim on each side.
Unscrew the screws securing the back panel, lift the front of the back panel, release it from the 4 plastic clips and remove the back panel.
Front side interior trim
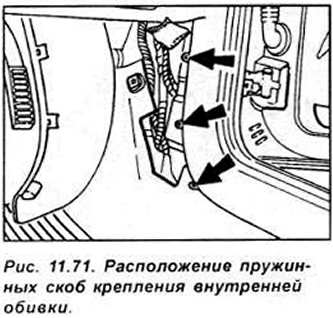
To release the inner side trim, turn the plastic latch located at the front of the trim by 90°. Remove the rear part of the trim from the spring clips (see Fig. 11.71.).
Trunk trim for hatchback and sedan models
Fold down the back of the rear seat.
Using a lever, remove the trunk trim mounting brackets (see Fig. 11.72, 11.73).
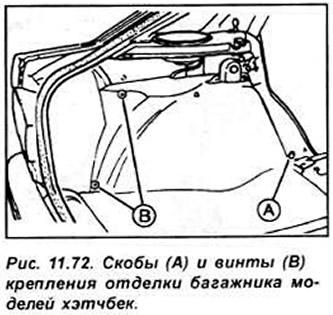
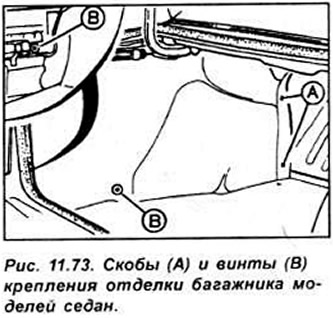
Remove the screws and remove the trunk trim.
Sun visors
Release the sun visors from the latches, unscrew the 2 screws securing the hinges and remove the visors. To remove the visor latches, use the lever to remove the flap of the cover, unscrew the screw and remove the latch.
Installation
Installation of all elements is carried out in the reverse order of removal.