Vehicle lighting system and electrical appliances Ford Escort 5

Fuses
Please note: Fuse ratings and electrical circuits may change from year to year. Fuses (in the fuse box) - vehicles manufactured before 1996. № Current Protected circuit...
Please note: Fuse ratings and electrical circuits may change from year to year. Fuses (in the fuse box) - vehicles manufactured before 1996. № Current Protected circuit...
Car relay
Relay for cars before 1996 № Color Controlled chain R1 Grey Heated windshield R2 Red Intermittent wiper control R3 Grey Heated rear window R4 Dark green ABS system R5...
Relay for cars before 1996 № Color Controlled chain R1 Grey Heated windshield R2 Red Intermittent wiper control R3 Grey Heated rear window R4 Dark green ABS system R5...
Incandescent lamps
Incandescent lamps Headlights (halogen H4) 60/55 W Side lights 5 W Front lamps 21 W Side turn signal repeater 5 W Taillights (Hatchback / Sedan) 5 W Stop Lights...
Incandescent lamps Headlights (halogen H4) 60/55 W Side lights 5 W Front lamps 21 W Side turn signal repeater 5 W Taillights (Hatchback / Sedan) 5 W Stop Lights...
General information and precautions
The electrical system voltage is 12 volts with negative ground. Power for the headlights and all electrical system components is supplied by the battery, which is...
The electrical system voltage is 12 volts with negative ground. Power for the headlights and all electrical system components is supplied by the battery, which is...
Open Circuit Detection
General description A typical electrical circuit consists of an electrical component, switches, relays, fuse motors, circuit breakers, wires, and connectors that connect...
General description A typical electrical circuit consists of an electrical component, switches, relays, fuse motors, circuit breakers, wires, and connectors that connect...

Fuses and relays
Fuses The main fuses, relays and timers are located in the central electrical box, located under the instrument panel on the driver's side. Additional fuses are located...
Fuses The main fuses, relays and timers are located in the central electrical box, located under the instrument panel on the driver's side. Additional fuses are located...

Switches
Ignition switch Remove the negative terminal from the battery. Remove the 2 screws at the top of the steering column and 4 screws at the bottom and remove the upper and...
Ignition switch Remove the negative terminal from the battery. Remove the 2 screws at the top of the steering column and 4 screws at the bottom and remove the upper and...

External lighting bulbs
Before replacing exterior light bulbs, check the associated electrical circuit and fuse. Warning. Do not touch the glass bulb of the lamp with bare hands. The...
Before replacing exterior light bulbs, check the associated electrical circuit and fuse. Warning. Do not touch the glass bulb of the lamp with bare hands. The...

Indoor lighting lamps
Interior lighting Set the switch to the middle position. Insert a small screwdriver from the side opposite the switch and push the lamp with the switch out of the...
Interior lighting Set the switch to the middle position. Insert a small screwdriver from the side opposite the switch and push the lamp with the switch out of the...

External lighting devices
Remove the ground cable from the battery. Headlights. Models up to 1996 Open and secure the hood in the open position. On pre-1993 models, remove the 4 screws securing...
Remove the ground cable from the battery. Headlights. Models up to 1996 Open and secure the hood in the open position. On pre-1993 models, remove the 4 screws securing...

Headlight adjustment
Correct adjustment of headlights is of great importance for traffic safety. Precise adjustment is possible only with the help of a special device. Before adjusting the...
Correct adjustment of headlights is of great importance for traffic safety. Precise adjustment is possible only with the help of a special device. Before adjusting the...
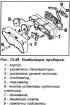
Instrument cluster
Removal. Models before 1996 Remove the battery ground cable. Remove the steering wheel. Unscrew the 2 screws securing the instrument cluster decorative trim at the top...
Removal. Models before 1996 Remove the battery ground cable. Remove the steering wheel. Unscrew the 2 screws securing the instrument cluster decorative trim at the top...

Elements of the instrument cluster
Removal (models before 1996) Remove the instrument cluster. PCB Remove all instrument cluster light bulbs from the rear of the instrument cluster (see Fig. 12.55)....
Removal (models before 1996) Remove the instrument cluster. PCB Remove all instrument cluster light bulbs from the rear of the instrument cluster (see Fig. 12.55)....
Speedometer drive cable
Removal Remove the instrument cluster. Unscrew the union nut on the gearbox and remove the speedometer drive cable from the gearbox. Mark the location of the speedometer...
Removal Remove the instrument cluster. Unscrew the union nut on the gearbox and remove the speedometer drive cable from the gearbox. Mark the location of the speedometer...
Cigarette lighter
Removal (models before 1996) Remove the ground wire from the battery. Unscrew the 2 screws and remove the storage compartment above the cigarette lighter. Disconnect the...
Removal (models before 1996) Remove the ground wire from the battery. Unscrew the 2 screws and remove the storage compartment above the cigarette lighter. Disconnect the...
Watch
Removal Remove the ground cable from the battery. On pre-1996 models, use a pry bar to remove the clock from the instrument cluster. Disconnect the electrical connector...
Removal Remove the ground cable from the battery. On pre-1996 models, use a pry bar to remove the clock from the instrument cluster. Disconnect the electrical connector...
Sound signal
Removal The horn is located at the front of the vehicle, behind the front bumper. To remove the horn, raise the front of the vehicle. Remove the wires from the horn....
Removal The horn is located at the front of the vehicle, behind the front bumper. To remove the horn, raise the front of the vehicle. Remove the wires from the horn....

Windscreen wiper arms
Removal Using chalk or a strip of tape, mark the position of the wiper arms in their original positions. Remove the plastic cover from the base of the wiper arm and...
Removal Using chalk or a strip of tape, mark the position of the wiper arms in their original positions. Remove the plastic cover from the base of the wiper arm and...

Windscreen wiper motor and rods
Removal. Windscreen wiper motor Turn on the wiper motor. Then turn it off. When the blades are in the home position. Remove the ground cable from the battery. Unscrew...
Removal. Windscreen wiper motor Turn on the wiper motor. Then turn it off. When the blades are in the home position. Remove the ground cable from the battery. Unscrew...

Windscreen wiper arm drive
Removal Turn on the windshield wiper motor and turn it off after the blades are in their original position. Remove the ground wire from the battery. Remove the wiper...
Removal Turn on the windshield wiper motor and turn it off after the blades are in their original position. Remove the ground wire from the battery. Remove the wiper...

Rear door wiper
Removal Turn the wiper on and off when it reaches its original position. Please note: The windshield wiper motor only operates when the rear door is closed. Remove the...
Removal Turn the wiper on and off when it reaches its original position. Please note: The windshield wiper motor only operates when the rear door is closed. Remove the...

Windscreen washer
Removal. Washer pump Remove the pump from the tank, after pumping out any remaining fluid from the tank, then disconnect the hoses and electrical connector from the...
Removal. Washer pump Remove the pump from the tank, after pumping out any remaining fluid from the tank, then disconnect the hoses and electrical connector from the...

Radio receiver
Removal Remove the ground cable from the battery. To remove the radio, you will need two special U-shaped tools to extract it. Insert the two special U-shaped tools on...
Removal Remove the ground cable from the battery. To remove the radio, you will need two special U-shaped tools to extract it. Insert the two special U-shaped tools on...

Loudspeakers
Removal. Door speaker Remove the door trim. Unscrew the speaker mounting screws and remove the speaker from the door, then disconnect the electrical wires from it (see...
Removal. Door speaker Remove the door trim. Unscrew the speaker mounting screws and remove the speaker from the door, then disconnect the electrical wires from it (see...
Radio receiver antenna
Removal Please note: The antenna wire runs from the roof mounting point, through the right front pillar and instrument panel to the radio. Remove the ground cable from...
Removal Please note: The antenna wire runs from the roof mounting point, through the right front pillar and instrument panel to the radio. Remove the ground cable from...

Anti-theft system
This system provides additional protection for the vehicle with an audible alarm. When the system is on, the audible alarm will sound if the doors, hood or rear door are...
This system provides additional protection for the vehicle with an audible alarm. When the system is on, the audible alarm will sound if the doors, hood or rear door are...
This section is available on russian, bulgarian, belarusian, ukrainian, serbian, croatian, romanian, polish, slovak, hungarian
See other similar sections for Ford cars:
• Electrical equipment: Lighting and signaling Ford Focus Turnier 1 (1998-2004)
• Electrical equipment: Headlights and lighting Ford Mondeo 4 (2007-2014)
• Electrical equipment: Light and appliances Ford Fiesta 4 (1996-1999)
• Electrical equipment: Headlights and lighting Ford Scorpio 2 (1994-1998)
• Electrical equipment: Lighting and signaling Ford Focus Turnier 1 (1998-2004)
• Electrical equipment: Headlights and lighting Ford Mondeo 4 (2007-2014)
• Electrical equipment: Light and appliances Ford Fiesta 4 (1996-1999)
• Electrical equipment: Headlights and lighting Ford Scorpio 2 (1994-1998)
Escort 5
Escort 4
Escort 3
- General information
- User manual
- Maintenance
- Engine
- HCS and Endura-E engines
- CVH and PTE engines
- Zetec and Zetec-E engines
- Gasoline engines
- Diesel engines
- Diesel engines (since 1992)
- Cooling and heating
- Carburetors
- CFI fuel injection
- EFI fuel injection
- SEFI fuel injection
- Exhaust system
- Charging and starting system
- Ignition system
- Transmission
- Clutch
- Mechanical gearbox
- Automatic gearbox
- Drive shafts
- Chassis
- Brake system
- Car suspension
- Steering
- Body
- Electrical equipment
- Light and appliances
- Schematic diagrams
Escort 4
- General information
- User manual
- Maintenance
- Gasoline engines
- OHV engine repair
- CVH engine repair
- Fuel system
- Weber 2V carburetor
- KE-Jetronic injection system
- CFI injection system
- Ignition system
- Diesel engines
- Engine repair
- Fuel system
- High pressure pump
- Cooling and lubrication system
- Transmission
- Clutch
- Mechanical gearbox
- Automatic gearbox
- Drive shafts
- Chassis
- Suspension and wheels
- Steering
- Brake system
- Body
- Body elements
- Doors, locks and windows
- Electrical equipment
- Equipment and devices
- Lighting system
- Electrical circuits
Escort 3
- General information
- Maintenance
- Characteristics
- Engine
- Disassembly and assembly
- Cooling system
- Lubrication system
- Supply system
- Fuel injection «K-Jetronic»
- Transmission
- Clutch
- Mechanical gearbox
- Hydromechanical box
- Drive shafts
- Chassis
- Front suspension
- Rear suspension
- Steering
- Brake system
- Electrical equipment
- Starting and charging system
- Ignition system
- Ignition «Escort RS 1600»
- Light and appliances
- Schematic diagrams