OHV engine intake and exhaust valves, except for 1.3 dm3 engine manufactured from September 1988
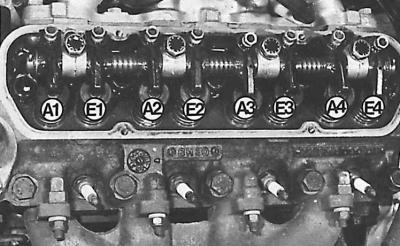
A - inlet;
E - graduation
The optimal clearance in the gas distribution mechanism is necessary to compensate for thermal expansion when the engine warms up and reaches its operating temperature. When the gap is less than optimal, the valve timing changes, the compression and engine power decrease, and the uniformity of the engine may also be disturbed. With increased valve clearances, which is determined by the presence of characteristic knocks, the valve timing changes, the filling of the cylinders with the fuel mixture and engine power decrease.
Checking and adjusting the valve clearances must be done every 20,000 km of the car.
Check and adjust valve clearances on a cold engine.
Valve clearances
| Valve | Optimal clearance, mm | Adjustment, mm |
| Inlet | 0,20 – 0,25 | 0,20 |
| High school graduation | 0,56 – 0,61 | 0,60 |
Adjustment procedure
| The levers press on the stems of both valves in the cylinder | 1 | 3 | 4 | 2 |
| Cylinder valve clearance adjustment | 4 | 2 | 1 | 3 |
1. Remove air filter.
2. Remove the high-voltage wires from the spark plugs by the tips.
3. Remove the cylinder head cover by first unscrewing the 4 bolts.
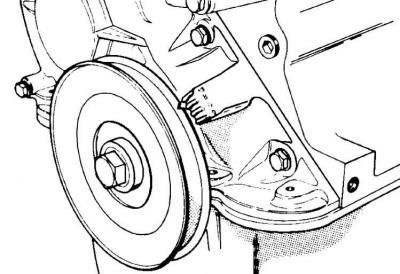
4. Turn the engine in the direction of its working rotation (clockwise) until the marks on the pulley and the front cover are aligned. You can turn the engine crankshaft with a key for the pulley mounting bolt or by turning the wheel with the gear engaged.
5. Carefully turn the engine in one direction or another until both valves in the first cylinder open, while the valves of the fourth cylinder are closed and there is a gap between the lever and the valve stem, which is measured with a feeler gauge and adjusted if necessary.

6. Adjustment is made by rotating the adjusting bolt so that the probe, the thickness of which is equal to the size of the gap, hardly moves in the gap.
7. Turn the engine crankshaft 90°and check the clearance of the next valve. The clearances of the remaining valves are also checked.
8. Install the cylinder head cover, air filter and connect the high voltage wires.
Visitor comments