Marks for installing the piston of the 1st cylinder at TDC on an OHV engine
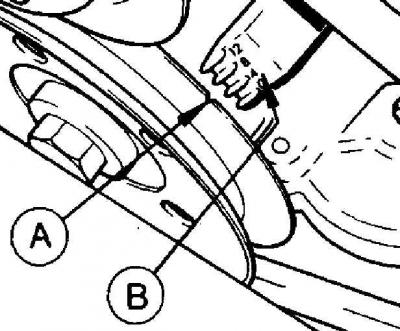
A - mark on the crankshaft pulley;
B - pointer on the front cover
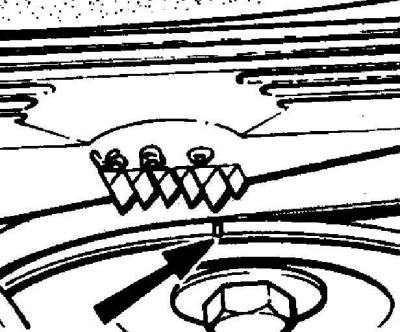
Marks on the crankshaft pulley for setting the piston of the 1st cylinder at TDC on the CVH engine
A stroboscope must be used to accurately check and set the ignition timing. But for the initial setting of the ignition timing (after a major overhaul or if the ignition timing is completely off) the basic initial setting can be made to start the engine. After starting the engine, it is necessary to correct the ignition timing using a stroboscope.
Static installation
1. Remove spark plug tip from cylinder 1 spark plug and unscrew spark plug.
2. Close the spark plug hole with your finger and turn the engine crankshaft using the pulley mounting bolt until pressure is felt on the finger. This indicates that the piston of the 1st cylinder is on the compression stroke.
3. Continue turning the engine crankshaft until the mark on the pulley aligns with the pointer. On OHV engines, the pointer is located on the front cover to the top right of the pulley. On CVH engines, the pointer is located on the timing belt cover above the pulley. On all engines "0" indicates top dead center (TDC), and the left label corresponds to 4 before TDC (see fig. Marks for installing the piston of the 1st cylinder at TDC on the OHV engine and fig. Marks on the crankshaft pulley for setting the piston of the 1st cylinder at TDC on the CVH engine).
4. Remove the distributor cap and check that the distributor rotor is directed to the spark plug of the 1st cylinder.
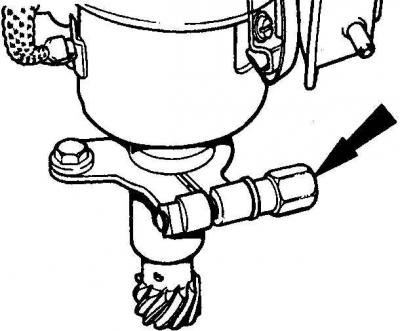
5. Loosen clamping bolt (OHV engines (indicated by an arrow)) or three bolts (CVH engine) ignition distributor.
6. Turn the ignition distributor housing counterclockwise until the contacts close, then slowly turn the housing clockwise until the contacts begin to open. While holding the distributor housing in this position, tighten the clamp bolt or bolts.
7. Install the ignition distributor cap, screw in the spark plug and install the tip of the high-voltage wire on it. In this position of the ignition distributor, the engine can be started.
Installation using a stroboscope
1. Align the mark on the pulley with the pointer and mark them with white paint.
2. Connect the stroboscope according to the manufacturer's instructions.
3. Disconnect the vacuum hose from the ignition distributor and close it with a suitable plug.
4. Start the engine at idle speed.
5. Point the strobe light at the marks. The marks should appear to be fixed and aligned with each other.
6. If the marks are not aligned, it is necessary to make an adjustment, for which loosen the clamping bolt or bolts and, turning the distributor, align the marks, then tighten the clamping bolt.
7. Turn off the engine and disconnect the stroboscope.
Visitor comments