Thermostat
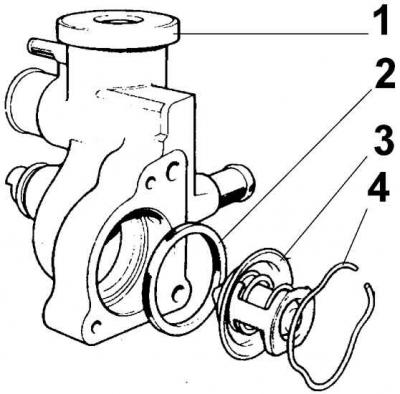
1 - thermostat housing; 2 - sealing ring; 3 - thermostat; 4 - latch
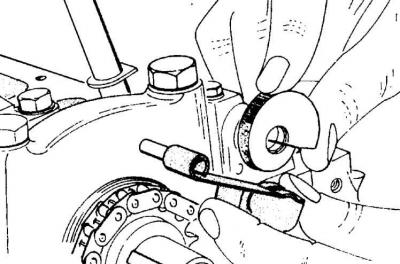
Camshaft chain drive
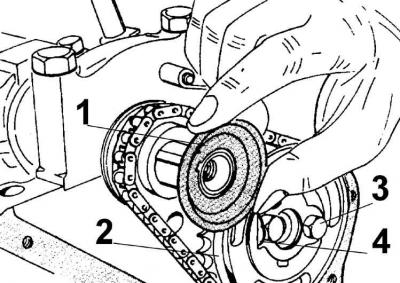
1 - crankshaft oil flinger ring; 2 – an asterisk of a camshaft; 3 - sprocket mounting bolts; 4 - fixing plate
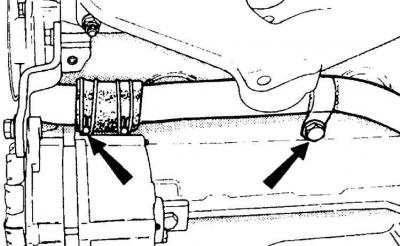
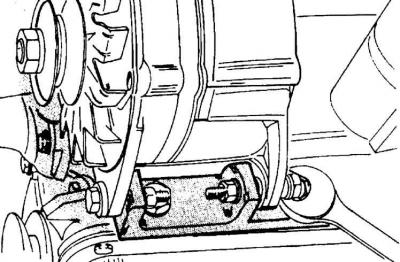
1. Disconnect and remove the coolant hose located on the side of the engine (arrows indicate hose fastening elements).
2. Drain engine oil.
3. Disconnect the ignition distributor cap and remove it together with the high voltage wires.
4. Unscrew the spark plugs.
5. Remove the oil filler cap together with the crankcase ventilation hose, having previously disconnected the hose from the intake manifold.
6. Unscrew the mounting bolts and remove the carburetor, having previously disconnected the fuel and vacuum tubes.
7. Unscrew the three bolts securing the thermostat cover and remove the thermostat.
8. Remove the cylinder head cover by first unscrewing the 4 bolts.
9. Remove the valve lever shaft assembly from the cylinder head by unscrewing the 4 bolts.
10. Remove the valve lifter rods. When reused, they must be installed in their original places, so mark the pushers with adhesive tape or fold them in such a way that they are not confused during installation.
11. Remove the cylinder head bolts in reverse order from tightening and remove the cylinder head from the engine.
12. Unscrew the clamping plate bolt securing the ignition distributor to the engine block and remove it.
13. Remove fuel pump.
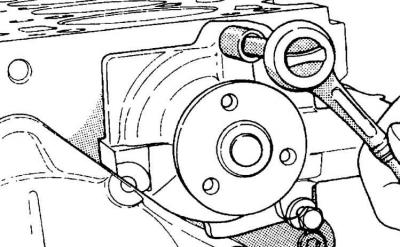
14. Unscrew the 3 oil pump mounting bolts and remove it.
15. Unscrew the water pump pulley. To prevent the pulley from turning when unscrewing the bolts, you can use a gas wrench or strongly compress the two branches of the drive belt.
16. Loosen the lower mounting bolts, unscrew the upper alternator tension bolt, tilt the alternator towards the engine and remove the drive belt.
17. Remove the alternator mounting bracket bolts and remove the alternator.
18. Remove the water pump mounting bolts and remove the pump.
19. Remove pulley from crankshaft.
20. Position the engine horizontally and remove the oil pan.
21. Remove the camshaft drive chain cover (see rice. Camshaft chain drive).
22. Remove the oil flinger from the crankshaft.
23. Remove chain tensioner.
24. Remove the sprocket from the camshaft together with the chain, having previously unbent the plate that fixes the sprocket mounting bolts and unscrewing the bolts.

25. Unscrew the two bolts and remove the camshaft mounting plate.
26. Rotate the camshaft a few revolutions to disengage the tappets from contact with the camshaft. The engine must be in a horizontal position.
27. Remove the valve lifters and mark them with adhesive tape so that they fall into place during assembly.
28. Remove the camshaft from the engine block.
29. Remove the sprocket from the crankshaft with a puller.
30. Check the numbers on the connecting rod caps and connecting rods and their position. Connecting rod No. 1 is located on the drive side of the gas distribution system, and the numbers are on the side of the camshaft.
31. Unscrew the connecting rod cap and remove it together with the connecting rod bearing.
32. Remove piston with connecting rod.
33. Remove the rest of the pistons in the same way.
34. Unscrew the bolts securing the leading part of the clutch to the flywheel alternately crosswise, blocking the flywheel ring gear with a screwdriver.
35. Remove drive gear and clutch disc.
36. Unscrew the flywheel mounting bolts and, being careful, remove the flywheel.
37. Remove the rear engine cover.
38. Unscrew the bolts and remove the crankshaft rear O-ring cover.
39. Check the markings of the crankshaft main bearing caps. The letters indicate: F - front, C - middle and R - rear main bearing caps. The arrows on the covers must point towards the timing gear. Loosen the main bearing cap bolts and remove the caps.
40. Remove crankshaft.
Visitor comments