Contents: Removal ↳ Installation ↳
Removal
Disconnect the ground wire from the battery clamp.
Remove the air filter.
Install a container to collect any fuel that leaks from the CFJ.
Loosen the connection of the elastic high-pressure hose and bring it to a drop in fuel pressure. Disconnect the high-pressure hose. and the fuel overflow line.
Disconnect the gas pedal linkage.
Drain the cooling system.
Disconnect the electrical wire connectors from the CFJ control unit.
Remove the plug from the pressure regulator cover and unscrew the hex socket head bolt.
Remove the pressure regulator cover.
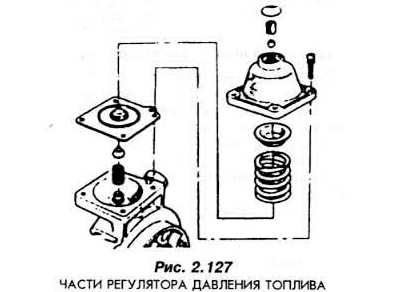
Remove the remaining parts of the regulator (Fig. 2.127).
Installation
Assemble the regulator parts as shown in Fig. 2.127. Tighten the cover bolts evenly.
Insert the valve ball and position it so that it is securely seated in the spring washer (plate).
Screw the Allen head bolt in until it stops and back it out approximately three turns.
Attach to the CFJ device intake manifold.
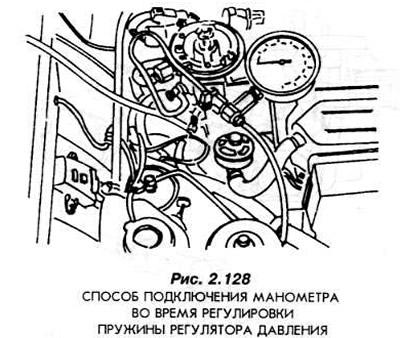
Connect a pressure gauge to check the fuel pressure (Fig. 2.128).
Connect the fuel lines.
Install the gas pedal linkage.
Connect the electrical equipment connections and connectors.
Connect the cooling system pipes and fill it with coolant.
Connect the vacuum tube.
Close the fuel pump switch so that the pump operates continuously. The fuel pressure supplied by the pump should be 1.0 ±0.05 Bar.
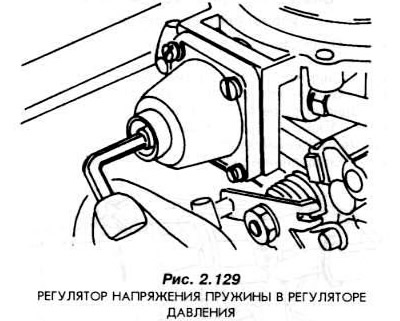
If fuel pressure adjustment is required, turn the Allen key bolt with a 4 mm Allen key. One turn of the bolt should cause the pressure to drop to 0.5 bar. Turn the bolt in the opposite direction until the fuel pressure increases to 1.0 bar (Fig. 2.129).
Install a new plug into the regulator cover socket.
Start the engine and check the fuel lines for leaks.
Install the air filter.
[A copy of the article is available on the website: FordBook]