Removal
Disconnect the negative terminal from the battery. Remove the air filter housing. To prevent coolant loss, pinch the coolant supply and return hoses to the automatic choke. Remove the coolant hoses from the automatic choke housing. Remove the fuel line and connector from the anti-knock valve. Unscrew the screws (2 regular and 4 TORX type), then remove the top cover of the carburetor. Pay attention to the position of the choke housing alignment marks. Unscrew the 3 screws and remove the bimetallic spring housing. Remove the shielding ring. Unscrew the 3 screws securing the automatic choke and disconnect it from the control lever. Unscrew the 3 screws and remove the vacuum diaphragm housing.
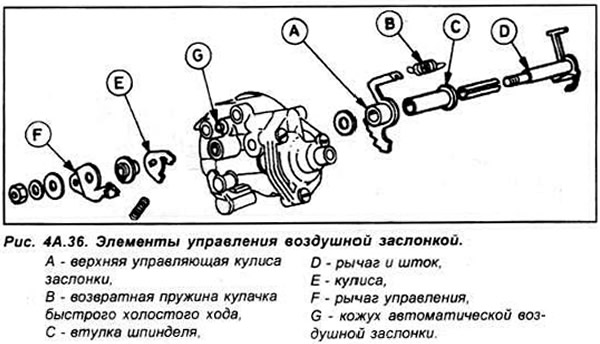
When removing the damper control mechanism, pay attention to the relative position of the parts (see Fig. 4A.36).
Examination
Clean and visually inspect all parts of the automatic air damper for defects and wear. Pay particular attention to the condition of the vacuum diaphragm and the O-ring of the air damper housing. Replace worn or damaged parts if necessary.
Installation
Assemble the automatic air damper drive mechanism. Do not use any lubricants. Install the vacuum chamber. Install the O-ring and connect the air damper drive. Install the automatic air damper housing and secure with screws. Check and, if necessary, adjust the air damper vacuum drive.
Install the screening ring. Install the automatic air damper housing with the bimetallic spring. Install the carburetor cover. Use a new gasket.
Connect the fuel supply hose to the carburetor, using new clamps and screws if necessary.
Connect the connector to the anti-knock valve.
Connect the coolant supply hoses to the automatic air flap. Check the coolant level.
Connect the negative terminal to the battery. Install the air filter housing.