Floor drive
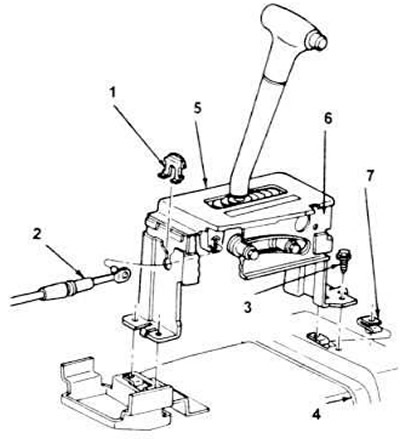
Lever and drive housing
1. Grasp the drive handle tightly and pull it up to remove it.
2. Remove the center console (chapter 11).
3. Unscrew the four screws and lift up the decorative trim.
4. Use a screwdriver to pry up the locking clip, disconnect the drive cable (see picture).
3.4. After removing the locking clip, disconnect the drive cable, four bolts and lift up the drive arm with the body.
1. Retaining clip.
2. Cable assembly.
3 Stop bolts (4 pieces).
4. Bottom.
5. Decorative overlay.
6. Housing and drive lever.
7. Clinch nut (4 pieces).
5. Unscrew four lock bolts and disconnect the lever and the case of a drive from the car body.
6. Installation is carried out in reverse order. After installation, adjust the mechanism (section 5).
Drive cable
7. Remove the console, disconnect the cable from the retainer.
8. To improve access, unscrew the floor covering and unscrew the screws securing the cable bracket to the front panel (see picture).
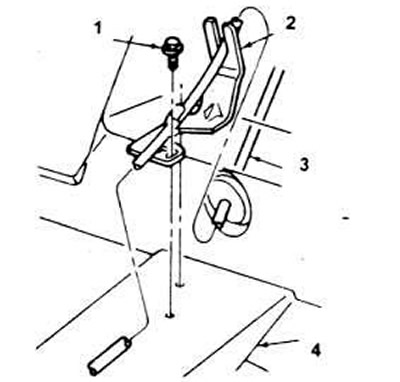
3.8. Peel back the floor covering to access the two cable stop bracket screws.
1. Locking bracket screws (2 pieces).
2. Cable locking bracket.
3. Rope control drive.
4. Front panel.
9. Push the rubber washer from the floor tray into the passenger compartment so that it does not interfere.
10. Unscrew the lock nut securing the cable to the drive lever on the gearbox, remove the clamp, disconnect the cable (see picture).
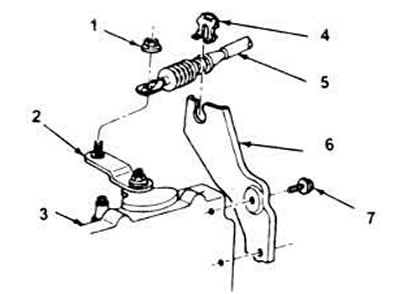
3.10. Details of the hand lever that connects the drive cable to the gearbox.
1. Lock nut.
2. Manual lever box.
3. Gearbox
4. Retaining clip.
5. Cable knot.
6. Cable bracket.
7. Screw (2 pieces).
11. Pull the cable out of the bracket and push it through the panel into the passenger compartment.
12. To install the cable, push the round end through the panel into the engine compartment, insert the rubber plug into the hole.
13. Install cable bracket, lay flooring.
14. Connect the cable to the drive lever, install the handle.
15. Connect a cable to an arm in an impellent compartment, establish a clip.
16. Place the cable on the box lever, screw on the nut.
17. Adjust drive mechanism (section 5).
Steering column drive
AXOD gearbox
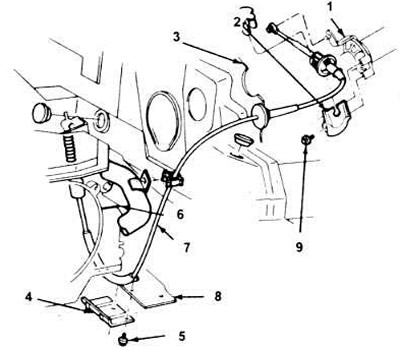
18. Working under the dashboard, remove the drive control cable and bracket from the steering column (see picture).
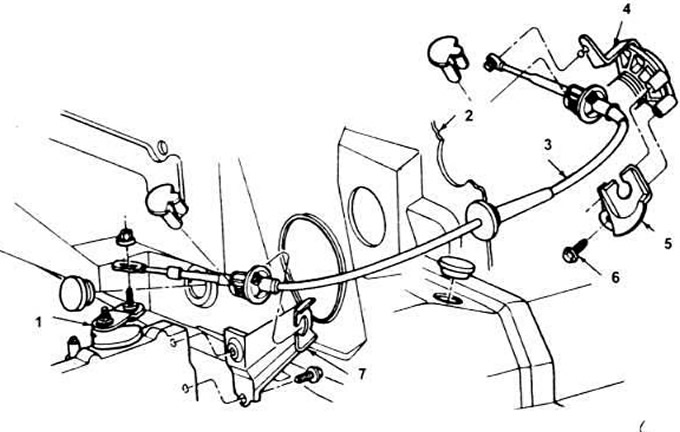
3.18. Details of installation and wiring of the cable for the drive of the gearbox type AHOD.
1. Manual box lever.
2. Dashboard.
3. Drive cable.
4. Steering column.
5. Rope stop bracket.
6. Locking bolt.
7. Rope stop bracket.
19. Using a screwdriver, separate the plastic end of the cable from the column selector pivot ball.
20. Pull the cable out of the locking bracket in the steering column.
21. Pull out an arm of a cable from the instrument panel from outside salon.
22. Unscrew a nut of a hairpin of the lever of a transmission.
23. Remove the cable from the transmission bracket, then push the cable into the engine compartment.
24. When installing the cable, push it through the panel into the passenger compartment. close the hole in the panel with a rubber plug.
25. Being from salon, put a cable in an arm, establish a clip. Connect the cable to the gear lever by tightening the nut.
26. From the cabin side, install the bracket and cable with two screws. Tighten the screws securely. Slide the plastic end of the cable onto the selector lever pivot ball on the steering column.
27. Adjust drive mechanism (section 5).
ATX gearbox
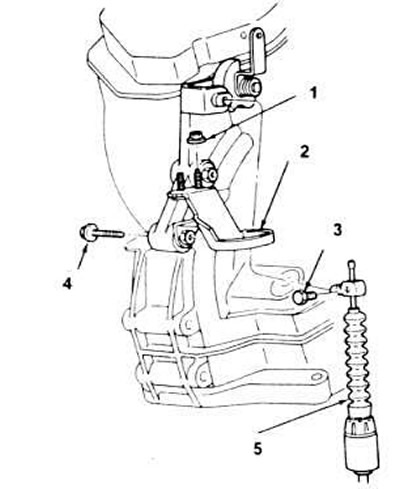
28. Working under the dashboard, unscrew the drive cable bracket from the steering column (see picture).
3.28. Details of fastening of the ATX type gearbox drive cable.
1. Steering column.
2. Rope stop bracket.
3. Dashboard.
4. Rope support bracket.
5. Bolt (2 pieces).
6. Gearbox.
7. Drive cable assembly.
8. Cross beam N2.
9. Bolt (2 pieces).
29. Using a screwdriver, disconnect the plastic tip of the cable from the column selector ball joint, pull the cable out of the bracket.
30. From the side of the engine compartment, pull out the rubber sealing cable bushing from the dashboard.
31. Unscrew the adjusting pin bolt at the end of the cable (see picture).
3.31. Details of installation of the ATX type gearbox drive cable.
1. Control cable stop bracket nut (2 pieces).
2. Control cable locking bracket assembly.
3. Adjusting bolt.
4. Bolt.
5. Control drive unit.
32. Remove the cable sheath retaining clip.
33. Disconnect the cable from the locking bracket on the gearbox and push the cable into the engine compartment.
34. When installing the cable, pull it through the dashboard into the passenger compartment, first of all - its plastic contact.
35. Put on a cable (in the cabin) in the dashboard rubber casing.
36. Connect a cable to a lock arm in a motor compartment.
37. Using a new sealing sleeve, install the adjusting pin of the cable located at the end of the drive control cable, install the bolt.
38. From the passenger compartment, install the bracket on the cable. Fasten the bracket with the cable to the steering column with two bolts. Tighten the bolts securely.
39. Firmly clamp the tip of the cable to the selector lever on the steering column.
40. Adjust the drive mechanism (section 5) and tighten the drive control cable bolt.
Visitor comments