Withdrawal
The automatic transmission is removed downwards from the engine compartment after the transmission has been disconnected from the engine. Due to the heavy weight of the gearbox, use an appropriate hoist.
Remove the negative terminal from the battery. Remove the air filter and elements of the air supply system to the engine.
Remove the speedometer cable from the gearbox. Disconnect from the gearbox housing and remove the starter interlock switch cable. Disconnect the connector from the vehicle speed sensor.
Unscrew the top bolts of fastening of a transmission to the engine. Unscrew the 2 bolts securing the gearbox holder to the rear left of the rubber support.
Drain the gearbox oil. Raise the front of the car and secure it on stands. Remove the front wheels.
Remove the starter.
Remove the shift cable from the shift shaft of the transmission. To do this, unscrew the nuts on the cable holder and the fork head from the shift shaft.
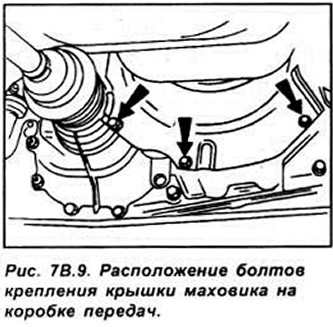
Disconnect the electrical connector from the starter override switch and reversing light switch on the transaxle case. Unscrew the 3 bolts securing the flywheel cover to the gearbox and remove it (see fig. 7B.9).
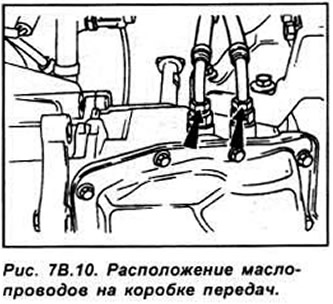
Unscrew the 2 oil lines on the gearbox to the oil cooler and move them to the side. Close pipelines with plugs (see fig. 7B.10).
Unscrew the ball joints of both transverse levers and remove them from the steering knuckles. Remove the cotter pin, unscrew the castle nut and remove the left tie rod ball joint from the steering knuckle.
Remove the drive shaft from the gearbox and use a soft wire to hang it on the steering rod. To do this, insert a mount between the inner CV joint and the crankcase, and while the assistant pulls the wheel hub of the car outward with a strong sharp blow on the end of the mount, disengage the drive shaft in the gearbox. Instead of the removed drive shaft, insert plastic or wooden plugs into the gearbox to fix the differential side gears.
Remove the second drive shaft in the same way.
Place a jack under the engine and raise it just enough so that the weight of the engine is supported by the jack.
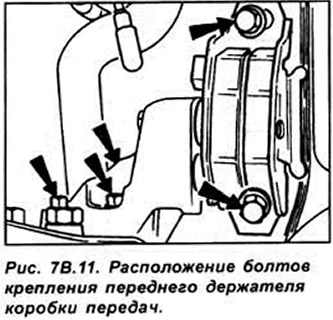
Unscrew the 5 mounting bolts and remove the front gearbox holder (see fig. 7B.11).
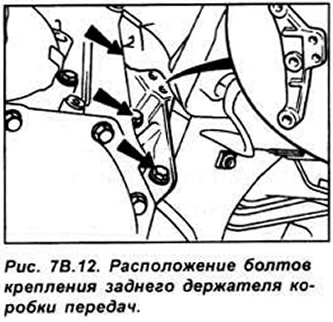
Lower the engine and gearbox and remove the rear bracket from the gearbox (see fig. 78.12).
Check that the jack is securely supporting the engine from below.
Unscrew bolts of fastening of a transmission to the engine. Check that the gearbox is disconnected from all vehicle components.
Separate the gearbox from the engine. lower it down and remove it from under the car.
Installation
Installation is carried out in the reverse order of removal, taking into account the following points:
- clean but do not lubricate the gearbox input shaft splines;
- when installing drive shafts, it is necessary to install new retaining rings on them;
- tighten all nuts and bolts to the required torque;
- if necessary, adjust the gear selection cable;
- pour oil into the gearbox;
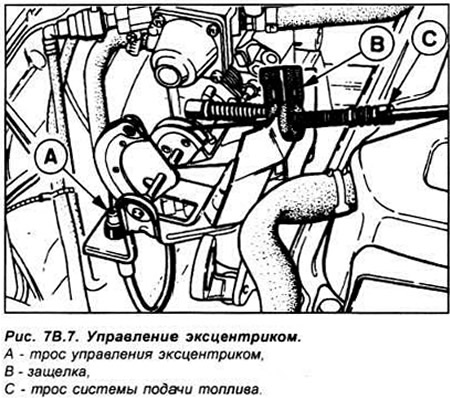
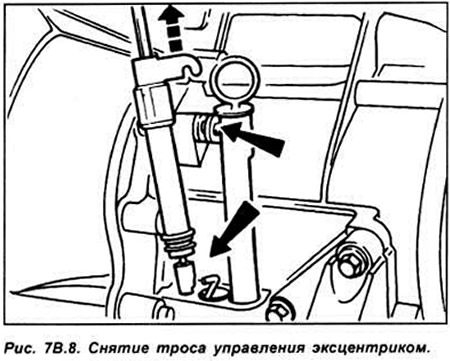
- adjust the throttle cable and eccentric control cable.
Visitor comments