Gear selector lever mechanism
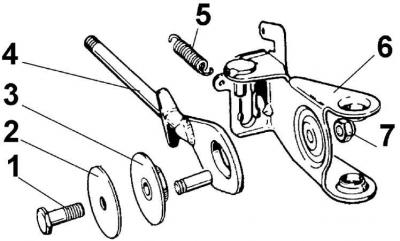
1 – tension bolt; 2 – washer; 3 – plastic gasket; 4 – spring; 5 – lever; 6 – movable base of the lever; 7 – self-locking nut
Control lever and regulator
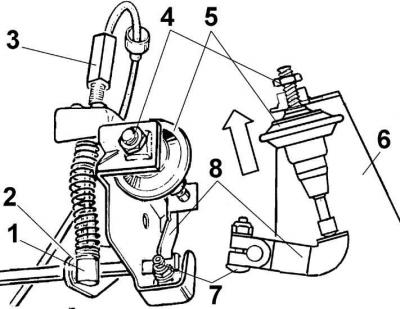
1 – retainer; 2 – drive for engaging the downshift mechanism; 3 – throttle actuator; 4 – lock nut; 5 – draft regulator; 6 – bracket; 7 – bolt; 8 – control lever
Gear shift mechanism
Removal
1. Set the gear selector lever to position "D".
2. Raise the front of the vehicle and secure it on stands.
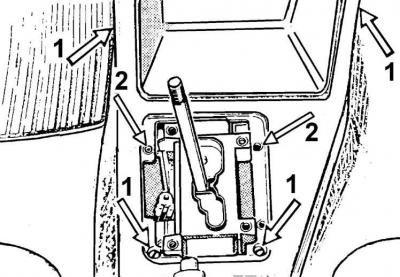
3. Unscrew the lever handle, remove the decorative cover from the center console and the console by unscrewing the self-tapping screws securing the console (1) and guide plate (2), located on the sides and at the rear of the console.
4. Remove the lever guide plate.
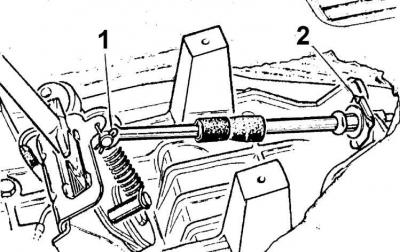
5. Disconnect the rod from the lever and gearbox (1 – rod connection, 2 – clamp).
6. Unscrew 4 screws and remove the gear selector lever housing.
7. Unscrew the nut of the gear selector lever pivot axis and remove the lever together with the bushings.
8. Remove the gear selector lever from the guide, having first removed the spring and mounting bolt.
Installation
1. The steps for installing the gear selection mechanism are performed in the reverse order of removal.
2. Tighten the lever lock bolt nut so that the lever can move freely.
3. Adjust the gear shift range rod by setting and holding the lever in the "D" position.
4. Unscrew the nut on the gear range selector lever.
5. Unscrew the nut securing the shaft to the gear selector lever and tighten the nut again to fix the shaft in the "D" lever position.
Trigger mechanism
Removal and installation
1. Remove the connector from the trigger mechanism.
2. Unscrew the nut and remove the mechanism from the throttle drive shaft.
3. Remove the downshift lever.
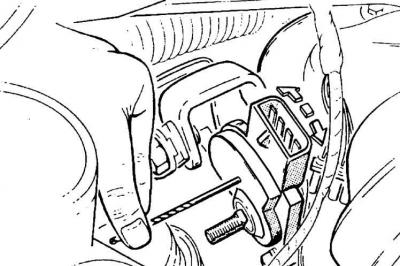
4. When installing the trigger mechanism, move the lever to the "D" position, take a steel rod with a diameter of 2.3 mm, insert it into the opening of the trigger mechanism housing and, turning the housing around the bolt in both directions, find a position in which the rod enters the inner opening and clearly fixes the housing. In this position, finally tighten the bolts.
Downshift mechanism
Adjustment
1. Warm up the oil in the gearbox to a temperature of 40–60°C by driving a short distance.
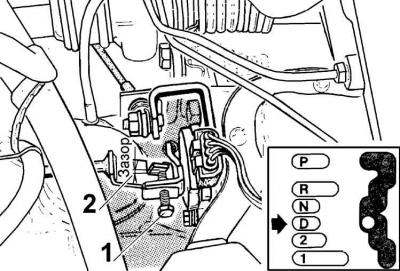
2. Unscrew the adjusting bolt (1) until a gap (2) of 2–3 mm is obtained between the bolt and the stop.
3. Apply the parking brake, start the engine, check the idle speed and tighten the adjusting bolt until a clearance of 0.1 mm is obtained.
4. Loosen the nut of the gear selector lever clamping bolt and, by turning the lever, ensure that the regulator pusher enters the lever by 5 mm, then tighten the nut of the clamping bolt.
5. If the mechanism was removed, unscrew the self-locking nut on the lever and screw the regulator body until the gap between the body and the regulator bracket is 2 mm.
6. Loosen the control lever clamp bolt, move the lever until it stops against the regulator and tighten the bolt.
7. Unscrew the regulator by 4 turns until a gap of 7 mm is obtained and secure the regulator with a lock nut.