Contents: Removal ↳ Installation ↳ Checking the timing belt tension ↳ Adjusting the timing belt tension ↳
Timing drive
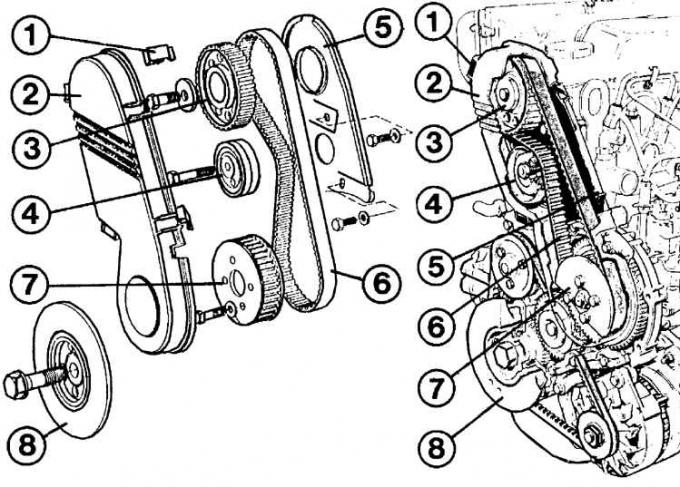
1 – clamp; 2 – toothed belt cover; 3 – camshaft pulley; 4 – tension roller; 5 – back cover; 6 – toothed belt; 7 – high pressure pump drive gear; 8 – V-belt pulley
The timing belt must be removed when the engine is cold.
Removal
1. Disconnect the ground wire from the battery.
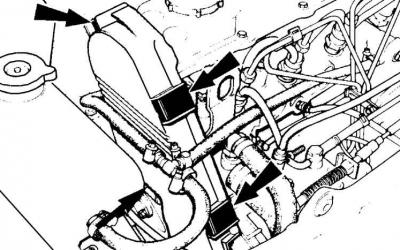
2. Remove the timing belt cover, having first released the 4 clamps (indicated by arrows).
3. Disconnect the elastic crankcase ventilation hose from the cylinder head cover.
4. Remove the cylinder block cover, having first unscrewed 10 M10 bolts.
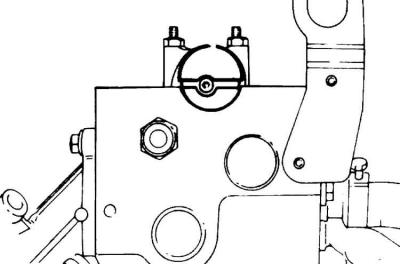
5. Turn the crankshaft to the TDC position of cylinder 1, using a 32 mm wrench. Turn the crankshaft pulley clockwise with the wrench. The crankshaft is in the TDC position if the groove on the end of the camshaft is parallel to the upper plane of the cylinder head, with the larger semicircle located on top.
6. Loosen the timing belt tensioner by loosening the Torx T50 bolt.
7. Remove the timing belt.
Caution! After removing the timing belt, do not turn the crankshaft, as this may cause the pistons to hit the open valves.
Installation
Dimensions of the mandrel for setting the crankshaft to the TDC position
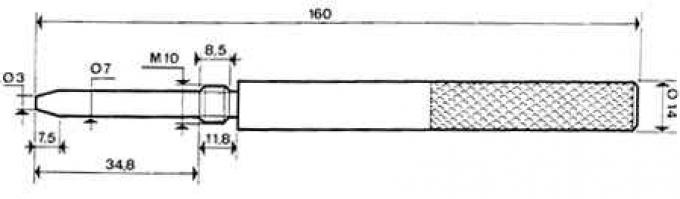
1. For precise installation, it is necessary to use a drift to set the crankshaft to the TDC position (Ford device 21-104) and an installation square (Ford device 21-105) to fix the camshaft.
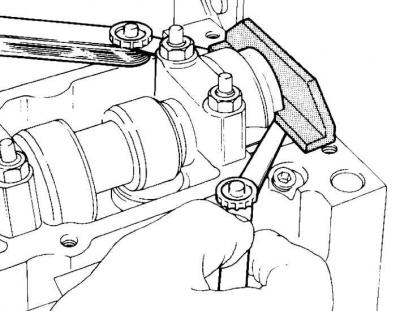
2. Insert a square or a 5 mm thick steel plate into the camshaft groove. Turn the camshaft with the square until the square stops against the cylinder head. Use a feeler gauge to measure the gap on the other side of the square, between the square and the cylinder head. Insert a feeler gauge whose thickness is half the measured gap, and turn the camshaft until the square stops against the feeler gauge. On the other side of the square, insert a second feeler gauge of the same thickness between the end of the square and the cylinder head.
3. Unscrew the camshaft toothed pulley mounting bolt.
4. Release the pulley from the seat cone by striking the back of the pulley with a mallet. The pulley should remain on the camshaft and be able to rotate.
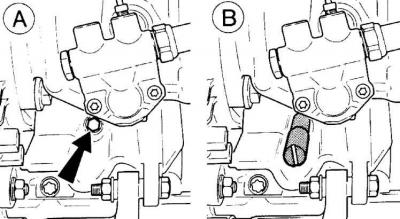
5. Unscrew the plug (indicated by the arrow in Figure A) on the engine cylinder block from the front side of the engine between the high-pressure fuel pump and the generator and, instead of the plug, screw in the mandrel (Figure B) to set the crankshaft to the TDC position.
6. Turn the crankshaft clockwise with a spanner until it stops in the mandrel, which ensures precise fixation of the crankshaft.
7. Place the toothed belt on the pulleys.
8. Tighten the timing belt using an 8mm Allen key and turning it counterclockwise.
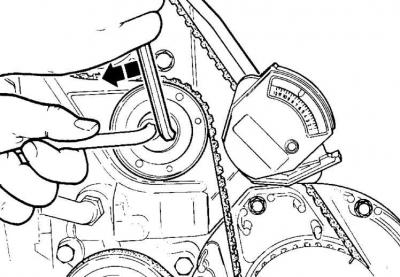
9. Tighten the belt tensioner to a torque of 30 Nm.
10. Tighten the camshaft pulley to 30 Nm.
11. Check the timing belt tension.
12. Install the timing belt cover and secure it with 4 clamps.
13. Unscrew the TDC mandrel and screw the plug back in its place.
14. Install the cylinder head cover with a new gasket and tighten the bolts evenly in a cross pattern.
15. Connect the crankcase ventilation hoses.
Installing a transporter on a fuel pump pulley
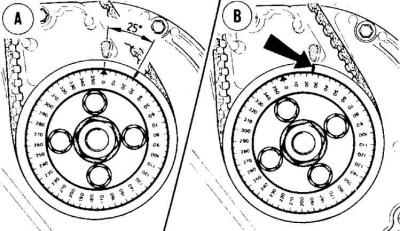
B – mark on the pulley; A – protractor scale
Checking the timing belt tension
To check and adjust the timing belt tension, you will need a protractor with a 360° scale and a timing belt tension tester (Ford 21-113).
1. Disconnect the ground wire from the battery.
2. Remove the timing belt cover after releasing the 4 clamps.
3. Place the protractor on the fuel pump pulley so that the mark on the pulley coincides with the 25° division on the protractor.
4. Turn the crankshaft at least 90° (a quarter turn) clockwise by turning the central bolt with a 32 mm open-end wrench or by moving the vehicle with 4th gear engaged.
5. Turn the crankshaft 25° counterclockwise using a 32 mm open-end wrench.
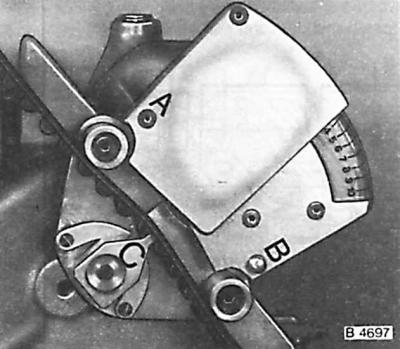
6. Install a belt tension tester. The tension of the toothed belt is measured on the belt section between the fuel pump pulley and the camshaft pulley.
7. Place the toothed belt between points A, B and C of the device, with the tensioner located between the belt teeth.
8. The tension of the toothed belt is normal if the instrument readings are from 8.5 to 10.5.
9. If the belt tension is not correct, adjust the timing belt tension.
Adjusting the timing belt tension
1. Loosen the timing belt tensioner by loosening the Torx T50 bolt.
2. Install a timing belt tension tester.
3. Insert an 8mm Allen key into the tensioner and turn it to adjust the timing belt tension to the required value and tighten the T50 Torx bolt.
4. Recheck the belt tension.
5. Check the fuel pump injection timing.
6. Remove the protractor.
7. Install the timing belt cover and secure it with clamps.